It's not a big deal if you suddenly find your labels printed incorrectly, even though they look fine on the screen. This can be confusing and annoying to those unfamiliar with the underlying causes and solutions.
However, you are not left in the dark. We are equipped to tackle such problems head-on. Today, we address the issue of fixing a label template with misalignment. Stay with us till the end, and you'll discover how to restore your labels to perfect condition by either improving the design or adjusting the printer settings accordingly.
Reasons for Misalignment
There are several reasons why your labels may not be printed correctly. This can occur when your printer is not configured properly for label printing, when a design mistake causes misalignment in the final output, or when the label paper is incorrectly loaded into the printer. An issue can also arise if the selected QuickPEEL paper size does not match the type of labels you intend to print. Fortunately, none of these errors are critical and can be easily rectified. Please refer to this tutorial for detailed, step-by-step instructions.
1. Check Your Printer Settings
The first thing you should do to fix the misalignment issue is to make sure your printer is configured correctly for printing labels.
MacOS Printing Settings
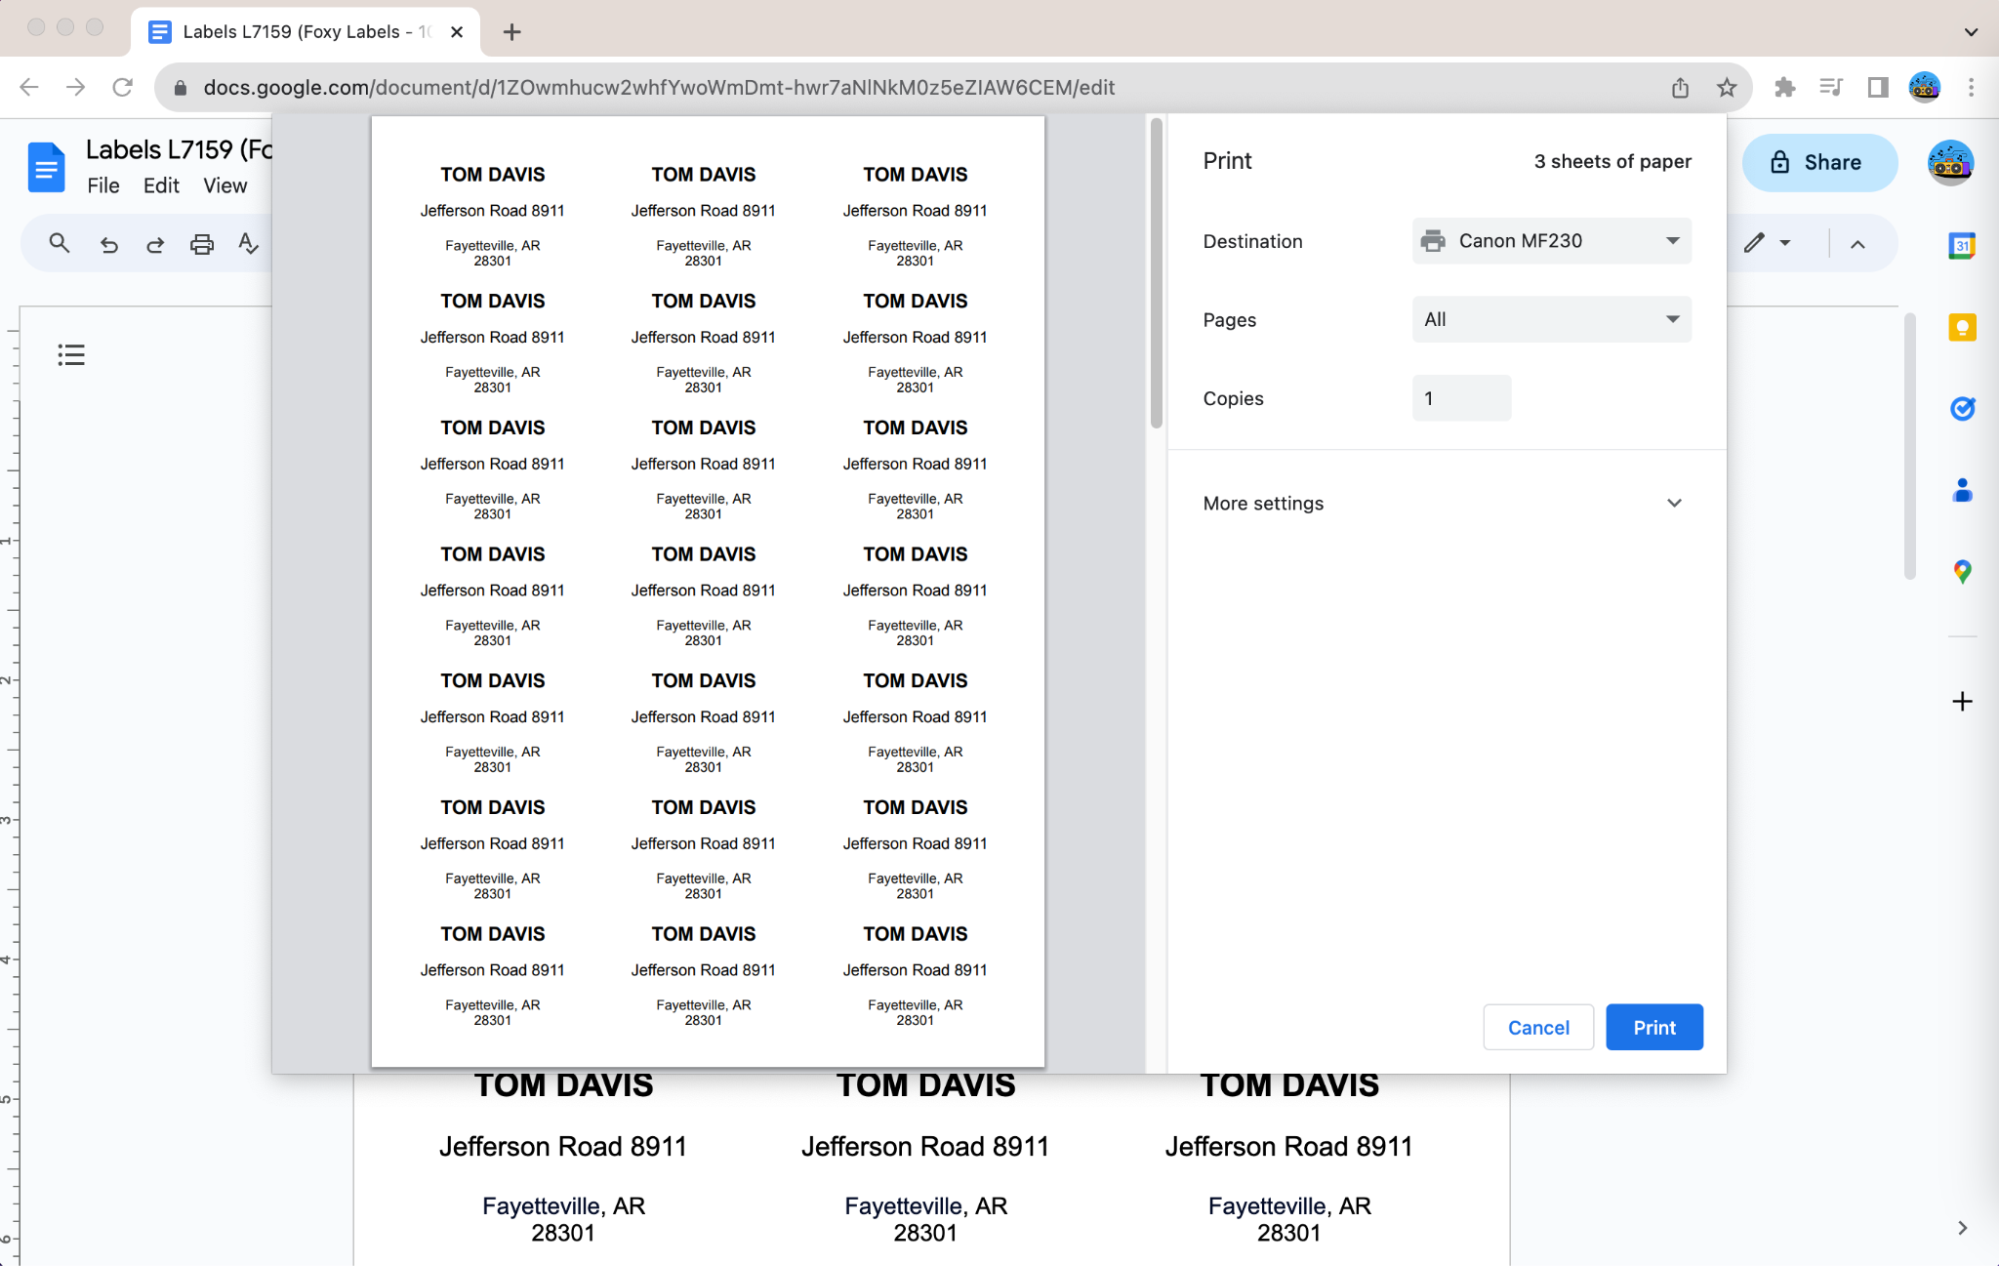
Click “File” and select “Print” in the dropdown menu (or use the keyboard shortcut Command + P) to access printing settings.
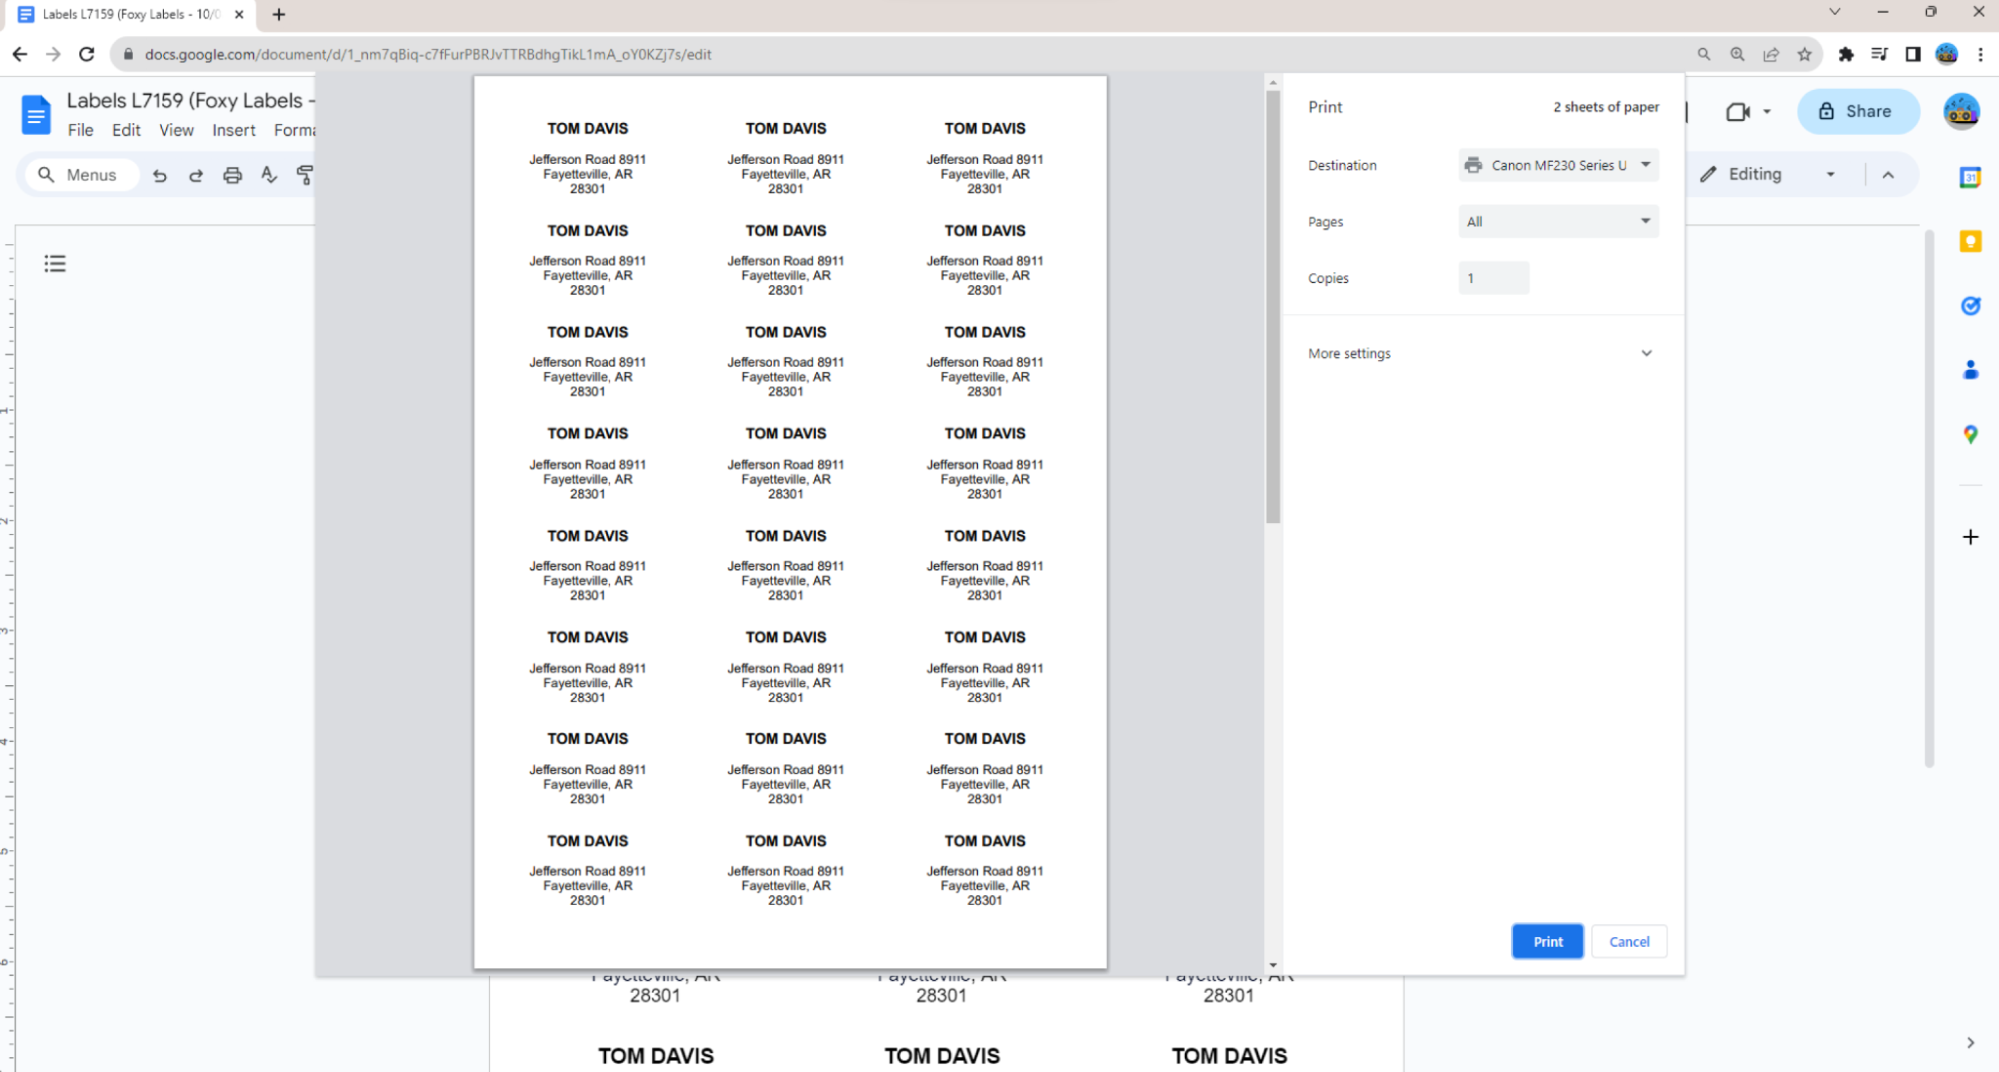
Click on “More settings” to view more printing options
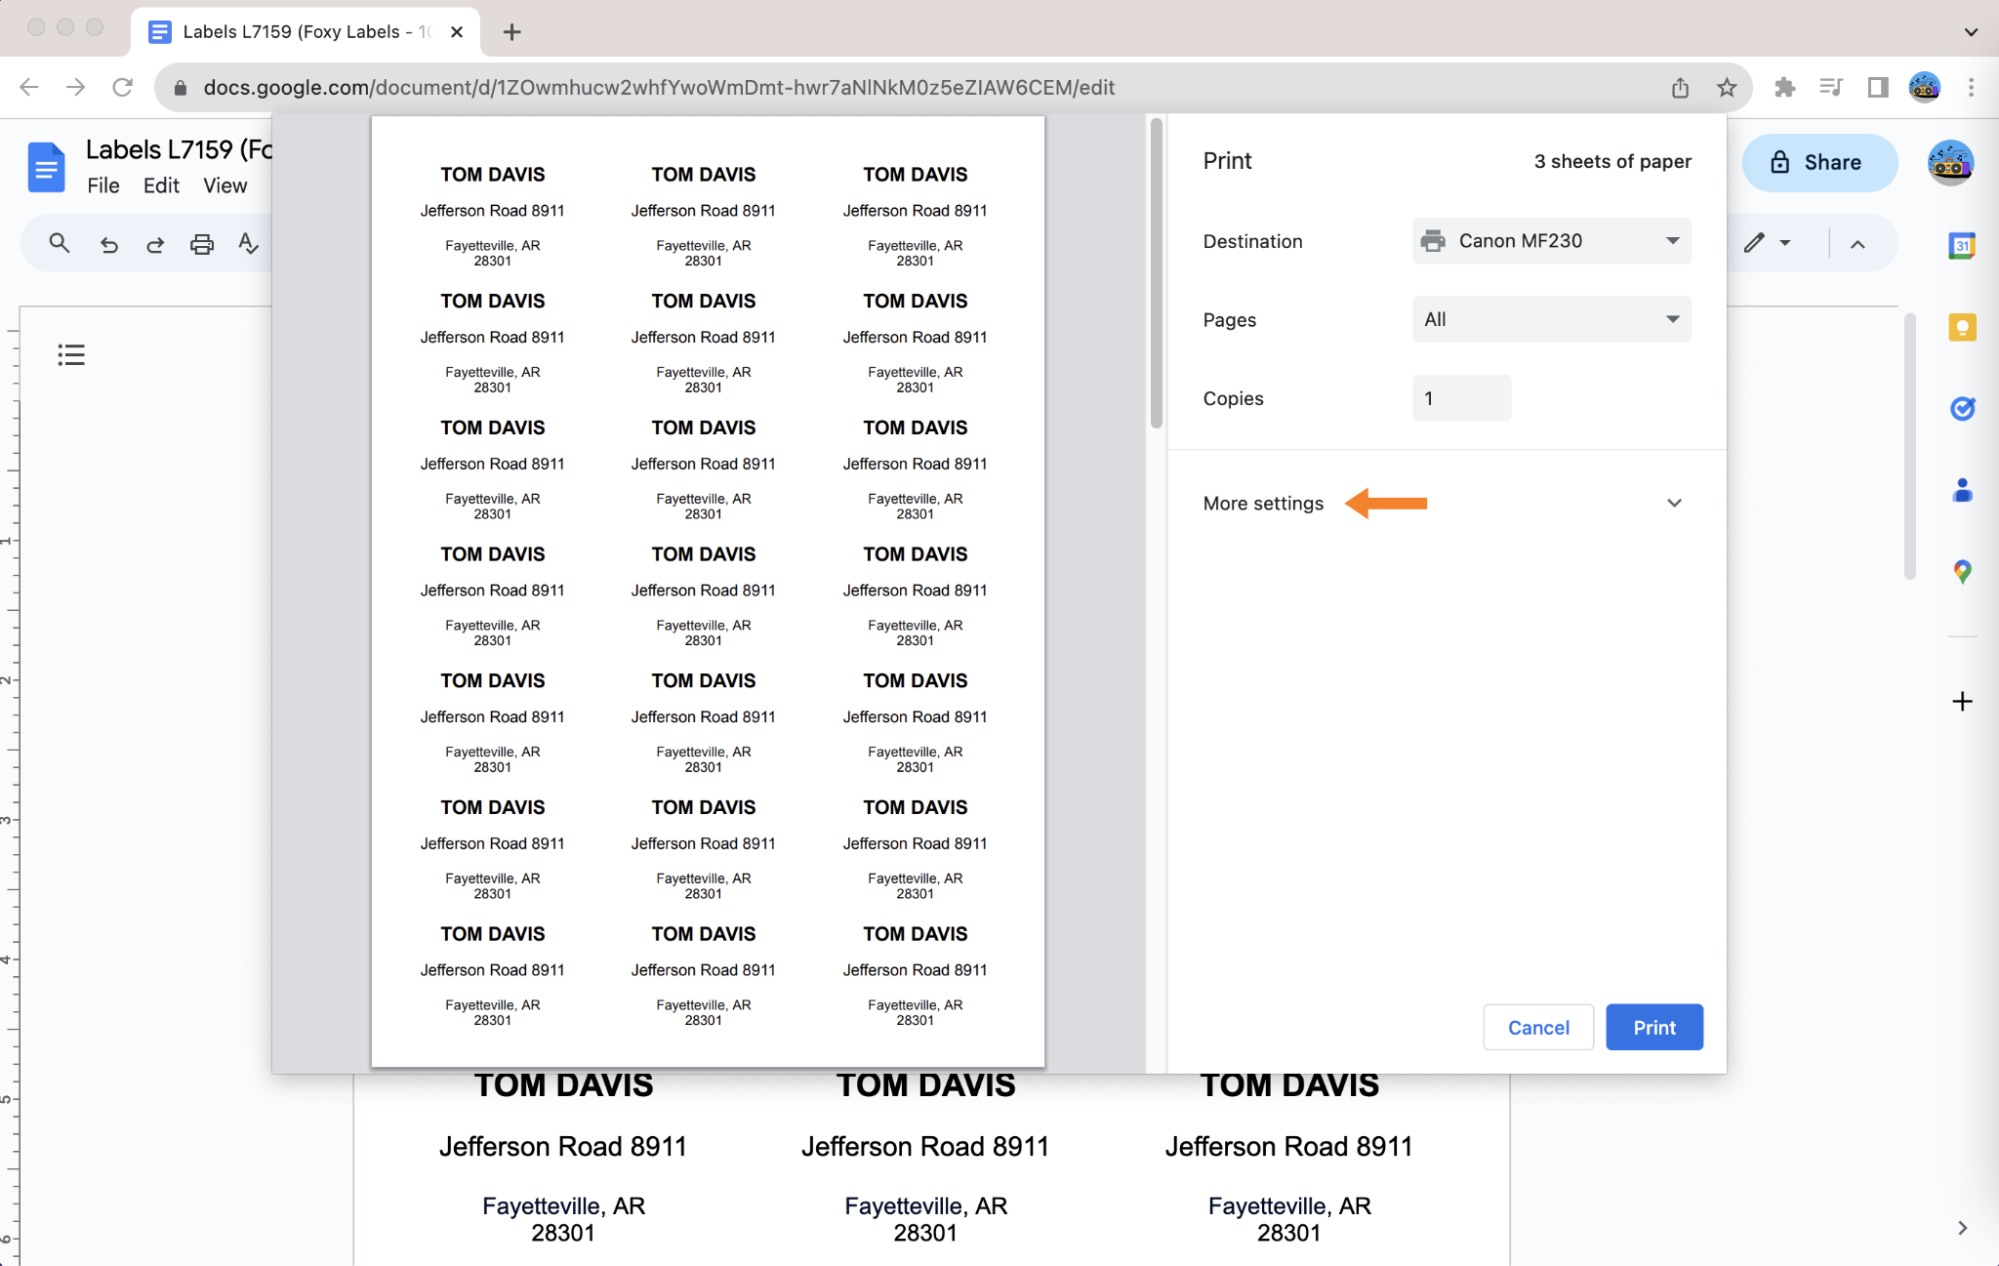
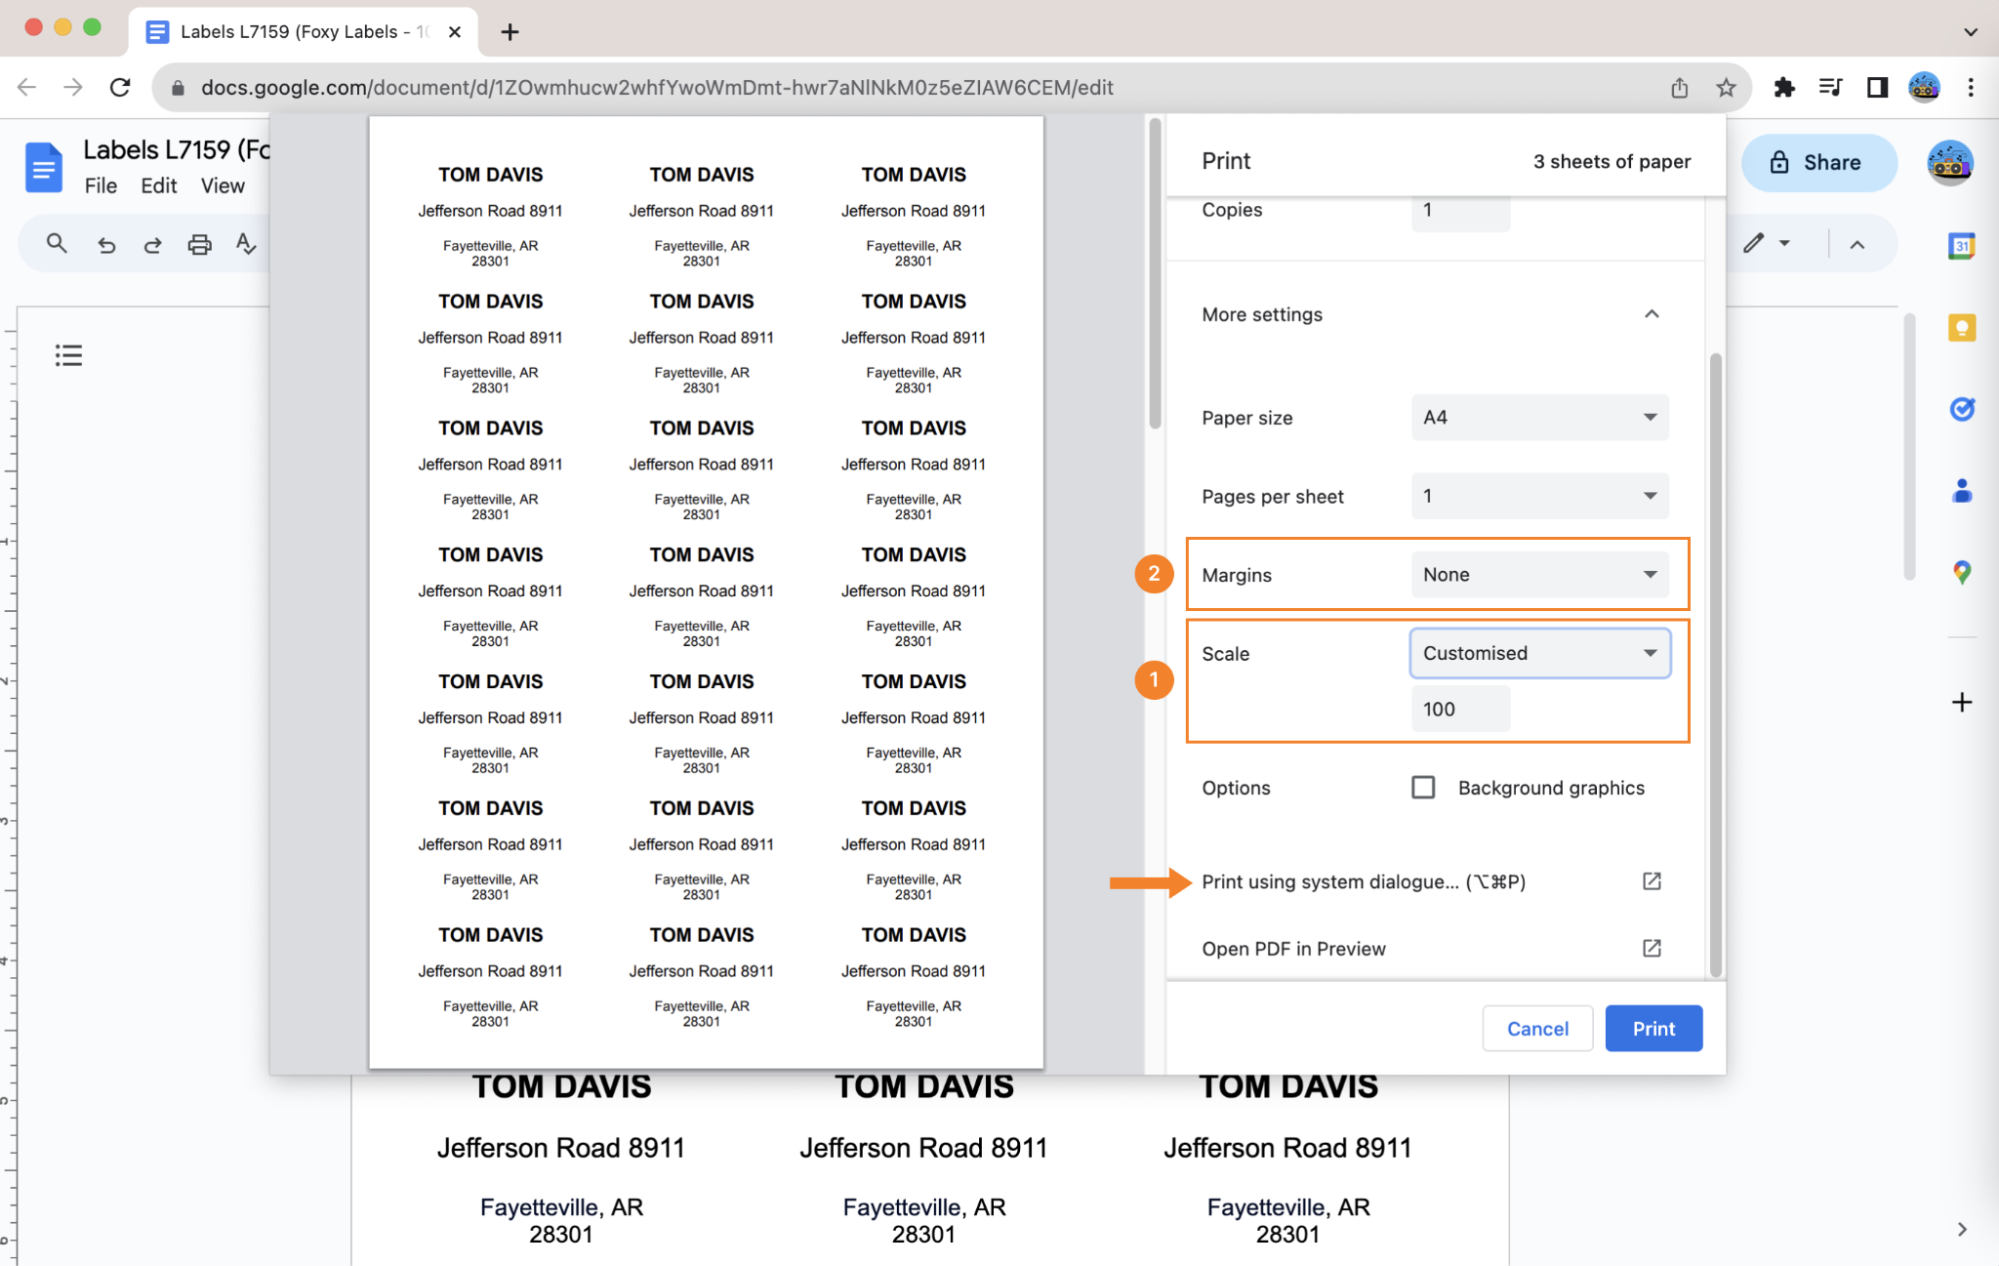
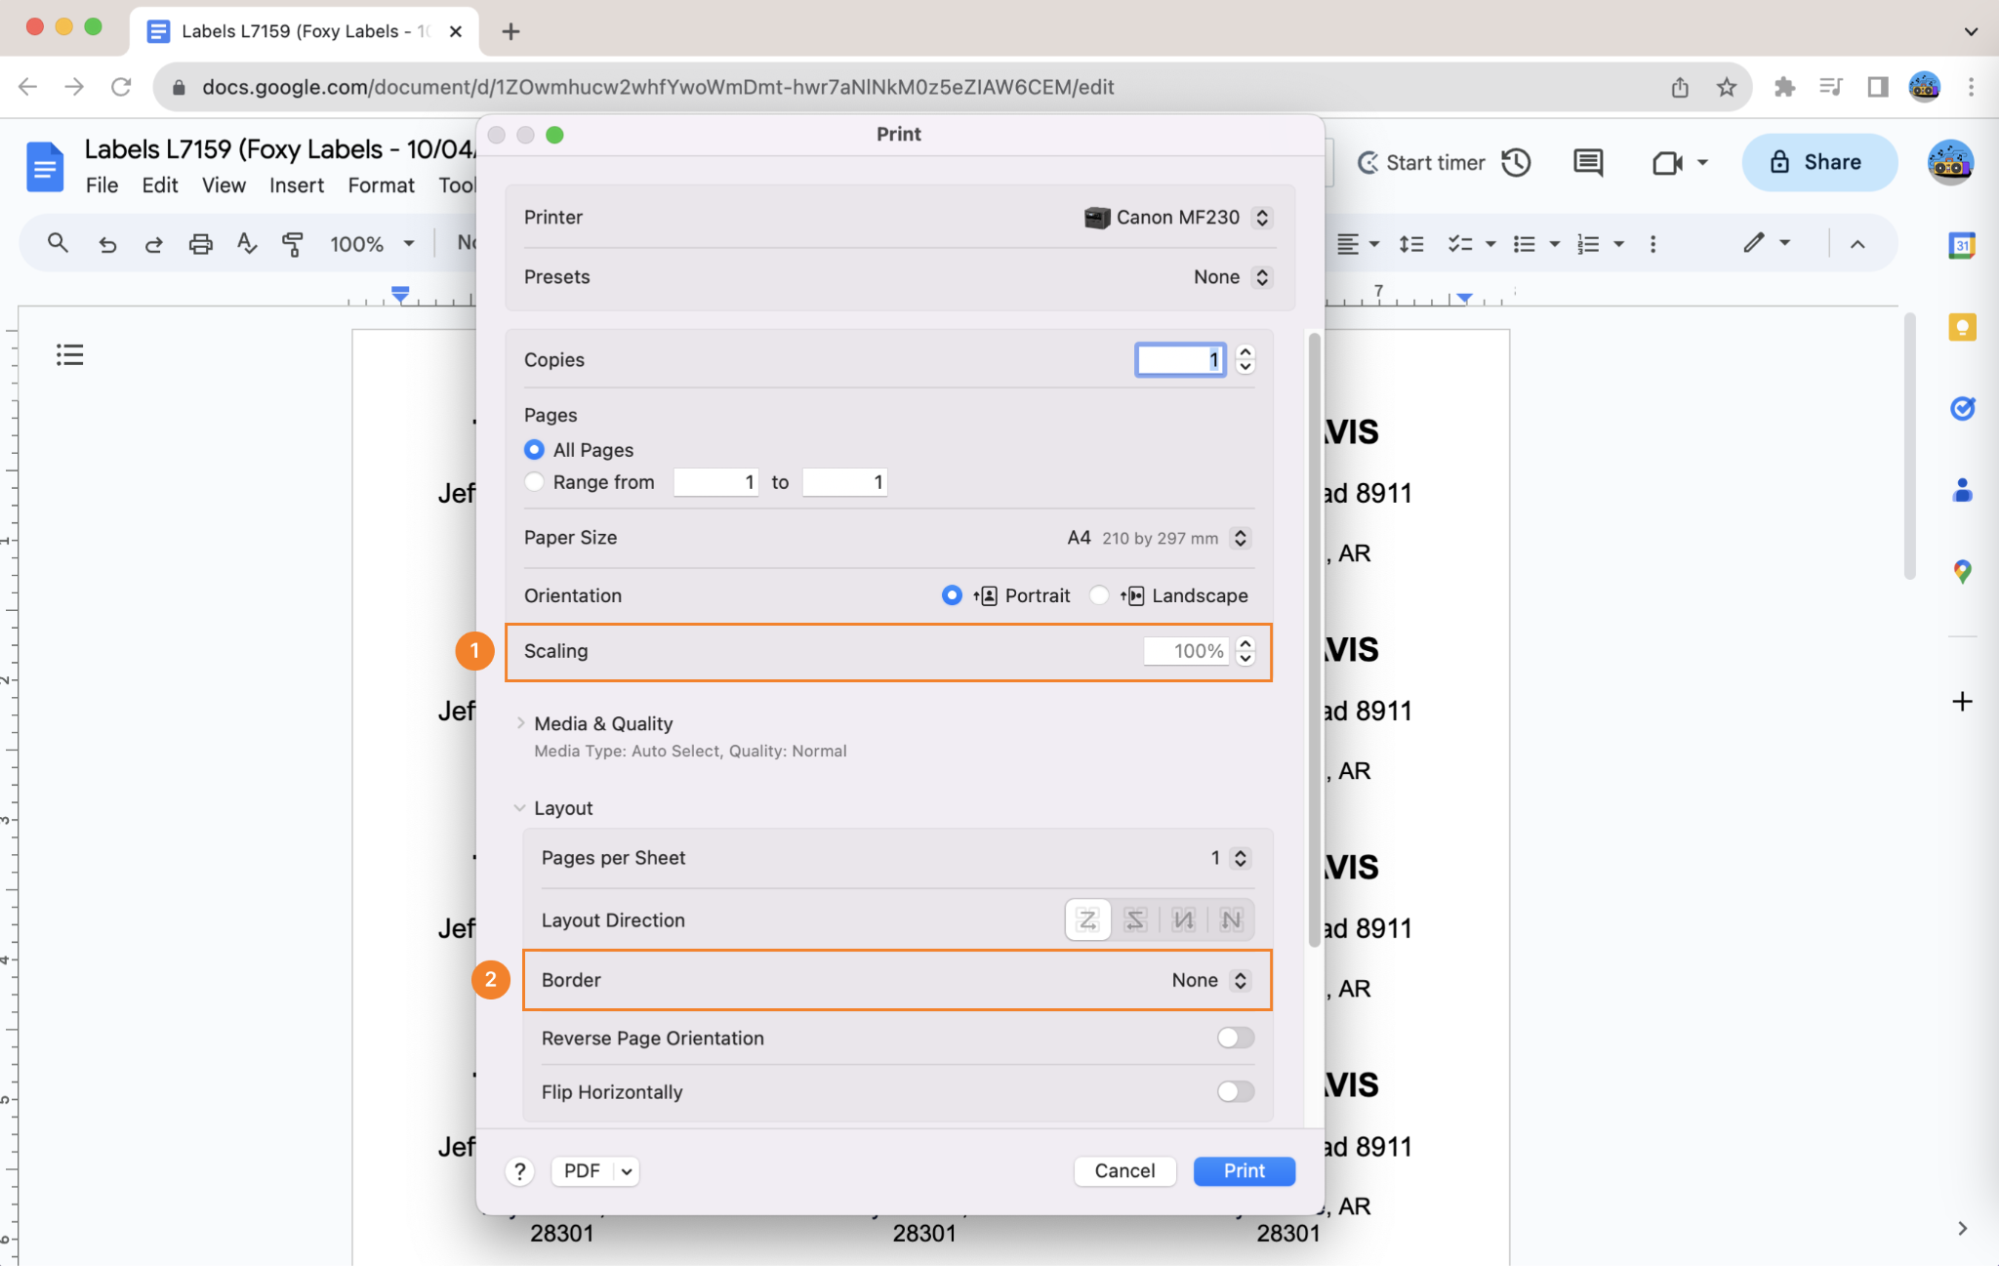
SCALE: the document must be printed in its actual size, so the scale must be set at 100% (step 1)
MARGINS: ensure this parameter is set to “None” (step 2). This will prevent your printer from adding any further margins, resulting in incorrect label alignment.
Your system’s printing dialogue
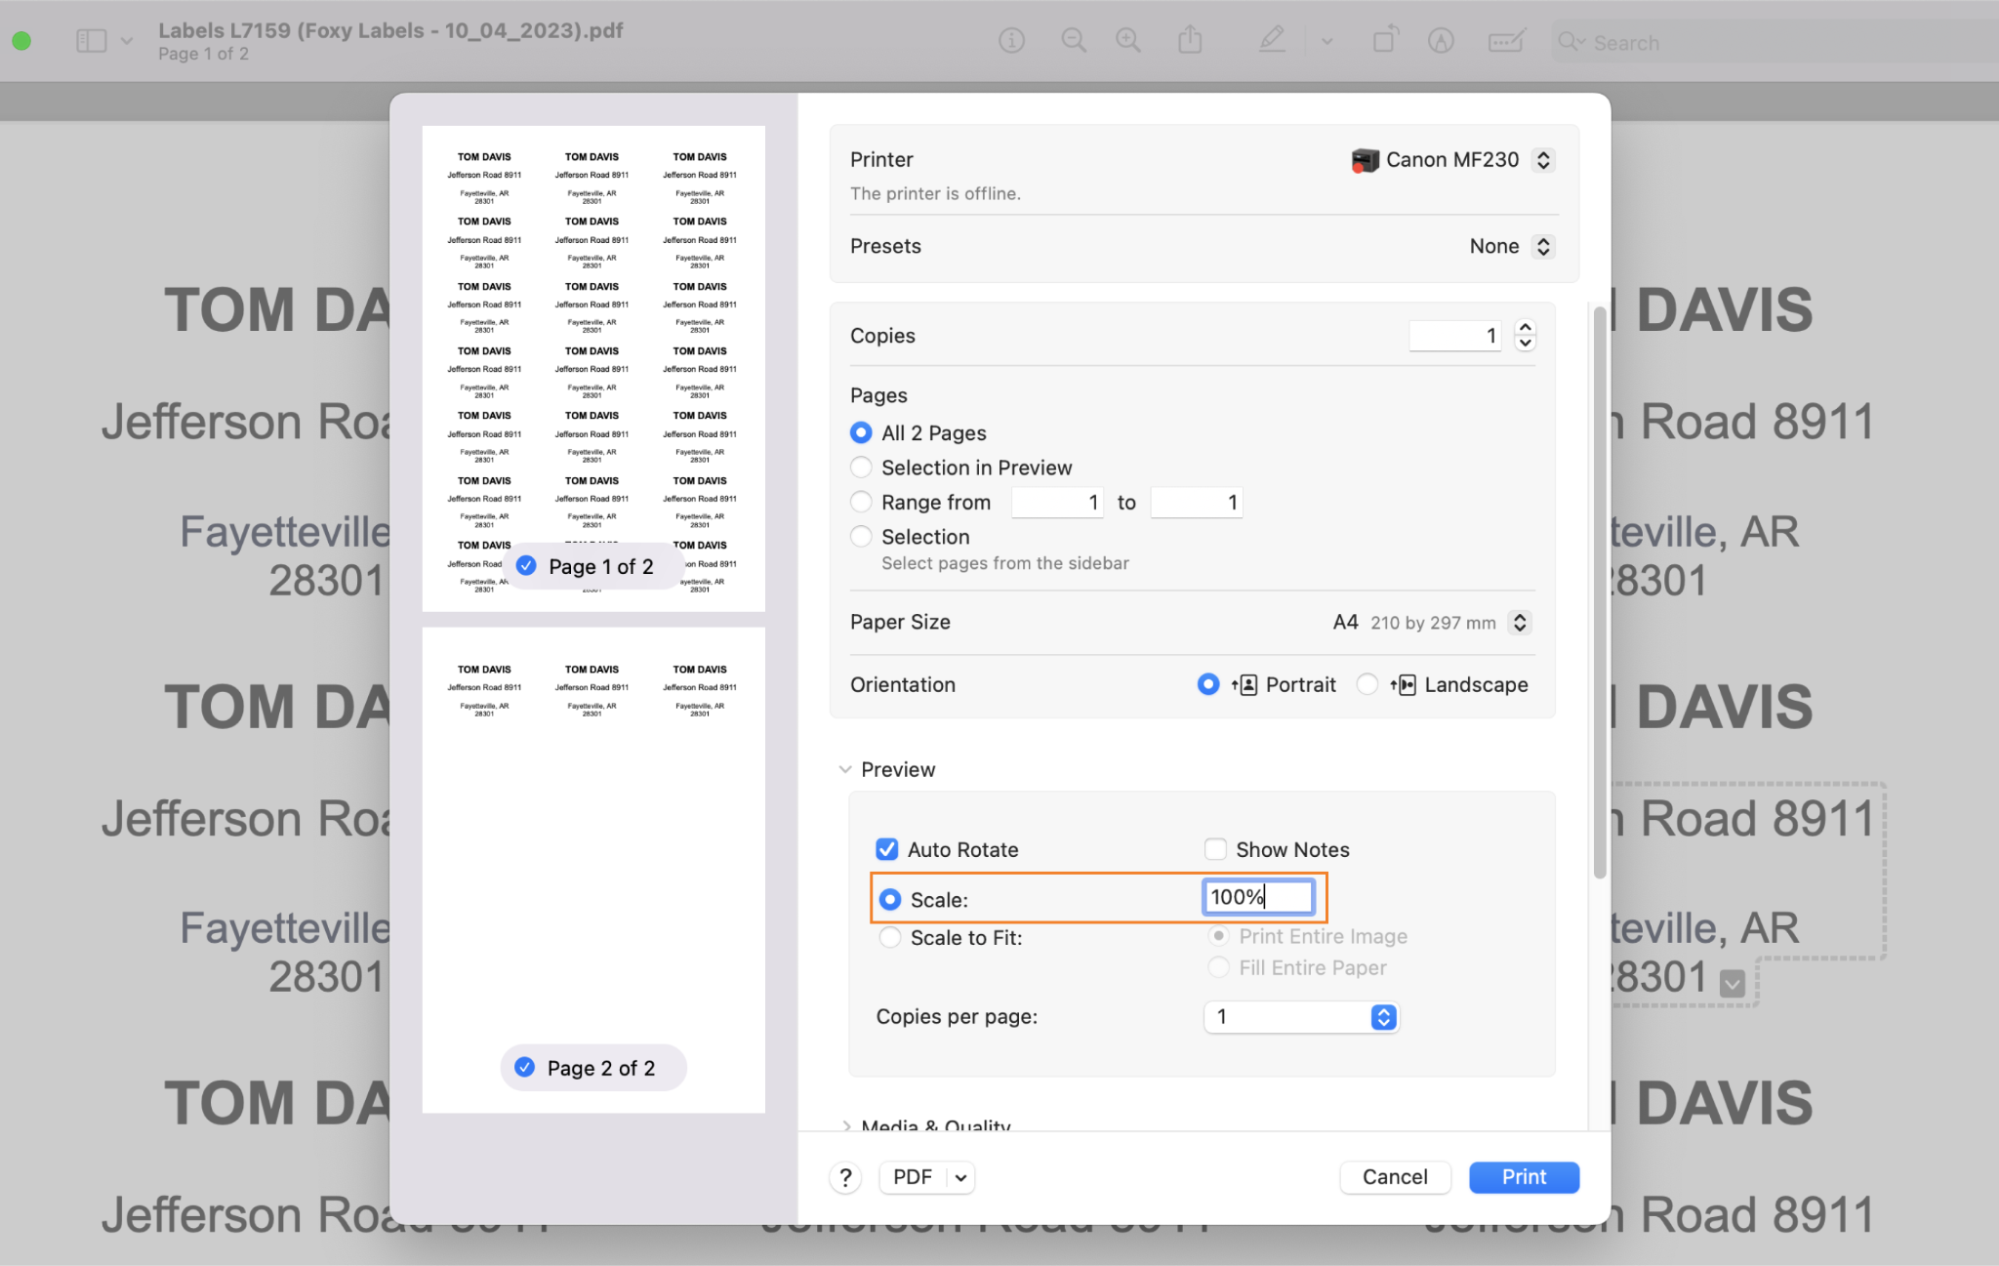
NOTE: if you’re printing your labels from a PDF document, ensure that “Scale” is set at 100% and the “Scale to Fit” box remains blank. Otherwise, your printing won't be completed at its proper size, and the alignment won't be accurate.
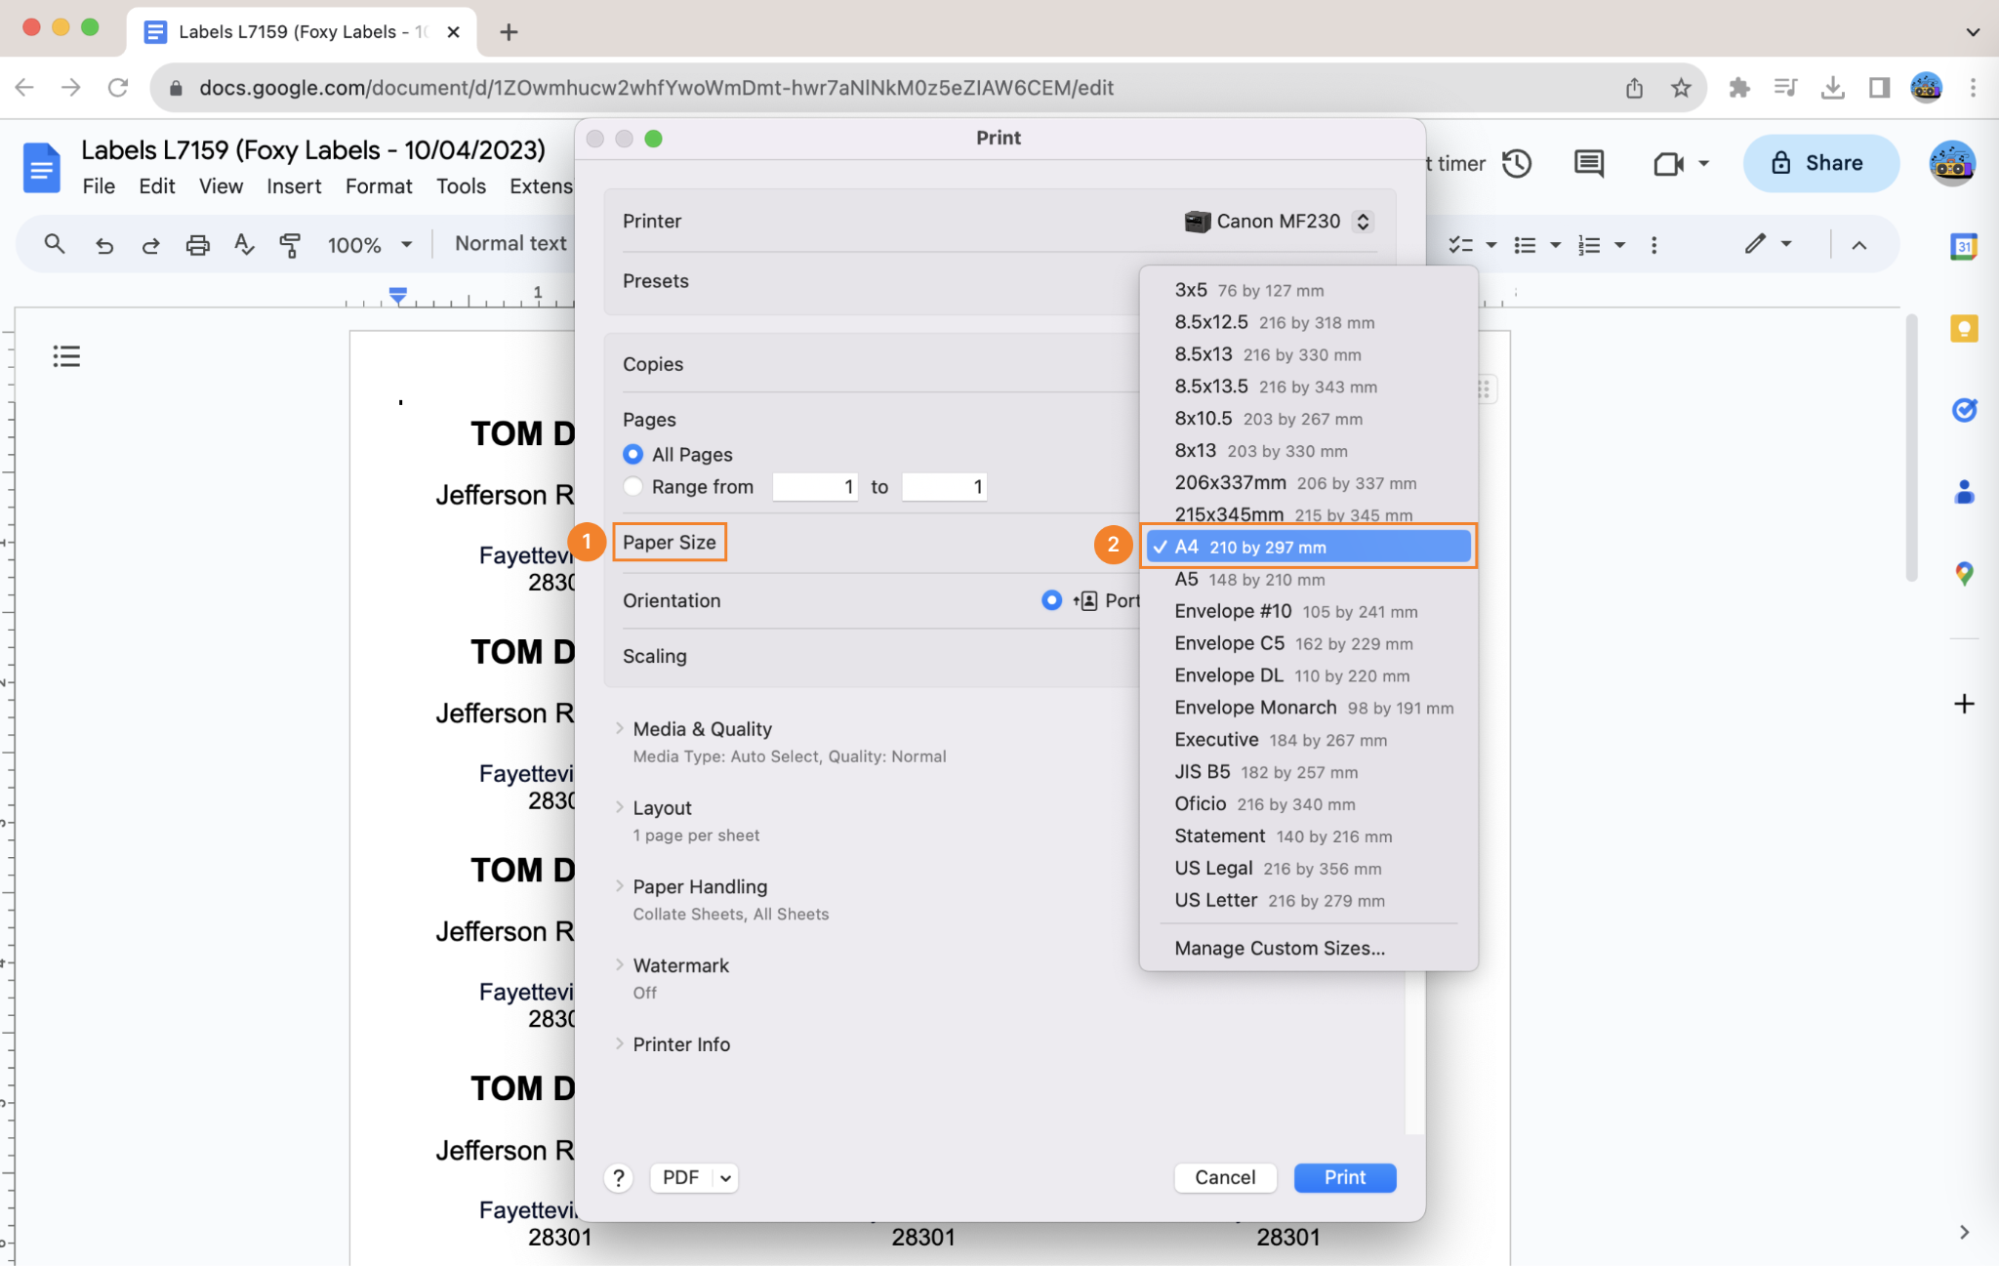
PAPER SIZE: Choosing the correct paper size for printing is crucial. Different templates need specific paper formats, and when creating and printing various labels, it’s essential to check the paper settings each time before printing a new document. For example, the Avery L7159 labels template that we are using in this tutorial requires the standard A4 format, whereas other kinds may need something more specific, like the "US Letter" format.
Foxy Labels, a specialized printing software, typically auto-adjusts your document to the proper format. Nonetheless, it's wise to double-check this setting before moving forward with printing.
Click on “Paper Size” in the printing dialogue and select the required paper format from the dropdown list (if it’s not already selected automatically). We’re choosing A4 210x297 mm since it is what our template Avery L7159 requires.
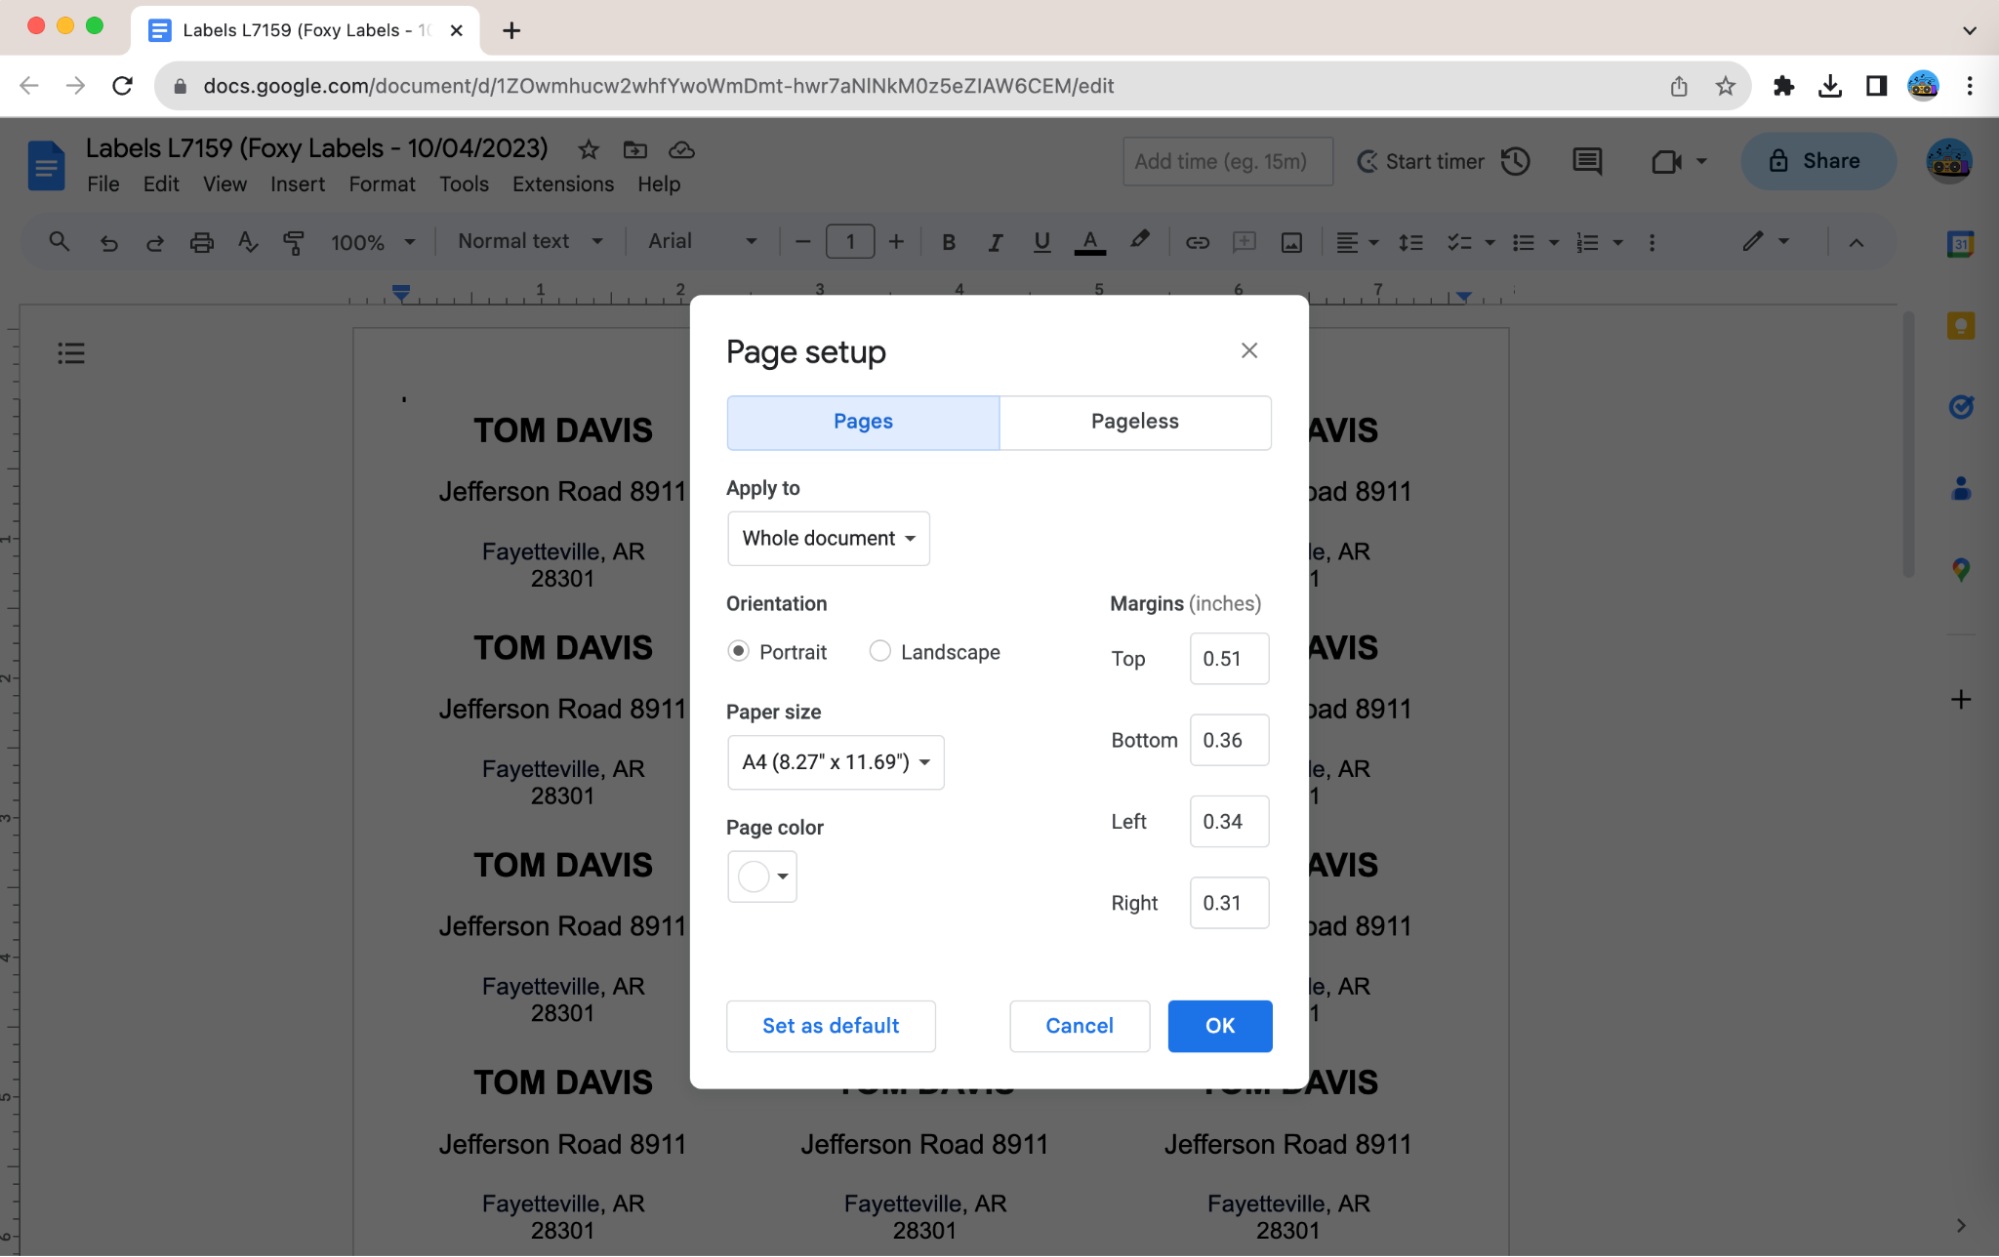
ADJUST MARGINS: If your printer displaces your design by a consistent measurement every printing session, margin adjustment is an option. This method involves manual alterations and, therefore, should be applied only as a last resort.
To modify the margins in Google Docs, navigate to File > Page setup. In Microsoft Word, use the ruler for margin adjustments.
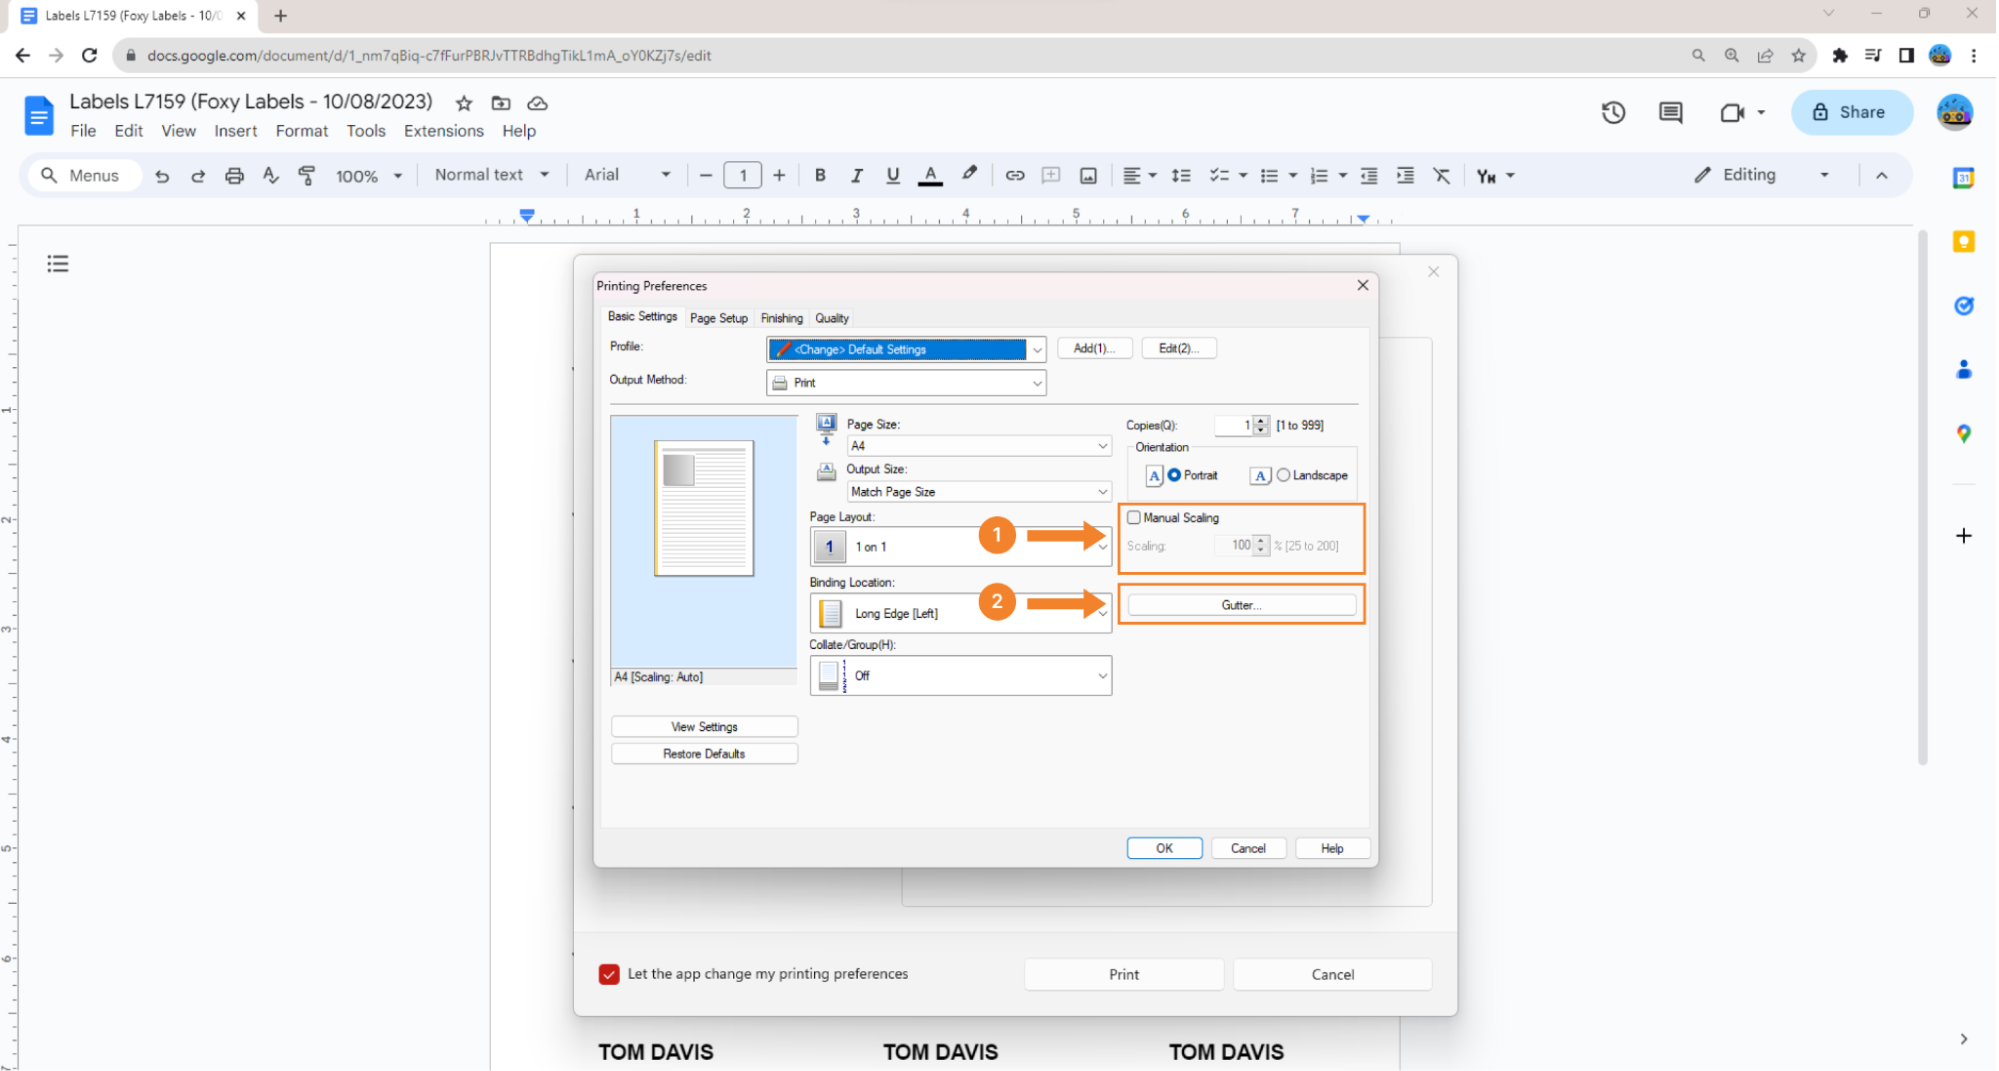
Windows Printing Settings
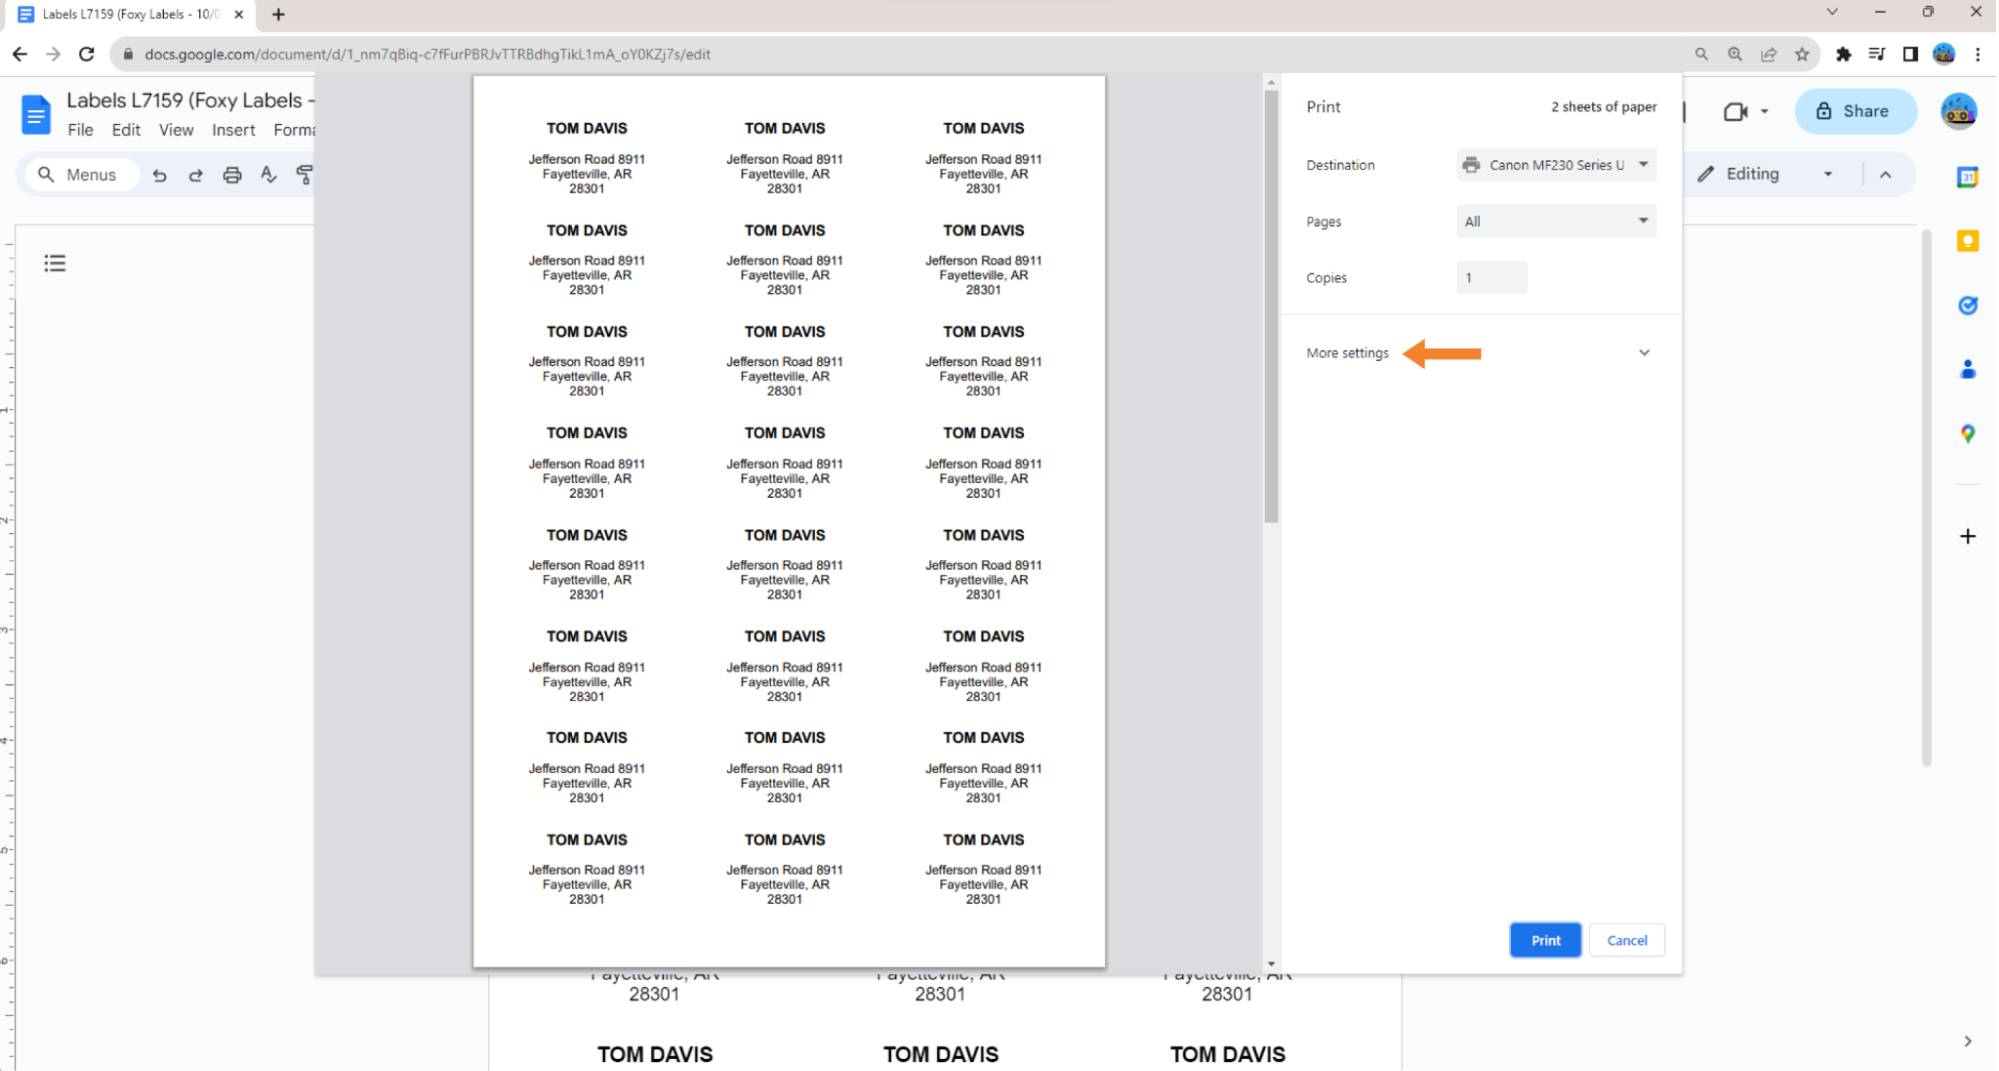
Click “File” and select “Print” in the dropdown menu (or use the keyboard shortcut Ctrl + P) to access printing settings.
Click on “More settings” to view more printing options
SCALE: the document must be printed in its actual size, so the scale must be set at 100% (step 1). Usually, this is the default setting, but if you see anything else on your screen, select “Custom” and set 100 manually.
MARGINS: ensure this parameter is set to “None” (step 2). This will prevent your printer from adding any further margins, resulting in incorrect label alignment.
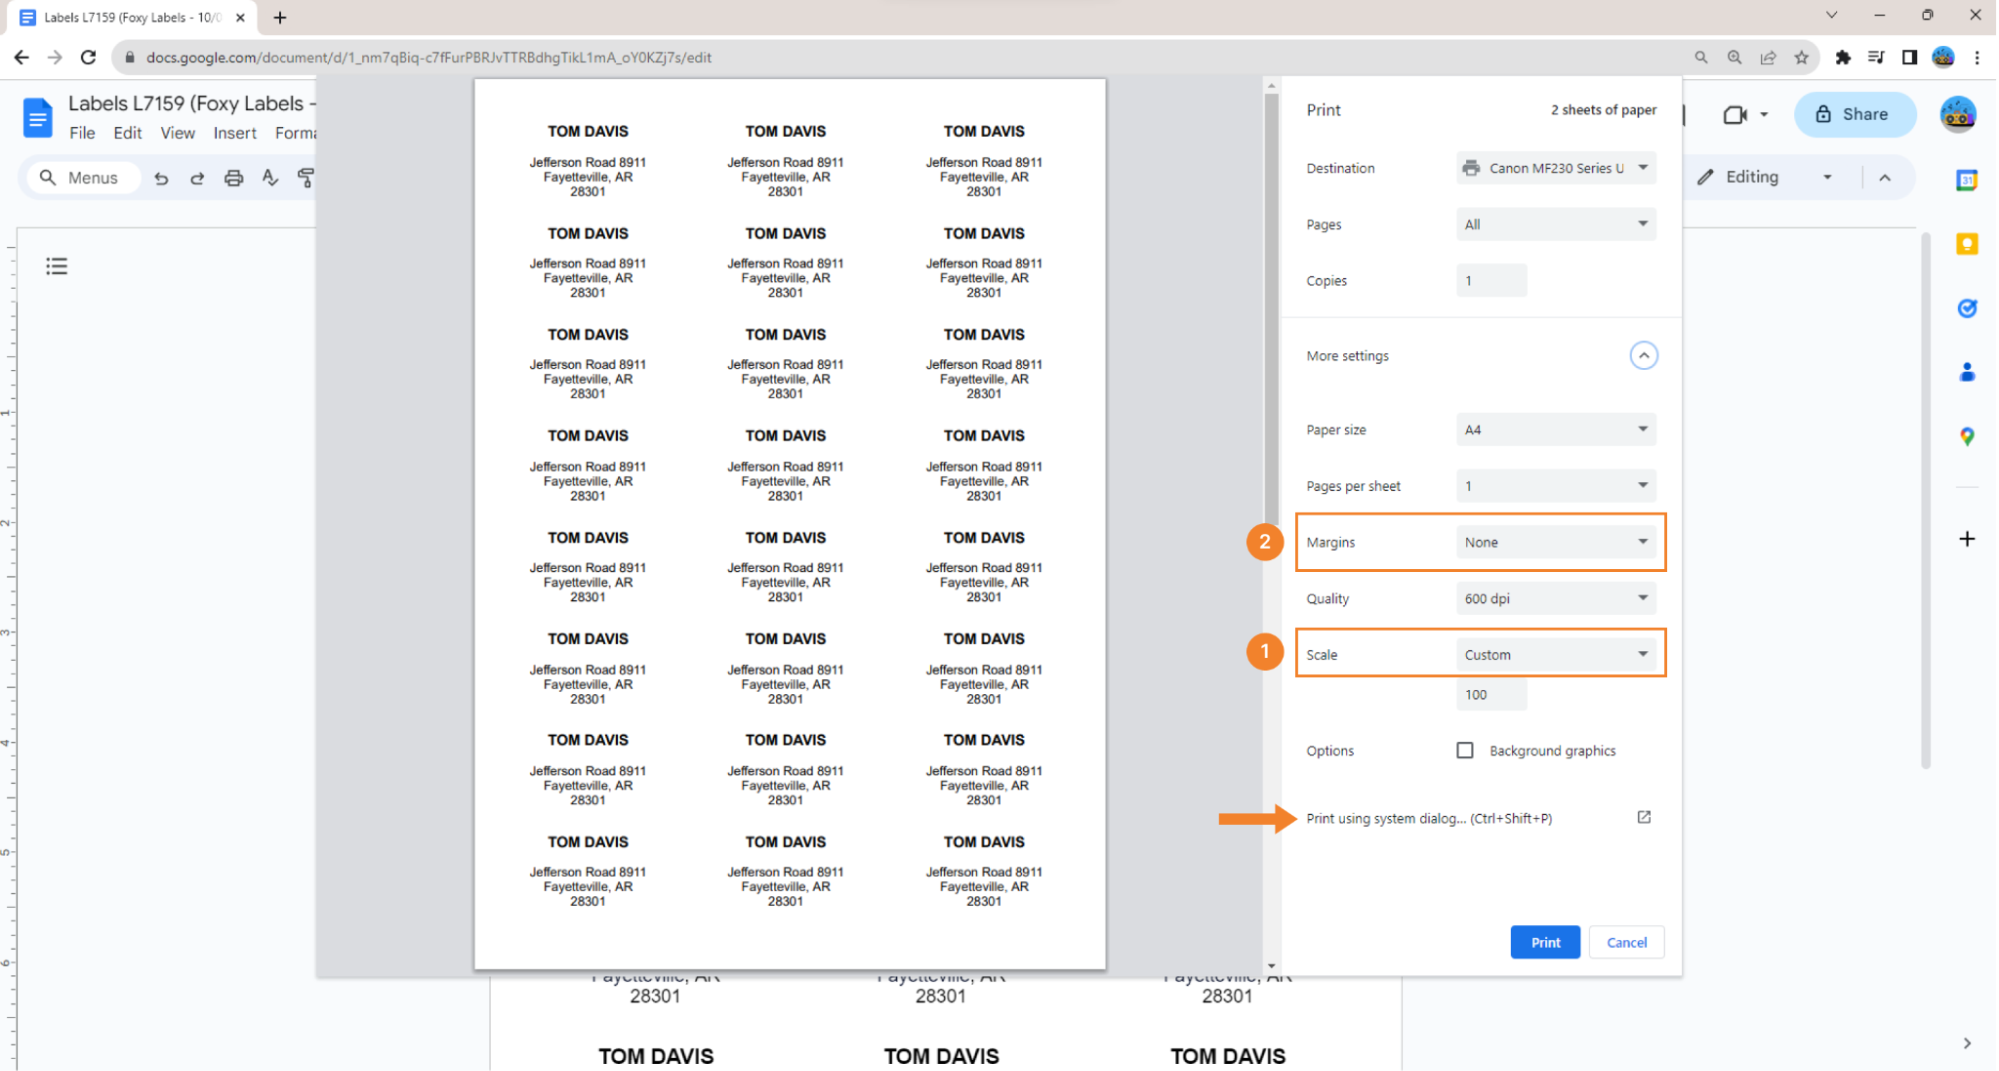
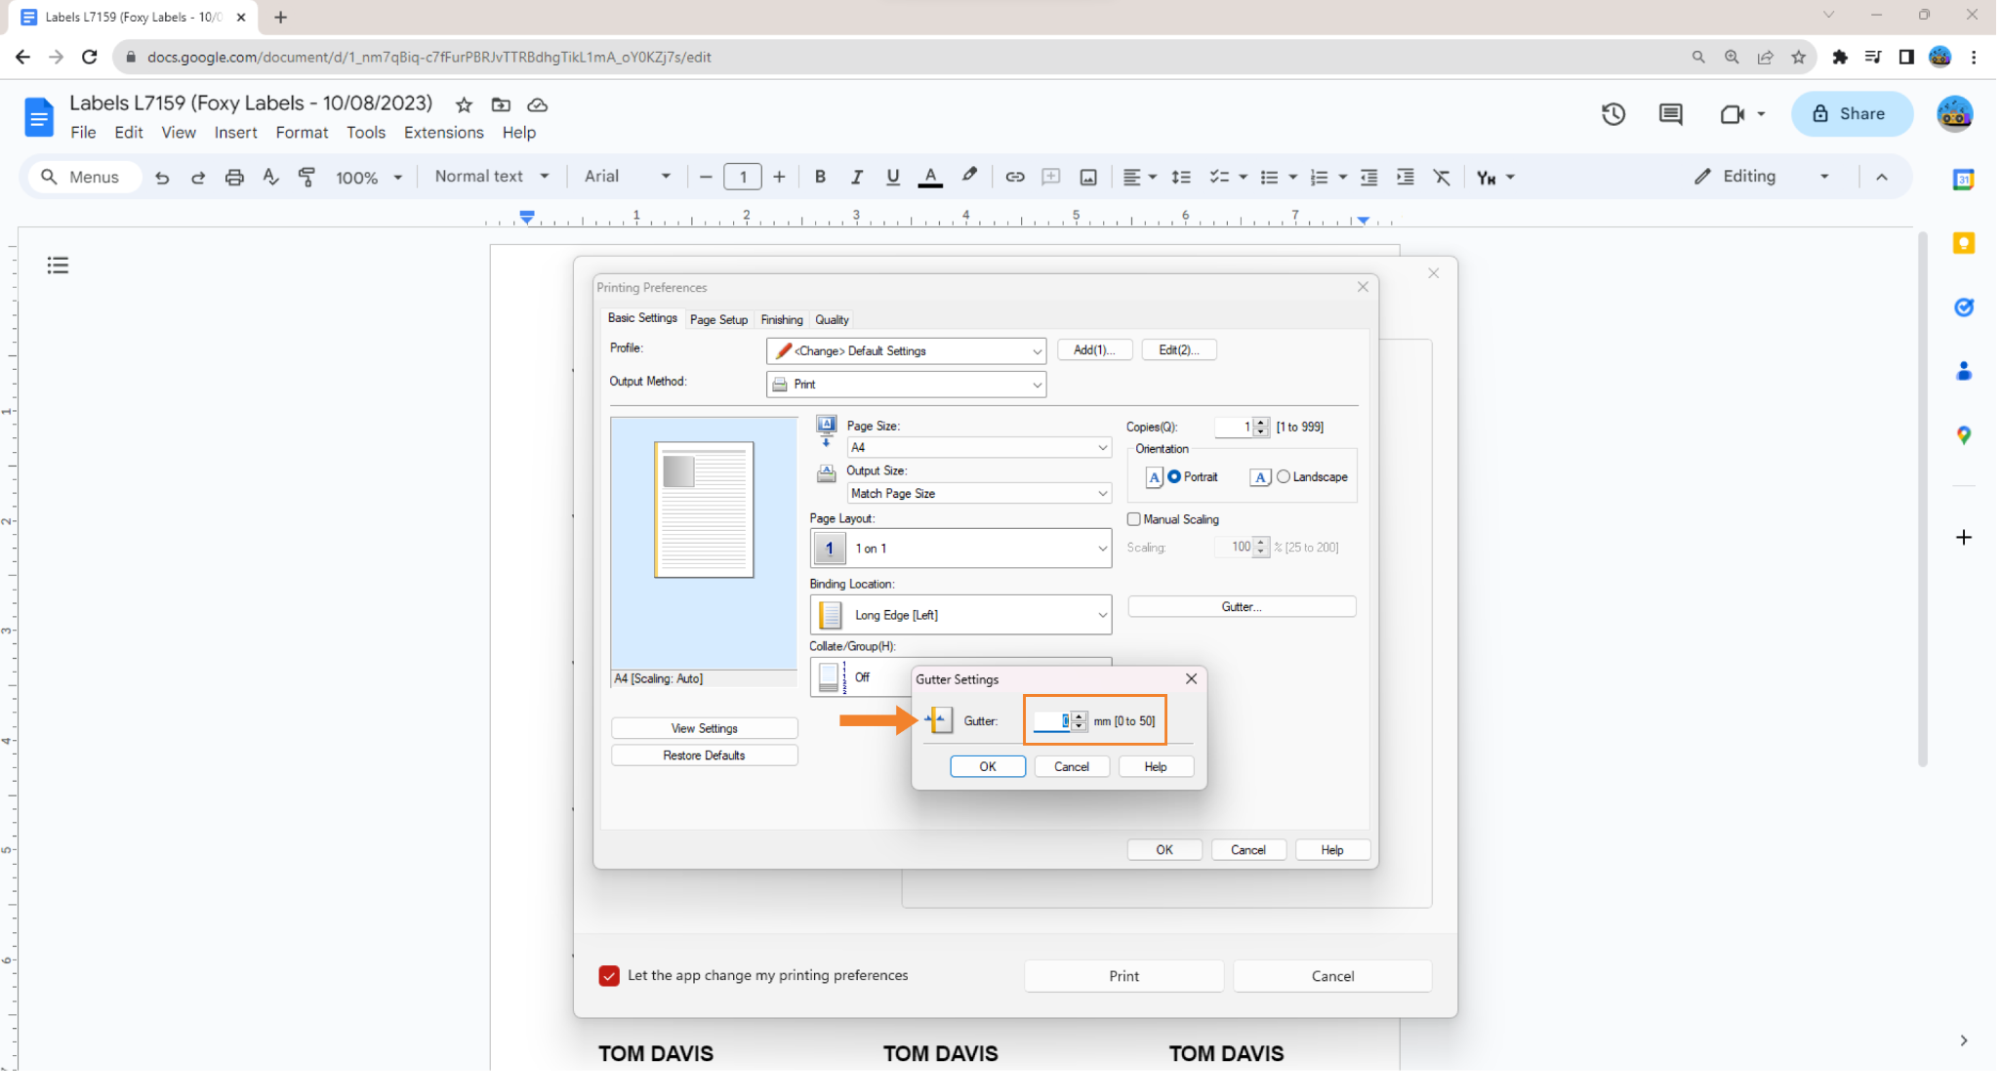
You can always double-check and confirm the same setting through the print dialogue of your printing device. Click “Print using system dialogue” (Ctrl+Shift+P) and then follow to “More settings” to access all printing features.
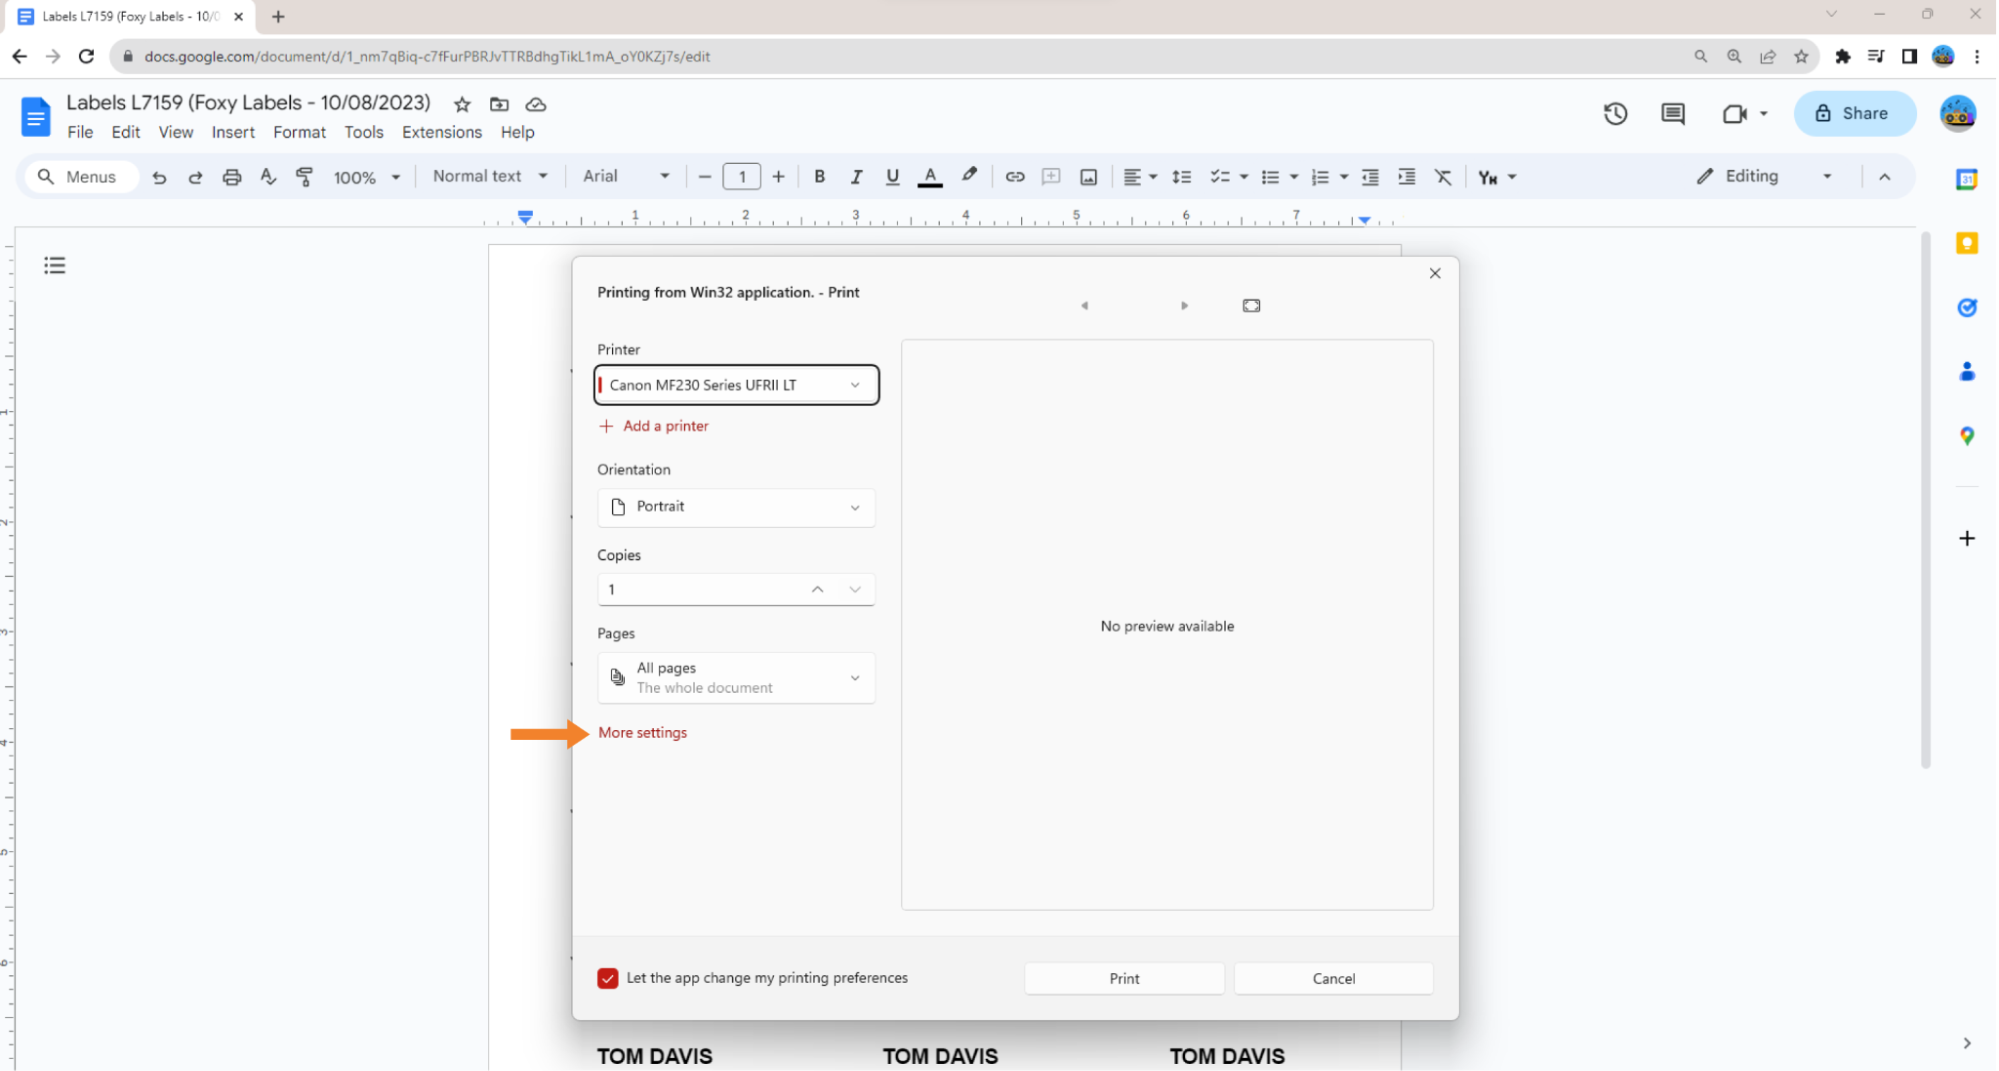
Depending on the printer's manufacturer and software features, the location and labeling of scale and margin settings can vary. Canon’s software, for instance, refers to margins as the "gutter," which essentially means the same thing. Don't be concerned if it appears your required parameter isn’t there at first look. Look closely, and you'll locate it since these are foundational printer settings, and every manufacturer permits users to modify them.
As you see here, we set the gutter (same thing as margins) to “0” (or “None”).
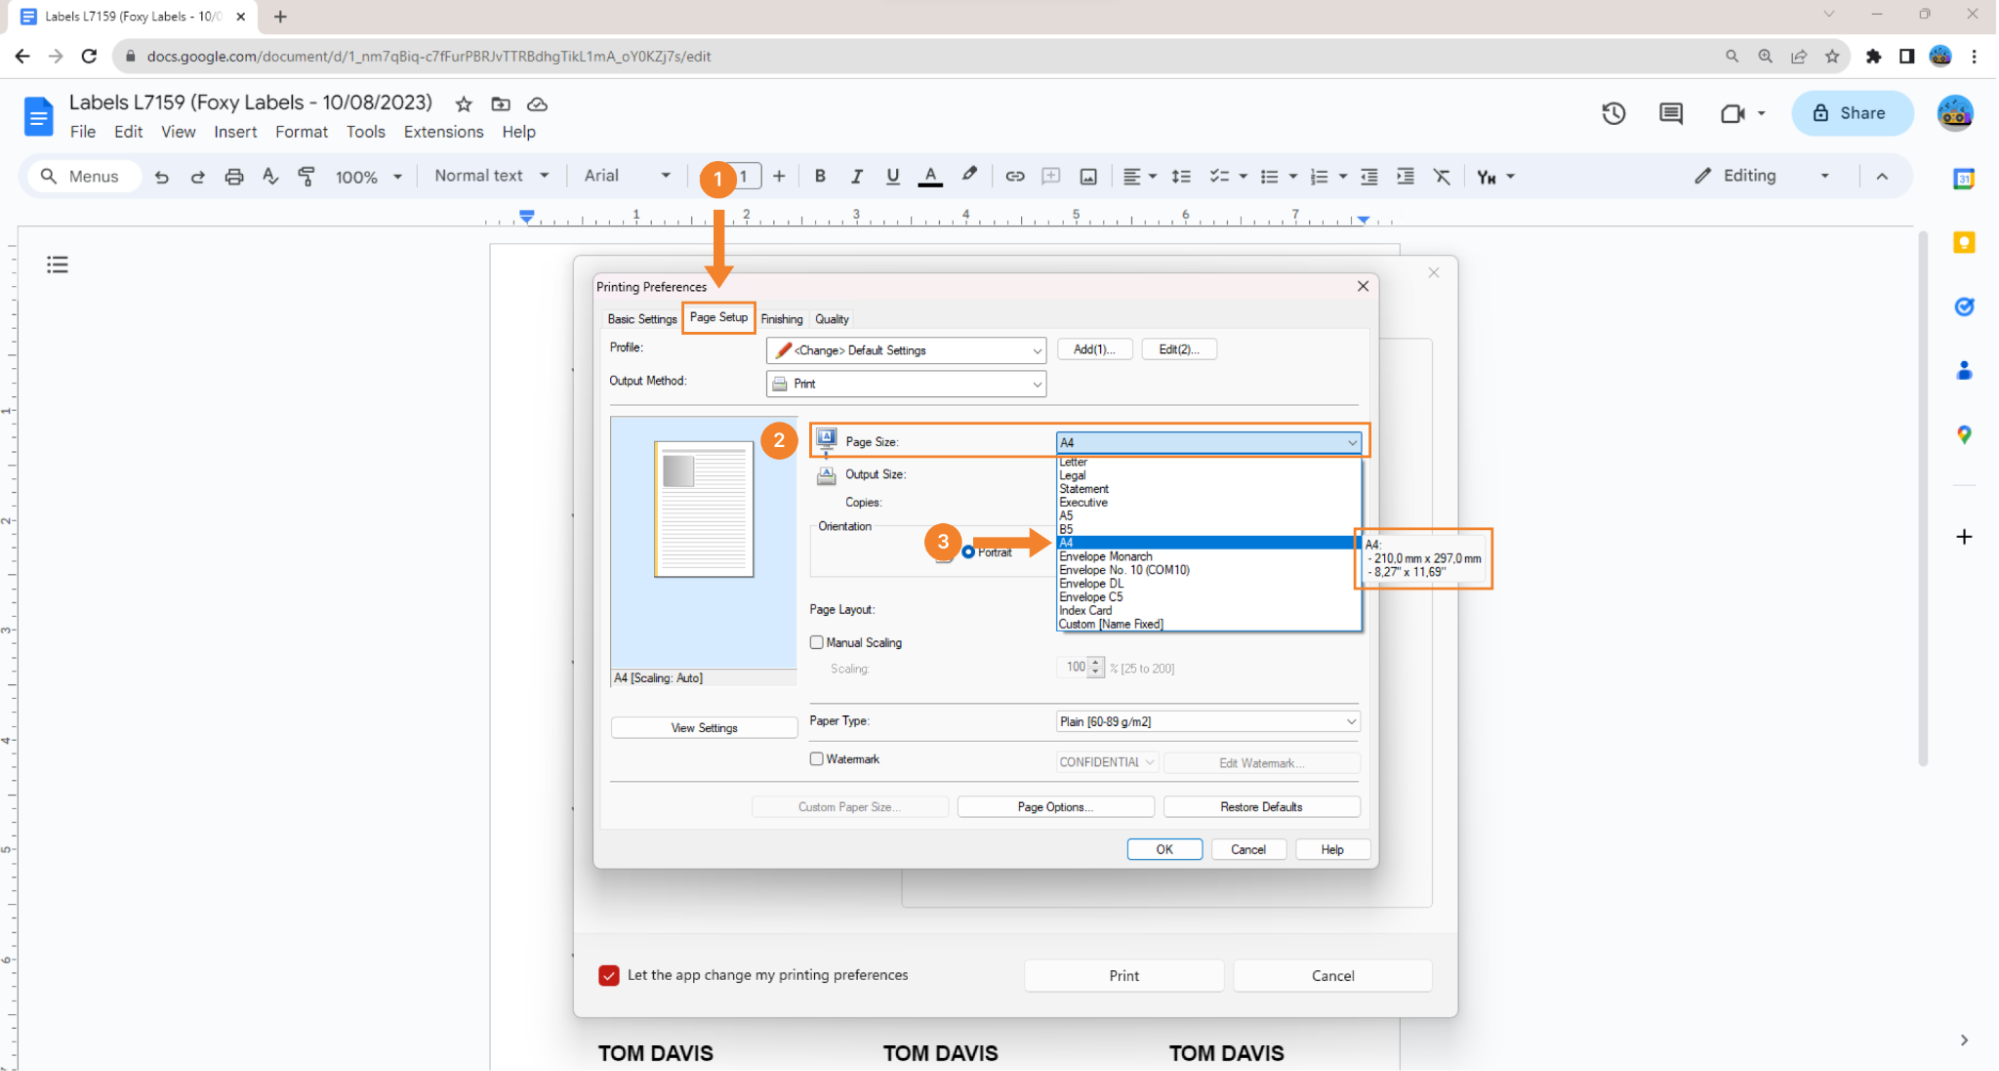
PAPER SIZE: Choosing the correct paper size for printing is crucial. Different templates need specific paper formats, and when creating and printing various labels, it’s essential to check the paper settings each time before printing a new document. For example, the Avery L7159 labels template that we are using in this tutorial requires the standard A4 format, whereas other kinds may need something more specific, like the "US Letter" format.
Foxy Labels, a specialized printing software, typically auto-adjusts your document to the proper format. Nonetheless, it's wise to double-check this setting before moving forward with printing.
Click on “Paper Size,” the second tab in the printing preferences dialogue, and select the required paper format from the dropdown list (if it’s not already selected automatically) under the “Page Size” setting. We’re choosing A4 210x297 mm since it is what our template Avery L7159 requires.
ADJUST MARGINS: If your printer displaces your design by a consistent measurement every printing session, margin adjustment is an option. This method involves manual alterations and, therefore, should be applied only as a last resort.
To modify the margins in Google Docs, navigate to File > Page setup. In Microsoft Word, use the ruler for margin adjustments.
2. Review Your Design
If your printing settings are all accurately configured, but misalignment still persists, the issue may stem from an inaccurate document design. A prevalent issue with printing is that the label content gets shifted down beyond the template's boundary, causing your label design to not properly fit into the cell of the label paper. There might be two solutions.
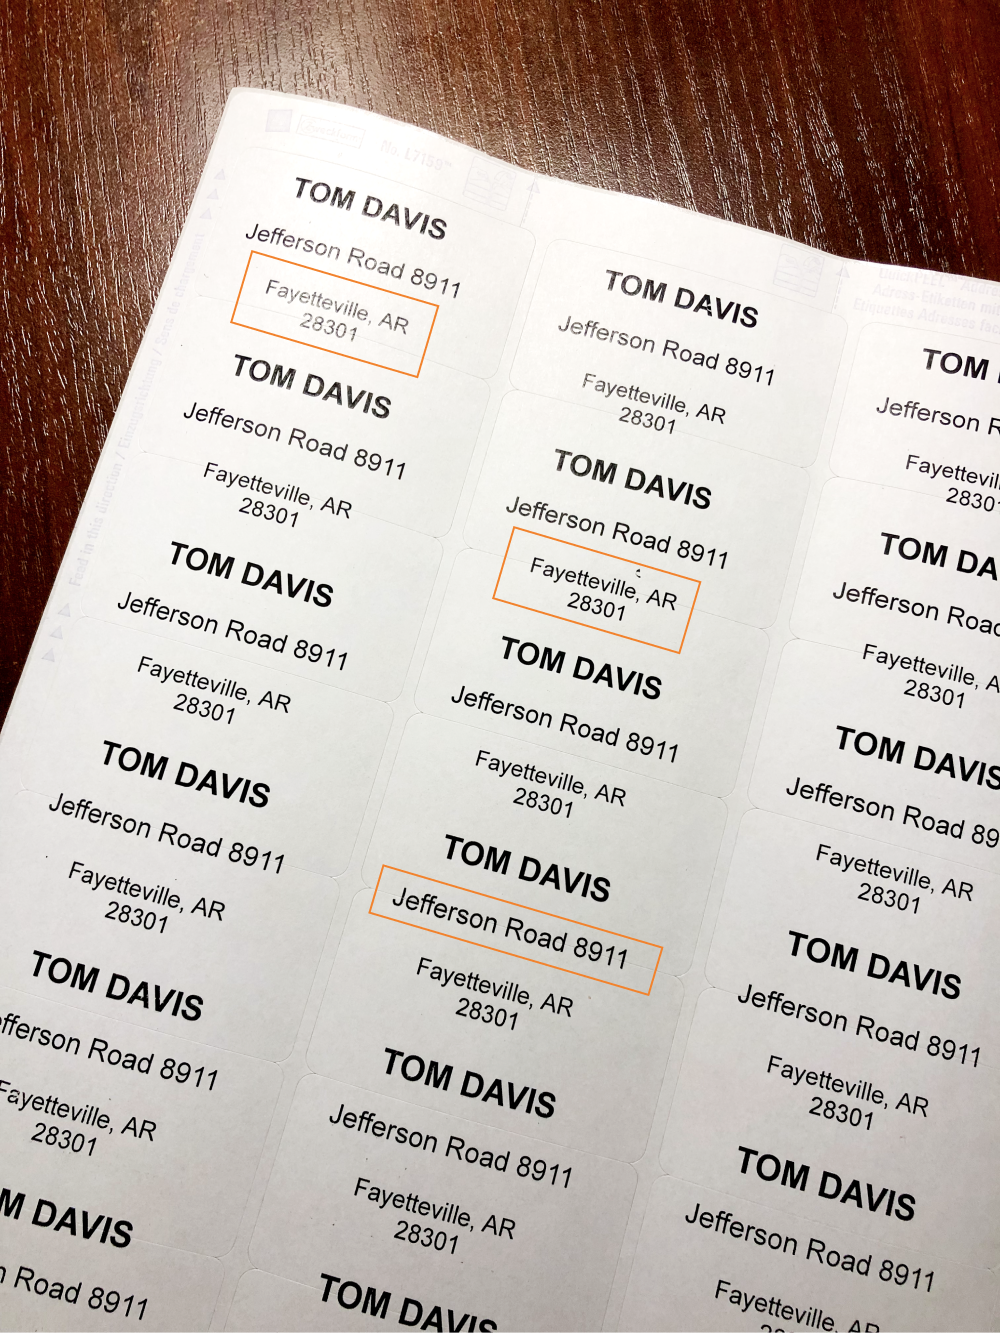
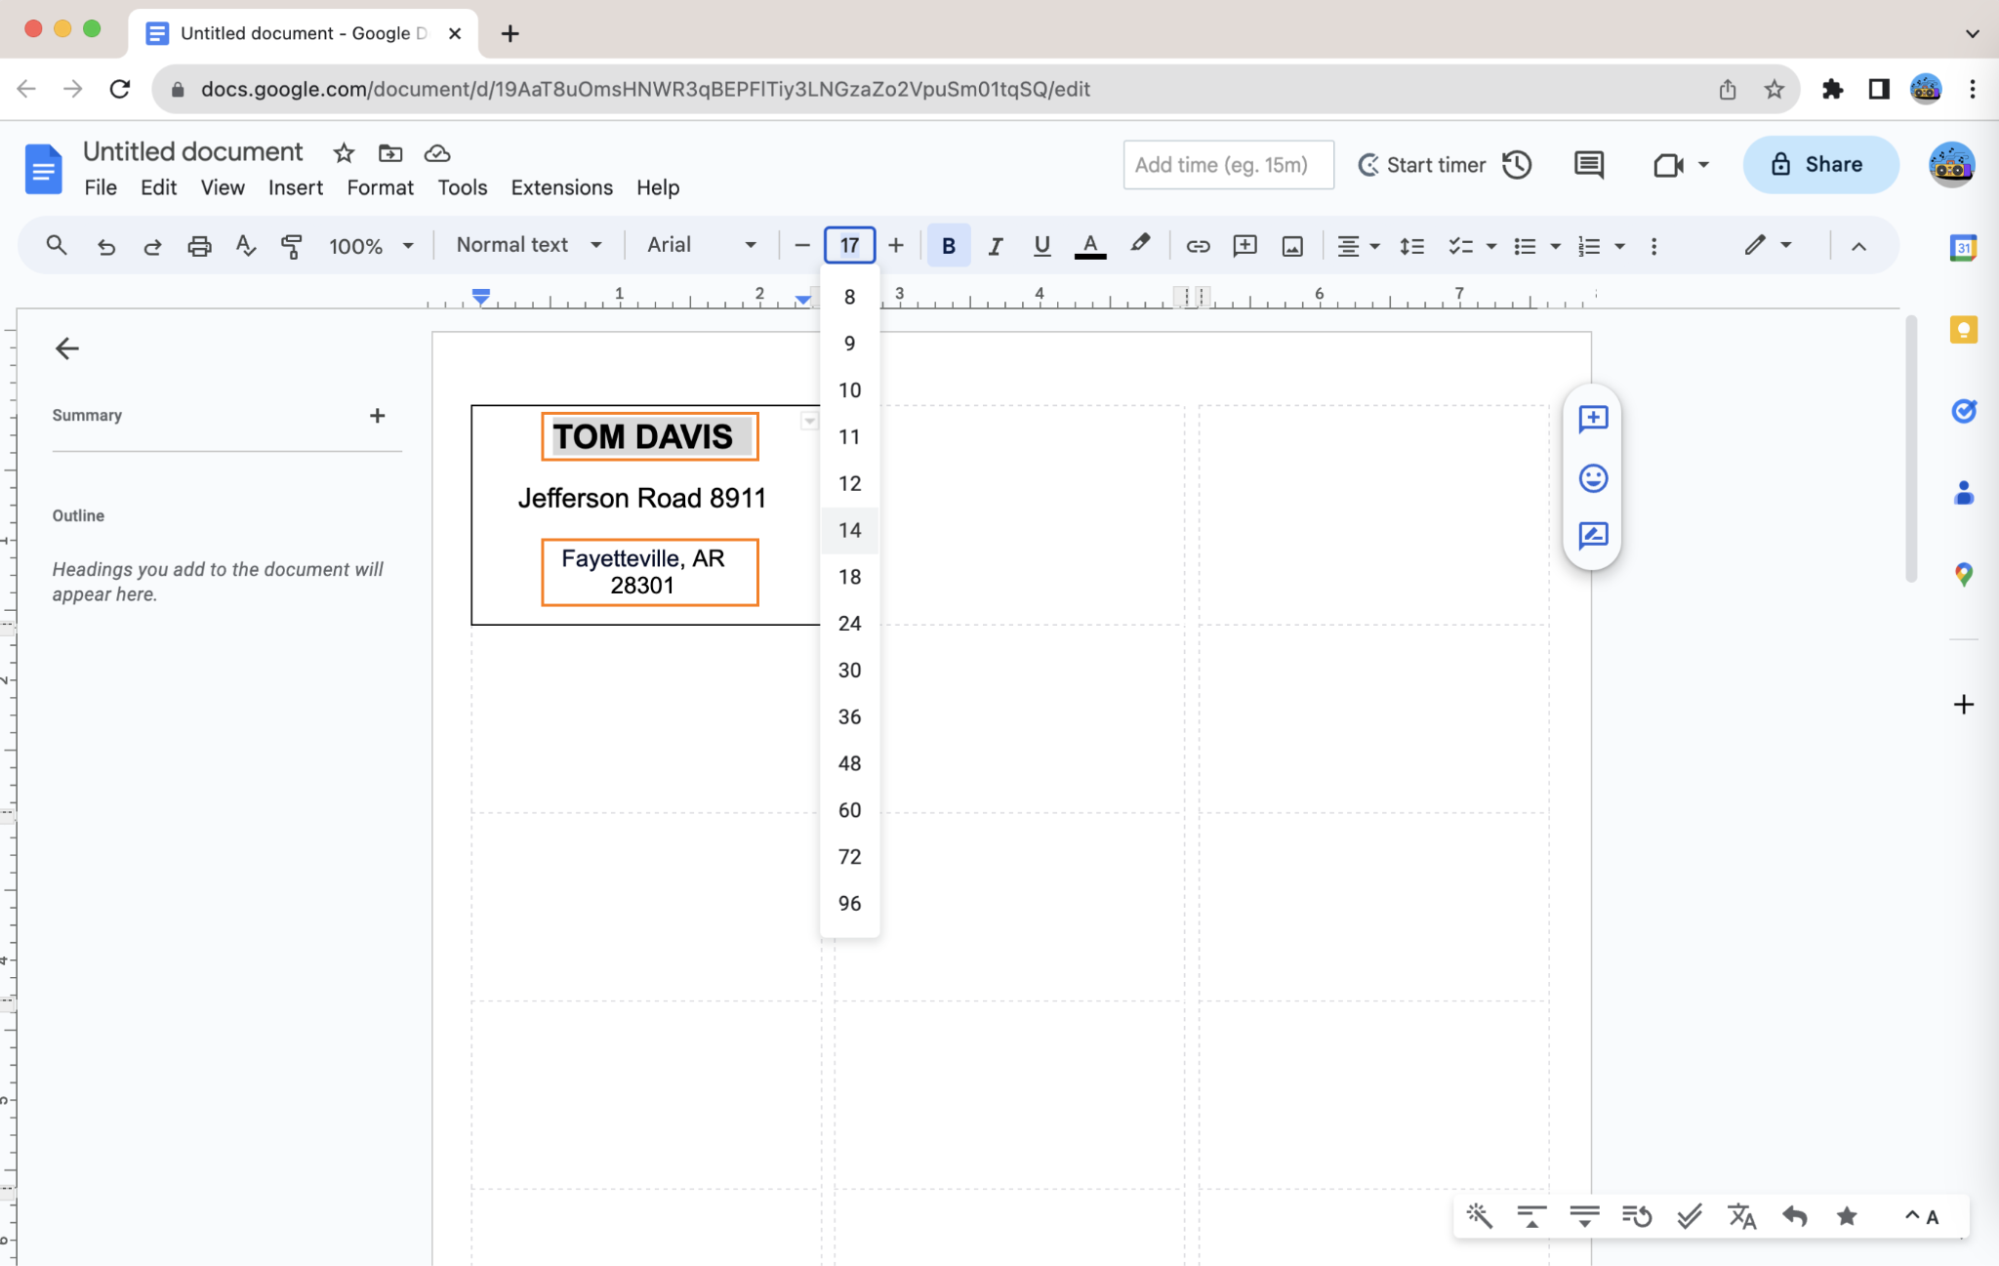
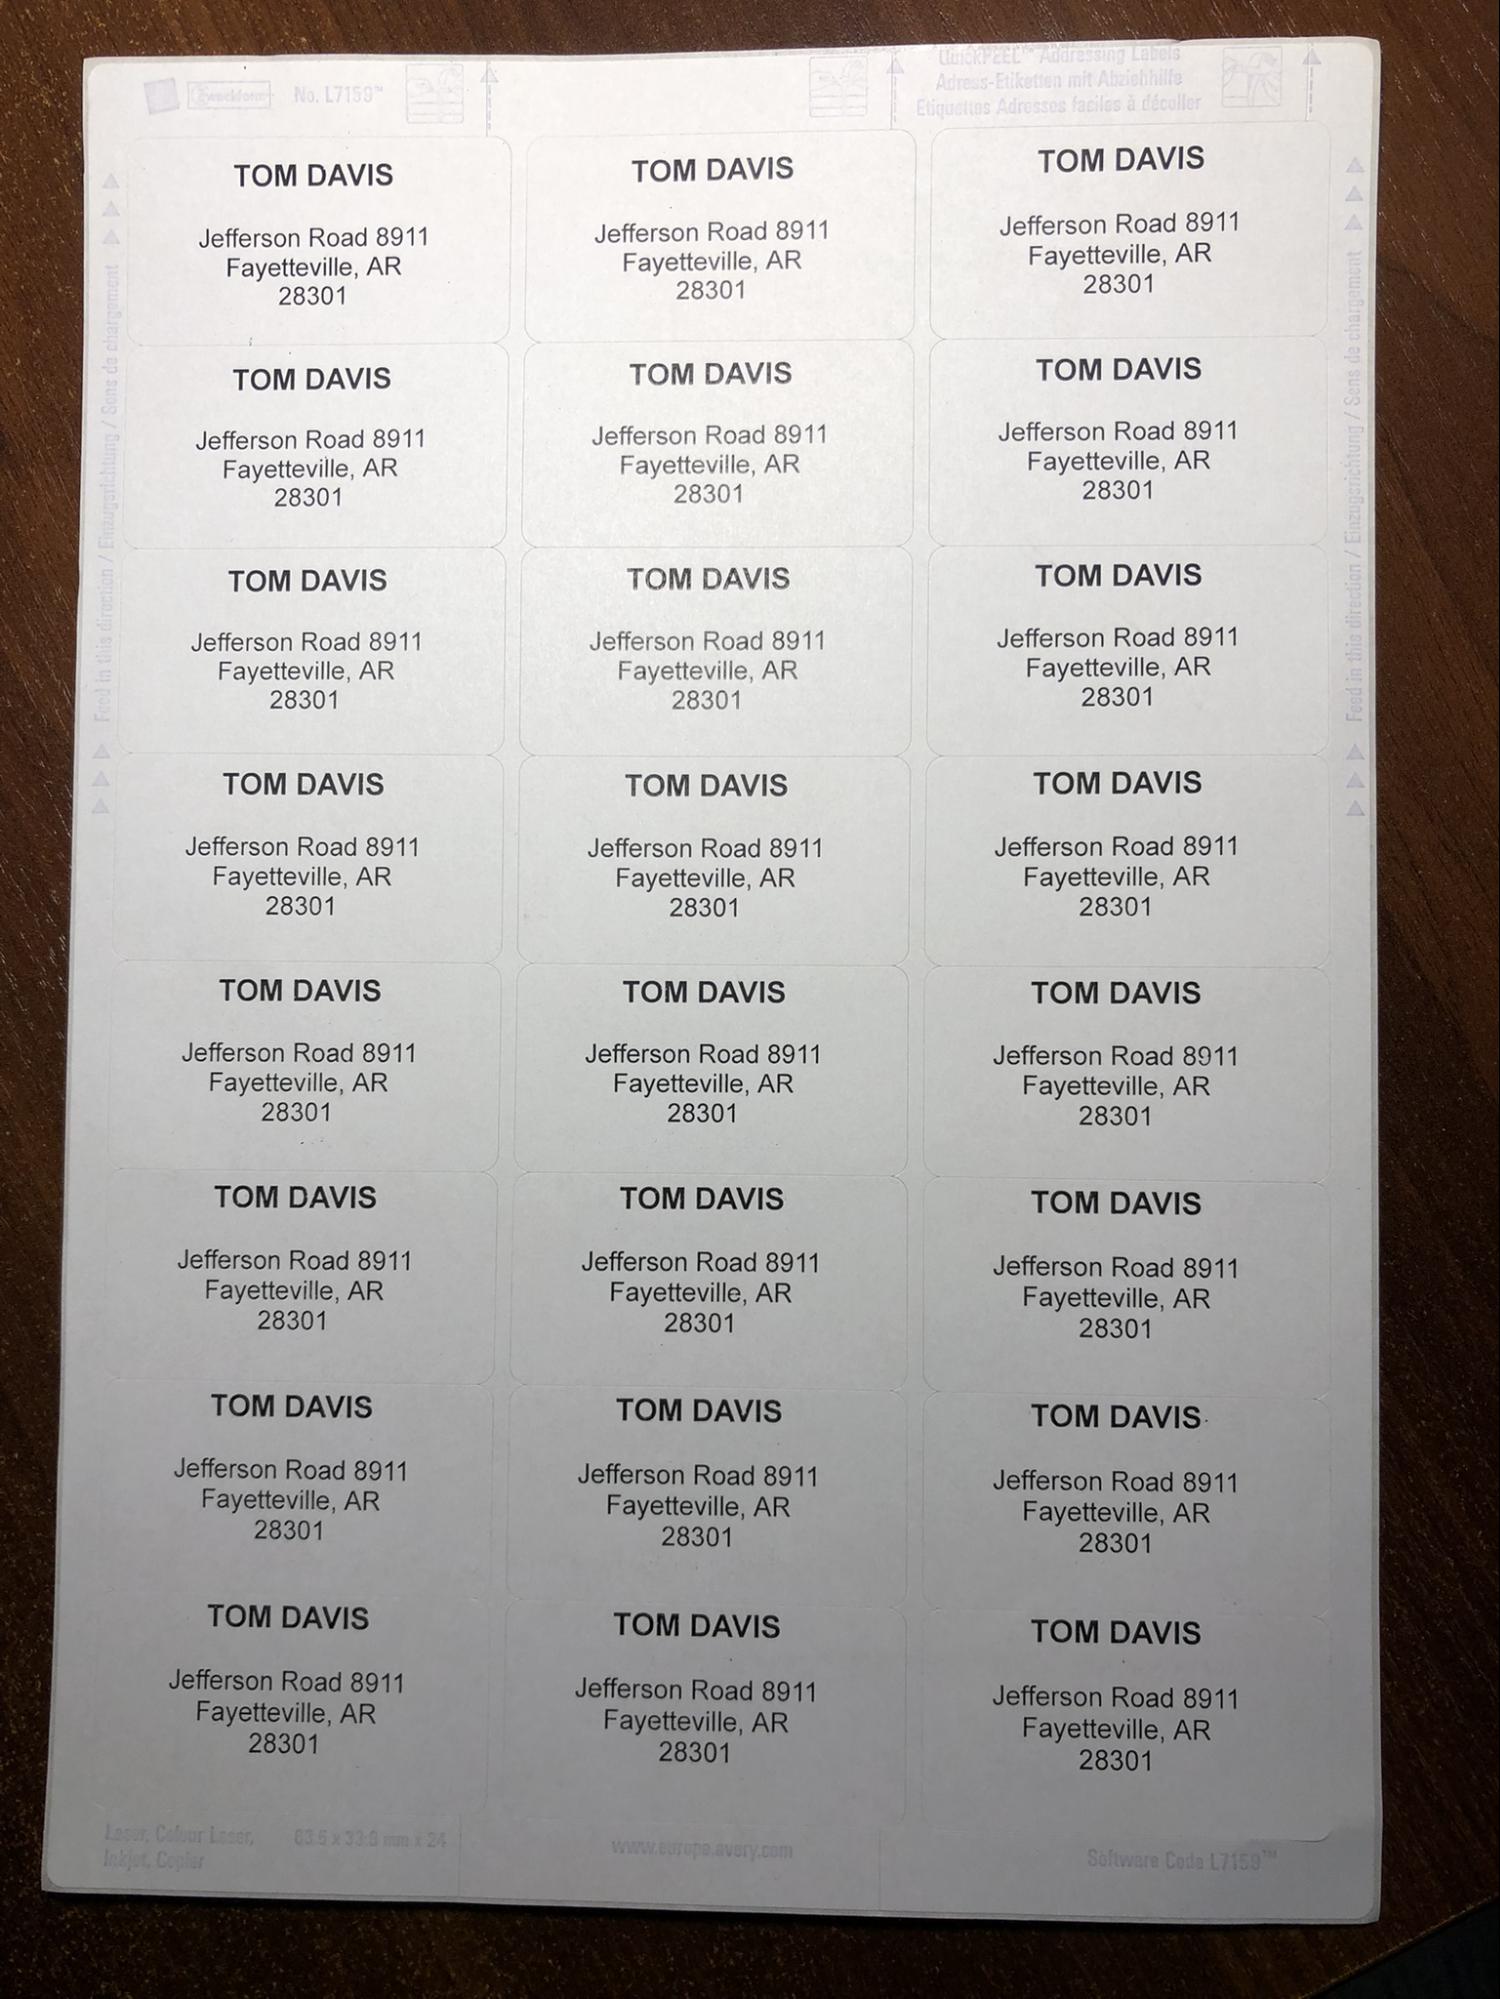
Reduce Font Size: A font size that is too large might cause text to occupy excessive space. If your label is text-heavy, downsizing the font could assist in fitting all the content within the provided space. Consider reducing the font size.As you see in the screenshot below, the name is typed in size 17 font, which is excessively large for a shipping label. Similarly, the other information on the label is also oversized. Consequently, downsizing the font a few notches to 14 or 12 can help bring the label back to its appropriate dimensions.
Remove Unwanted Blank Space: In addition to large font sizes, the misalignment issue may stem from excessively wide gaps between lines of text. More than one blank space can automatically resize the cell, making it exceed the dimensions permitted by the template. This issue is unapparent because the increased size of the label isn't visually noticeable until printing. Therefore, monitoring and minimizing unnecessary spaces is important at all stages of your label design.
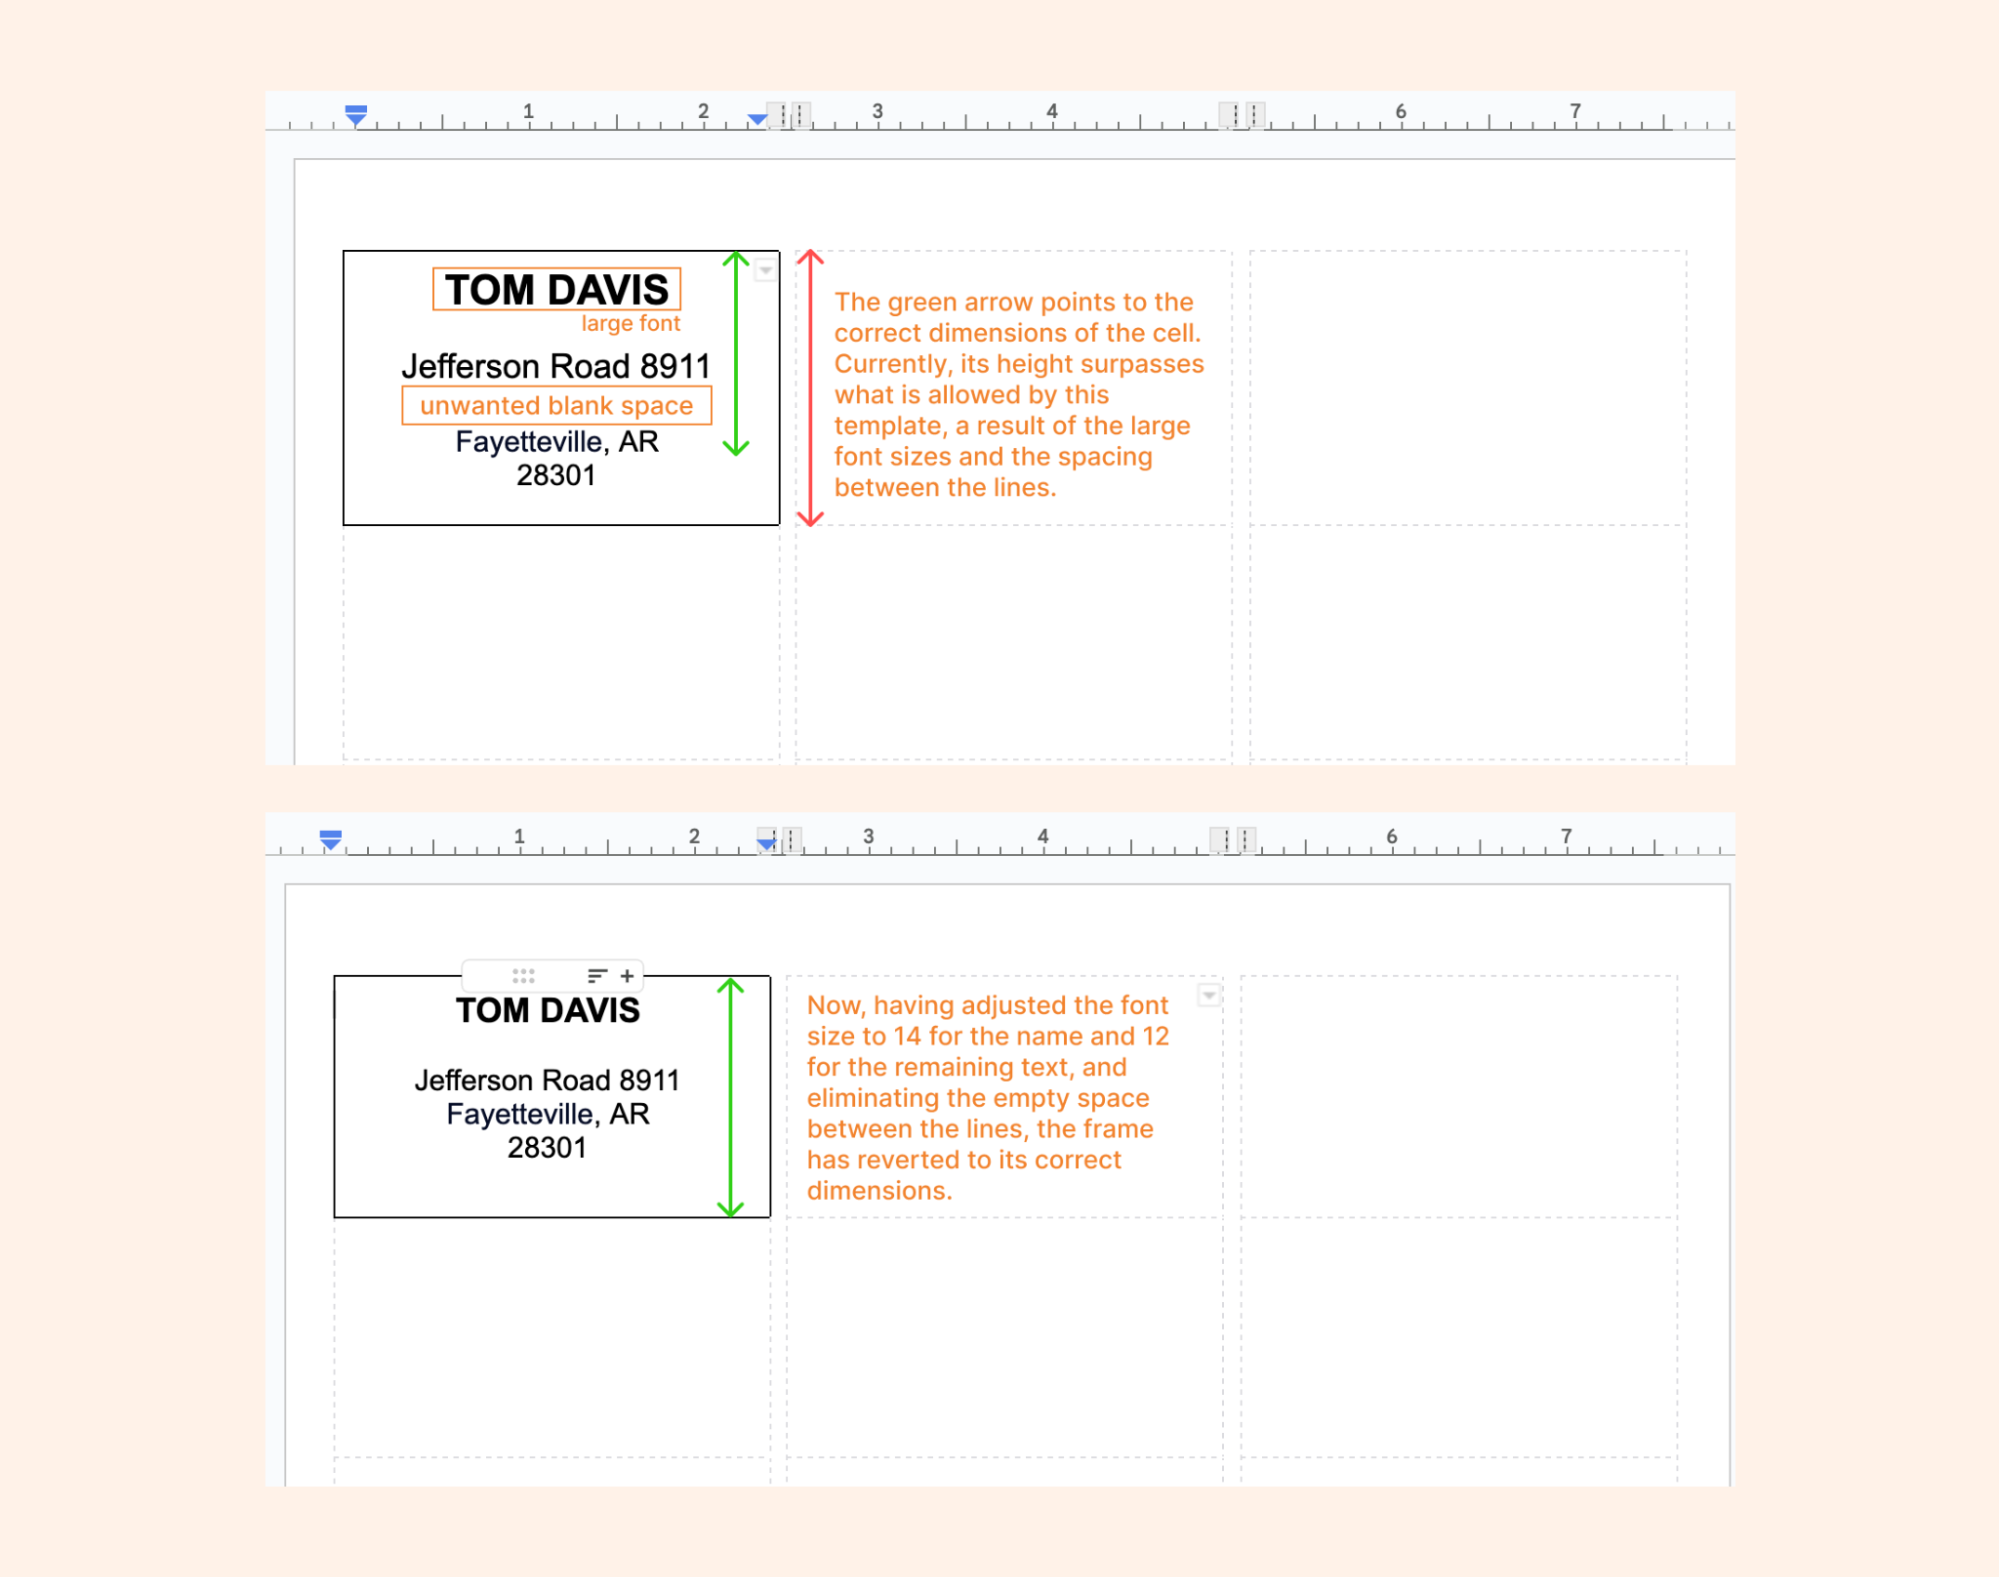
As you see, these minor adjustments take only a few seconds but can prevent an entire print series from going awry.
3. Use Correct Labels
The final potential cause of the misalignment issue might be a mismatch between your selected template and the label paper in your printer.
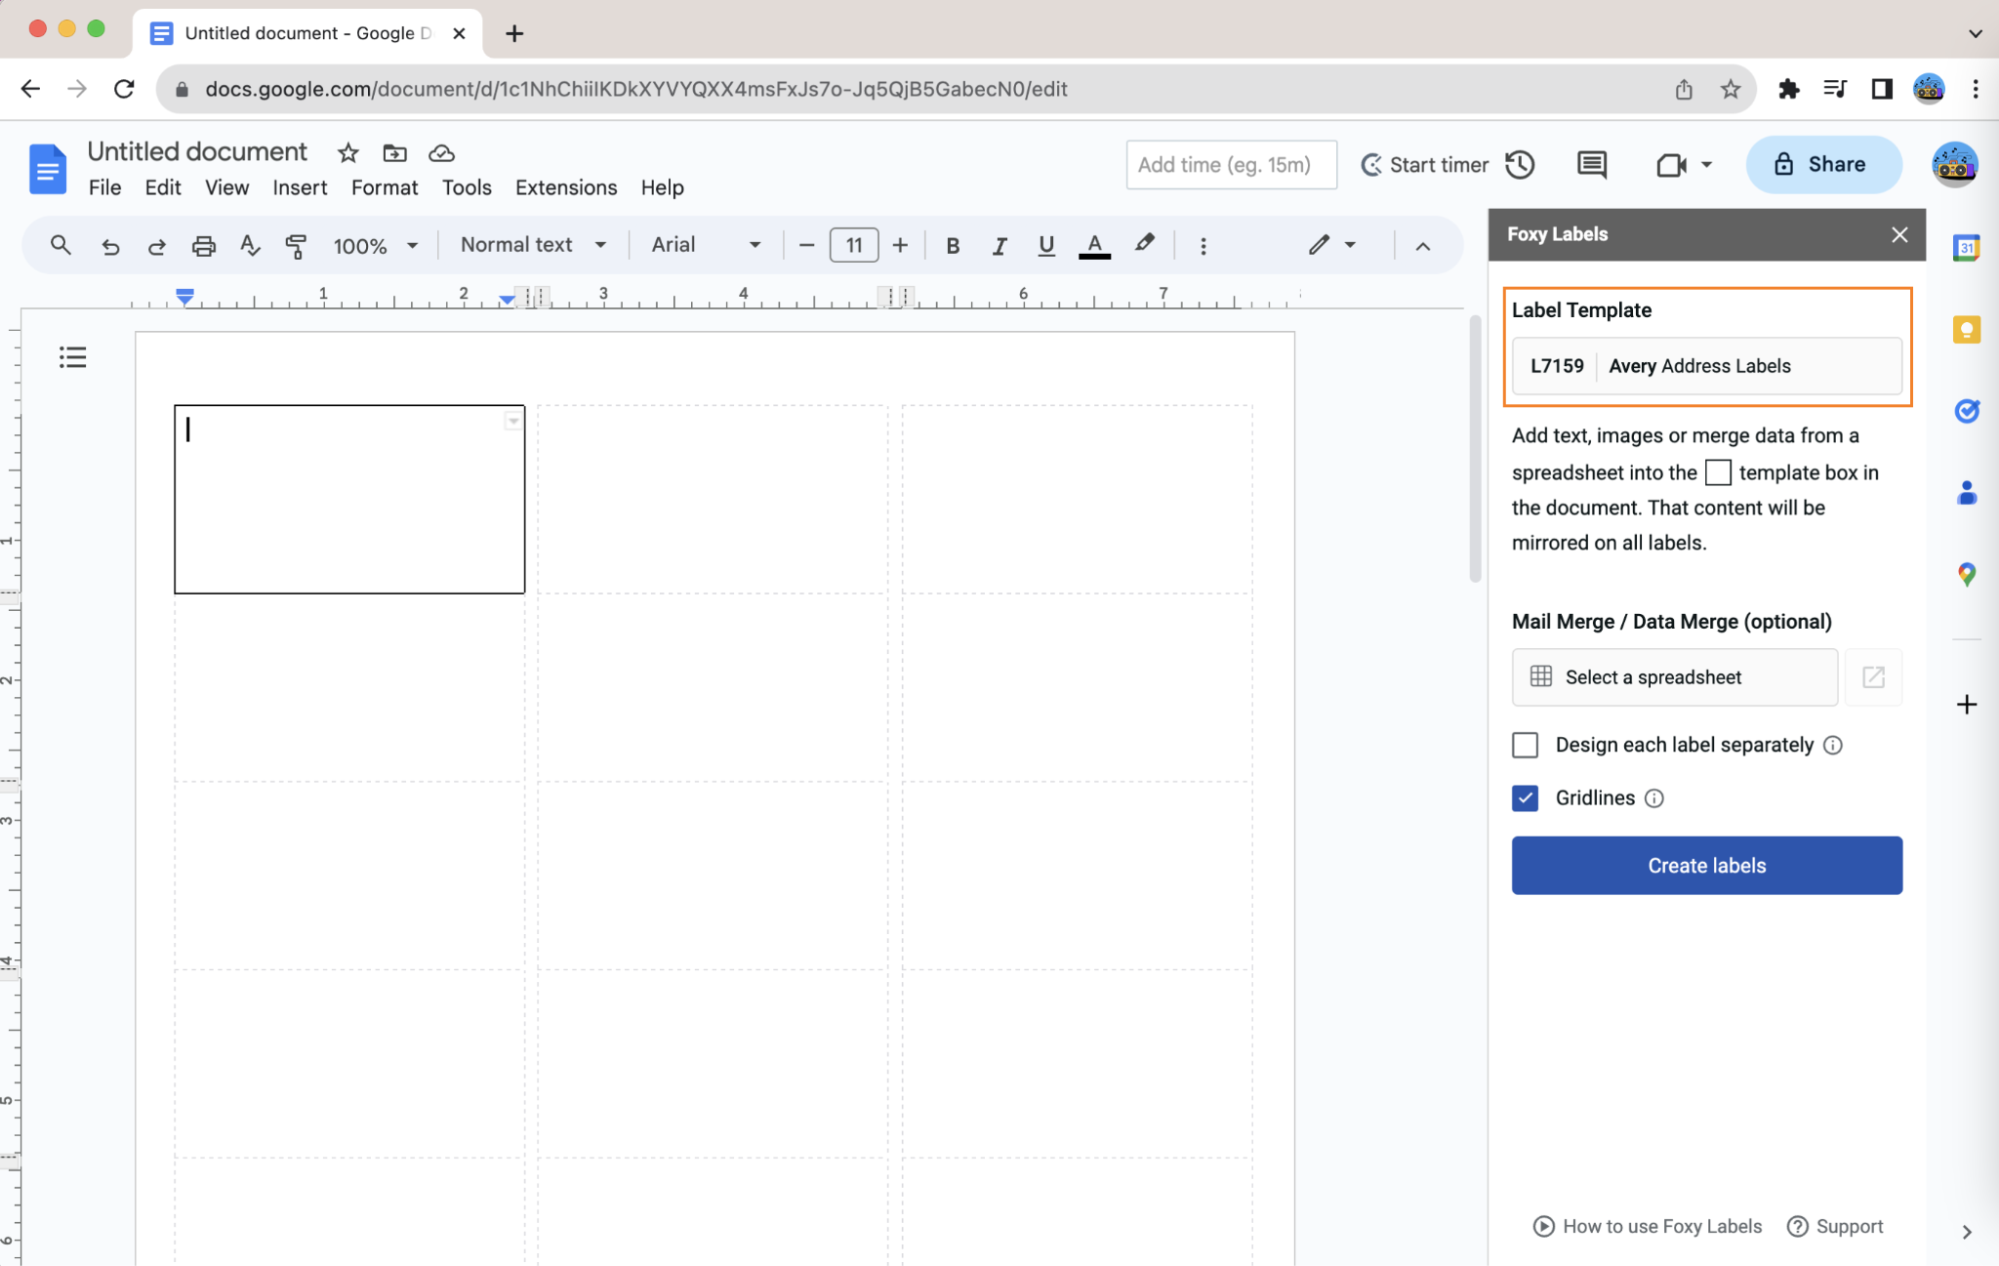
Carefully examine your label paper box and locate the vendor code, typically found in various locations on both the front and back of the box. Then, ensure that the code on the box matches the template code you're designing in Foxy Labels. The two codes must be identical.
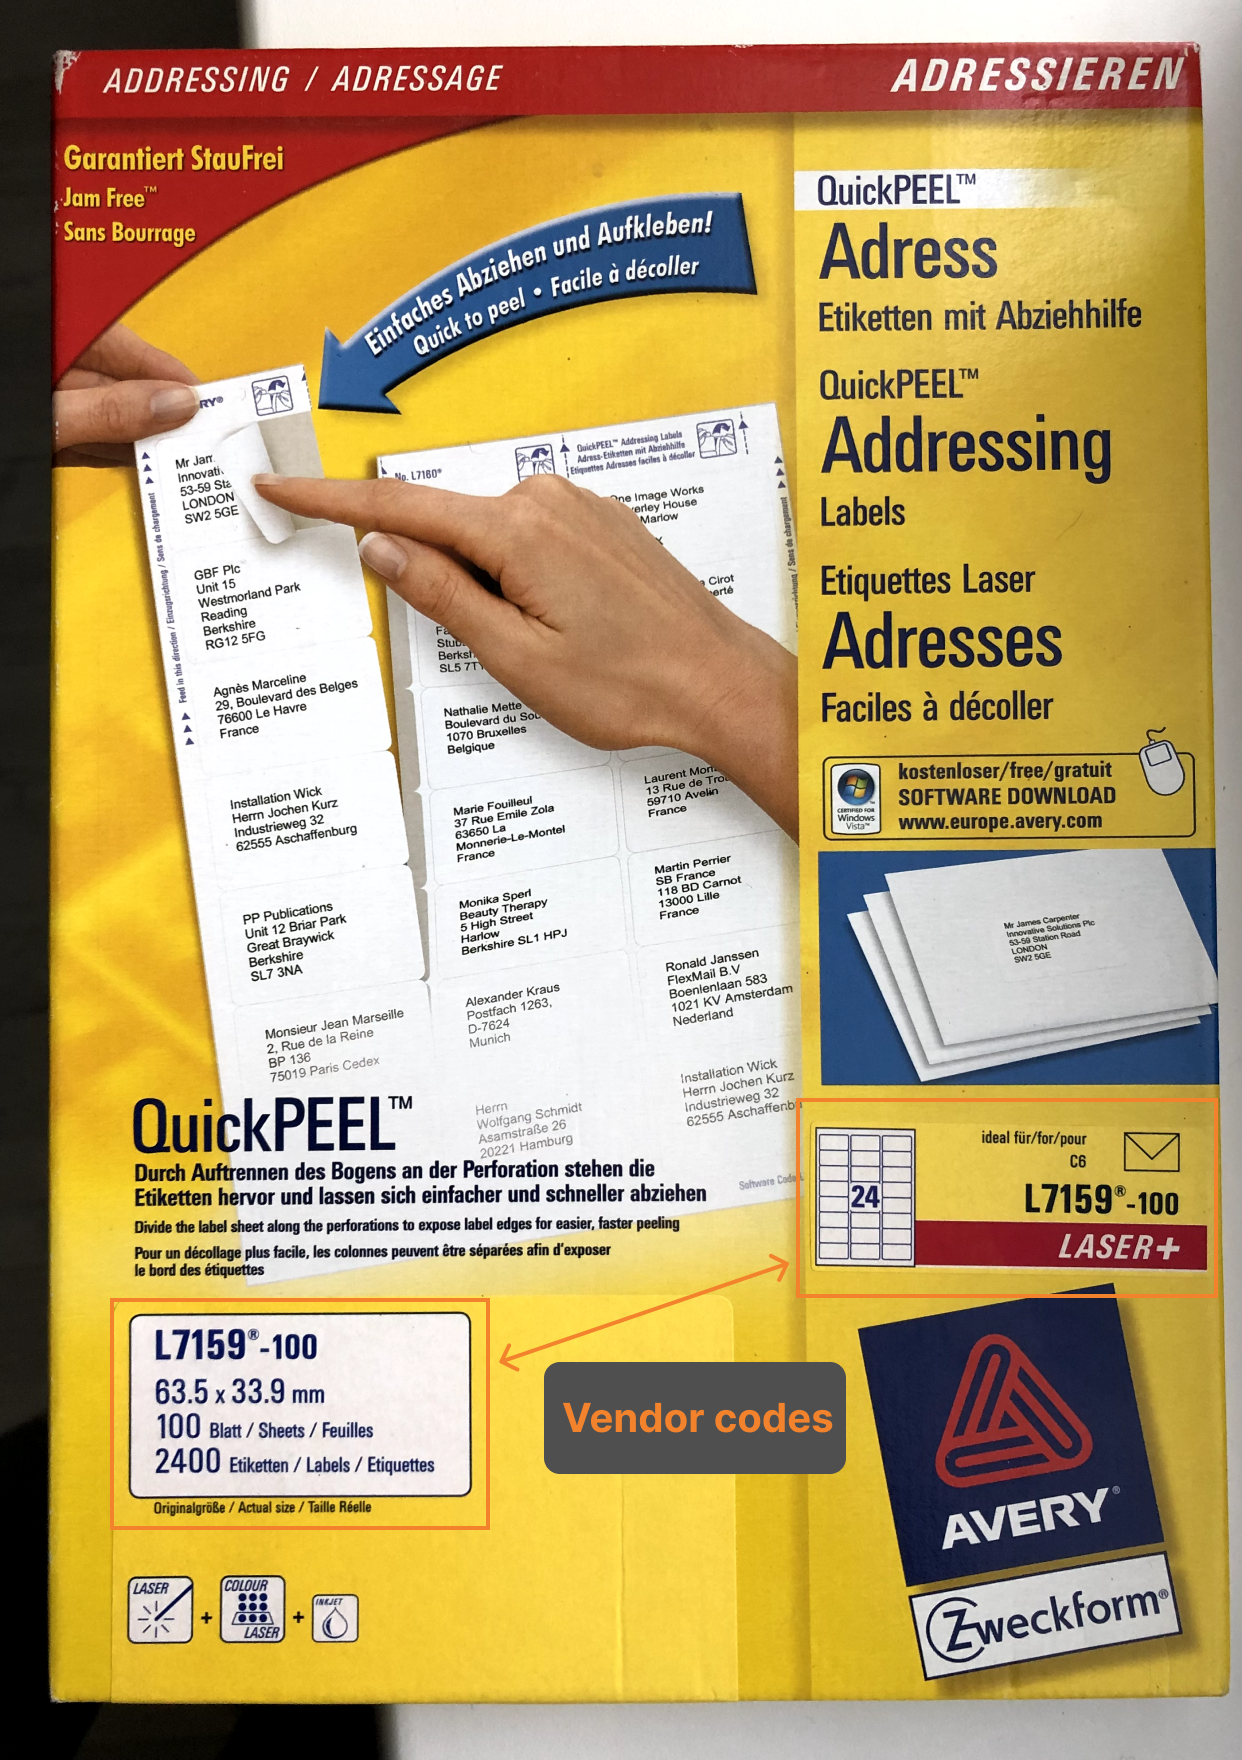
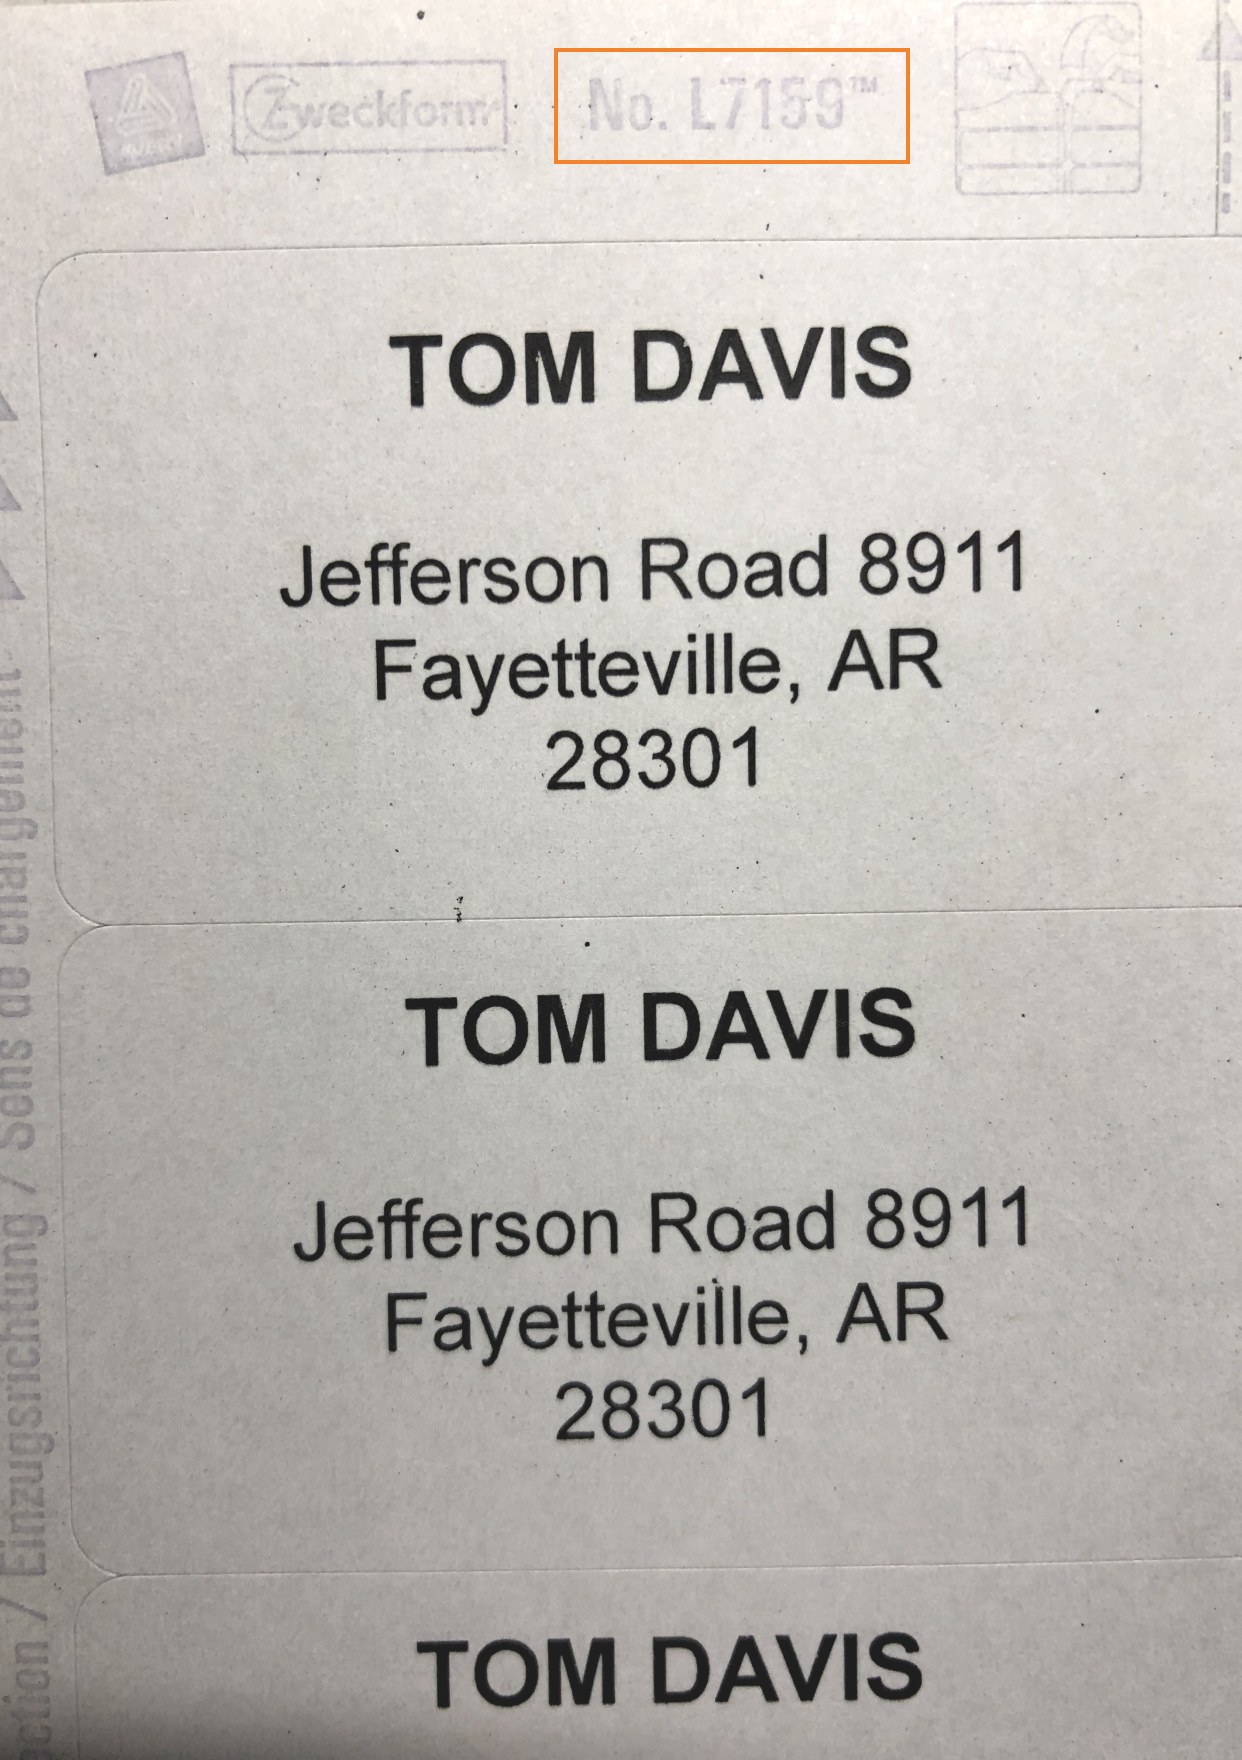
In case you no longer have the packaging, you can also find the code on each sheet of labels, located in both the top-left and bottom-right corners of the sheet.
After verifying everything and making the necessary adjustments to your label design and printer settings, it is recommended to start afresh and avoid reusing a sheet that has been formatted previously. There's a possibility that the table used for aligning labels has been disrupted, and your labels may not print neatly.
4. Run a Test Print
Running a test print before proceeding with printing your finalized labels is recommended for several pivotal reasons. A test print allows you to verify that all adjustments and alignments are accurate, ensuring that the text and graphics (if applicable) are positioned correctly on the label.
It also prevents the need to reprint batches of labels due to overlooked errors, saving both time and resources. For colored prints, a test run ensures that the colors translate well from the screen to the print, allowing you to adjust color settings if needed.
Proceed to load a sheet of plain paper into the printer and print a test copy by navigating to “File” > “Print” in your document, then review the test print for alignment, color, and layout issues. Make any necessary adjustments and repeat the test print to confirm accuracy.
Optionally, you may do a test print on an actual label sheet to ensure the design aligns with label borders, adjusting and retesting as needed. Once satisfied with the test prints, proceed to print your document on your final paper or label sheets.
If you've done everything correctly, there should be no misalignment problems, and your labels will look flawless as a printed product ready to be used.
FAQ
Is running a test print required?
A test print is important to guarantee your final document will be printed accurately, preventing misalignments, color discrepancies, and other common printing issues. It helps you avoid wasting resources, such as paper and ink and saves time by averting the need to redo print jobs due to unexpected errors.
What should I do if the colors on the test print do not match my document?
If the colors on the test print do not match your document, you may need to adjust the color settings on your printer. Ensure your printer is set to print in color (not grayscale), check the ink levels, and clean the print heads if needed. You might also adjust the color settings in your document or design software to ensure they are optimized for printing.
How can I save my print settings for future use?
The process to save print settings may vary depending on your software and printer. Typically, after adjusting your print settings, there may be an option to save or set as default within the print dialog box or printer preferences. Refer to the help section of the software you are using or your printer manual for specific instructions.
What should I do if my test print is perfect, but the final print on label sheets is misaligned?
If your test print is accurate, but the final print on label sheets is misaligned, ensure that the label sheets are loaded correctly into the printer and that no settings have been changed since the test print. Also, the label sheet must be flat, not warped or curled, as this can affect the print alignment. If the issue persists, run another test print to check for any changes or issues.
How can I fix issues with the quality of the print, such as streaks, and faded colors, or unclear text?
Issues with print quality, such as streaks, faded colors, or unclear text, can often be resolved by cleaning the print heads, checking the ink or toner levels, and ensuring the paper type selected in the print settings matches the actual paper being used. Refer to your printer manual for specific troubleshooting steps for print quality issues.