Whether in business matters or home organization, the power of well-crafted custom label cannot be overstated. Labels are our humble helpers that keep everything in its place when we streamline our office supplies or bring order to the chaos of household items. However, let's face it – the traditional label-making process often leads to frustration, with limited creative options and a time-consuming journey through inconvenient software.
But don't worry, as we introduce you to a game-changer that transforms the mundane task of label creation into an enjoyable experience – the add-on called Foxy Labels. We'll walk you through the use of this specific Google Workspace plugin, which opens up a world of possibilities for quick and easy label generation. Say goodbye to boring routines and restricted creativity. With Foxy Labels, you'll find a world where labeling is a snap and adds a dash of fun to your organized undertakings. Get ready to revolutionize the way you create mailing labels in Google Docs document.
1. Create a new document
To kickstart your label-making with Foxy Labels, you need to set up a new Google Doc first. There are a few ways to do it, but the quickest is to hit the link https://docs.new, and you'll have a blank document all set for your creative touches.
2. Launch the Foxy Labels add-on
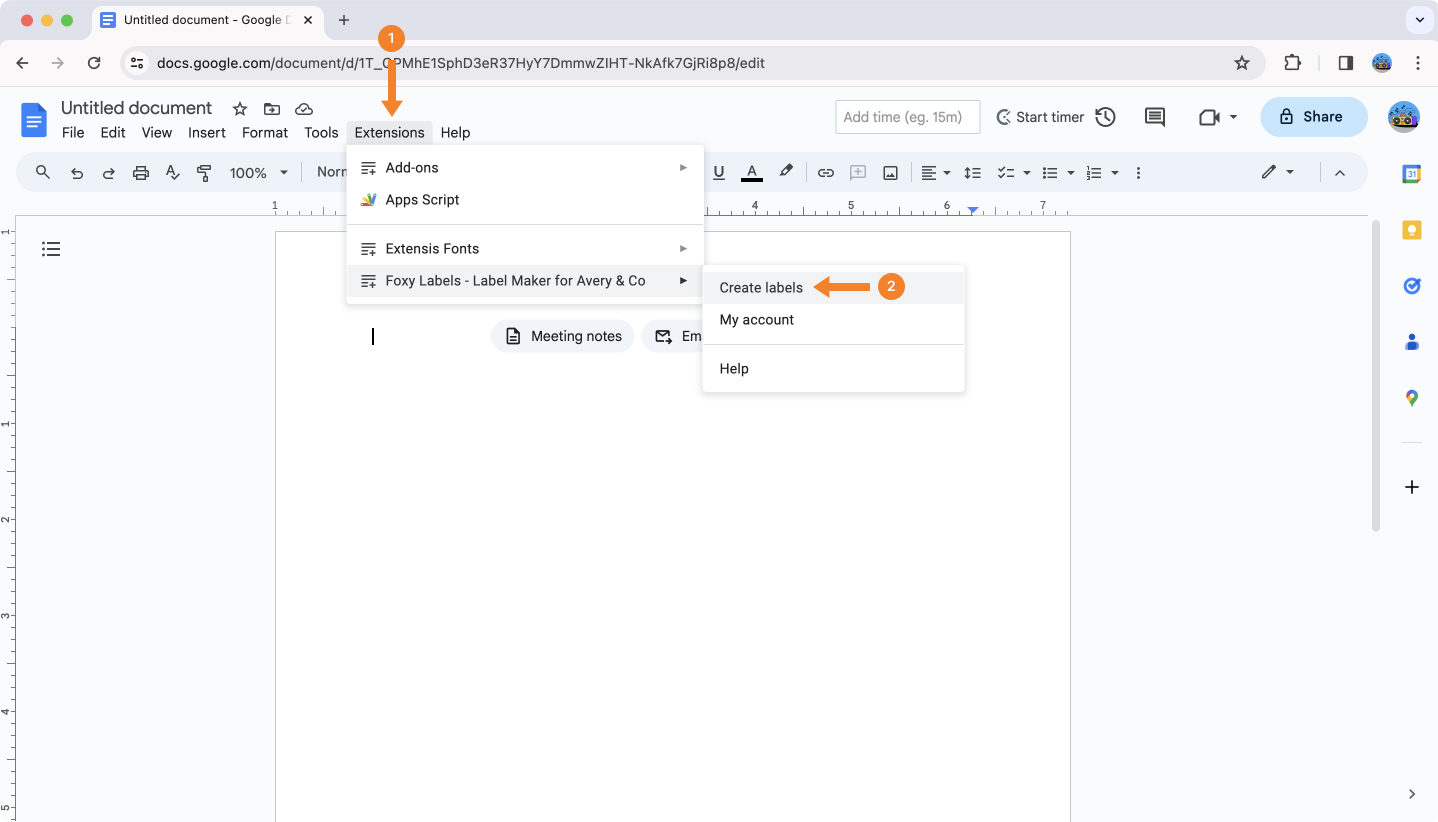
Once you've got your Google Doc ready, it's time to open the Foxy Labels app. Look for the "Extensions" in the top menu bar of your document (step 1), click on it, and then locate "Foxy Labels" and select “Create labels” to start working on your design.
If you're new to FoxyLabels, you'll need to install this Google Docs add-on first and then refresh your document to proceed.
3. Select a template
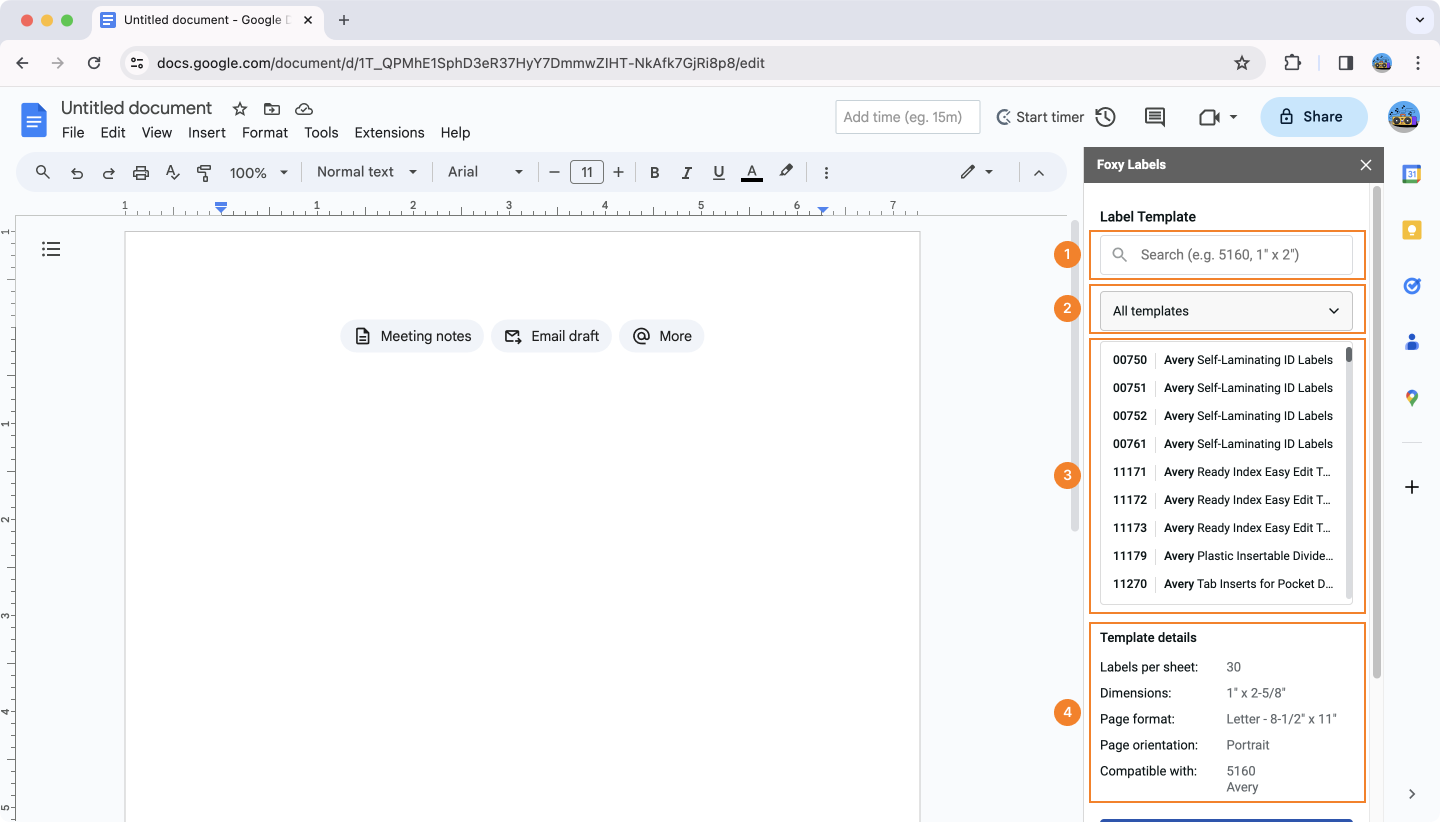
The label maker provides a vast array of templates, catering to a wide range of user preferences. Simply select your desired type from the right sidebar. For an overview of all available options, click "Select a template."

When you access the template menu in Foxy Labels, you'll find it's designed for convenience with several search options:
- Search by Name: Ideal if you already know the template's name or the size of the labels you need. Just type these details into the search field.
- All Templates: This method is based on searching by manufacturer or supplier. Here, you can select labels from a wide choice of providers, like the well-known Avery or Herma.
- Drop-down List of All Templates: Perfect for those who wish to browse through various options before deciding. This method displays the code, name, and often the shape of all available templates, making it easier to compare and choose.
Additionally, the application features a preview window (4) for the template you select. This window highlights key attributes of the chosen template, such as its orientation, the number of labels per sheet, dimensions, and other important details.
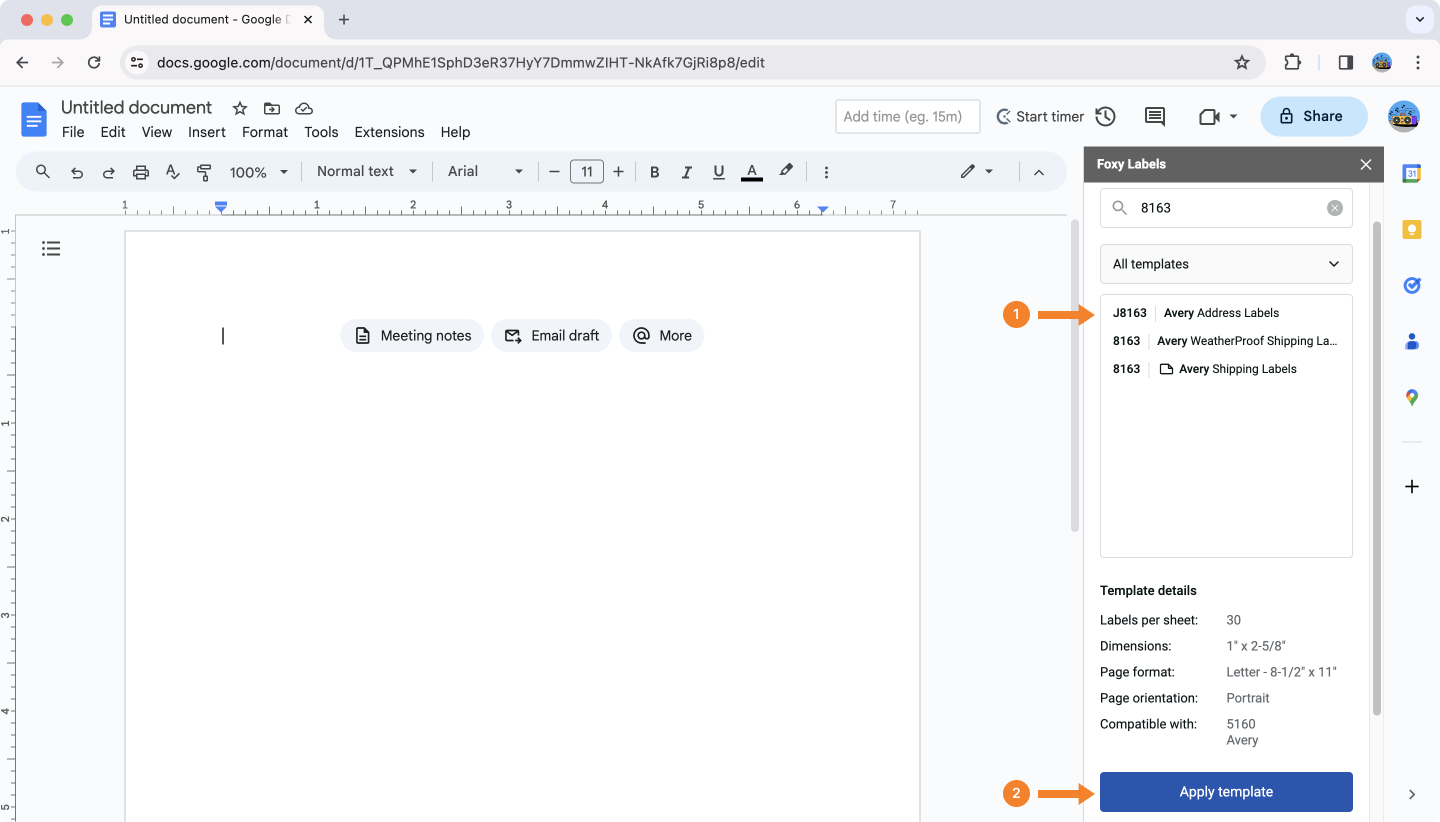
For this tutorial, we'll select "J8163", a popular template used for address labels. Locate it in the list using one of the search methods mentioned earlier, click on it to proceed (step 1) and hit the “Apply template” button (step 2).
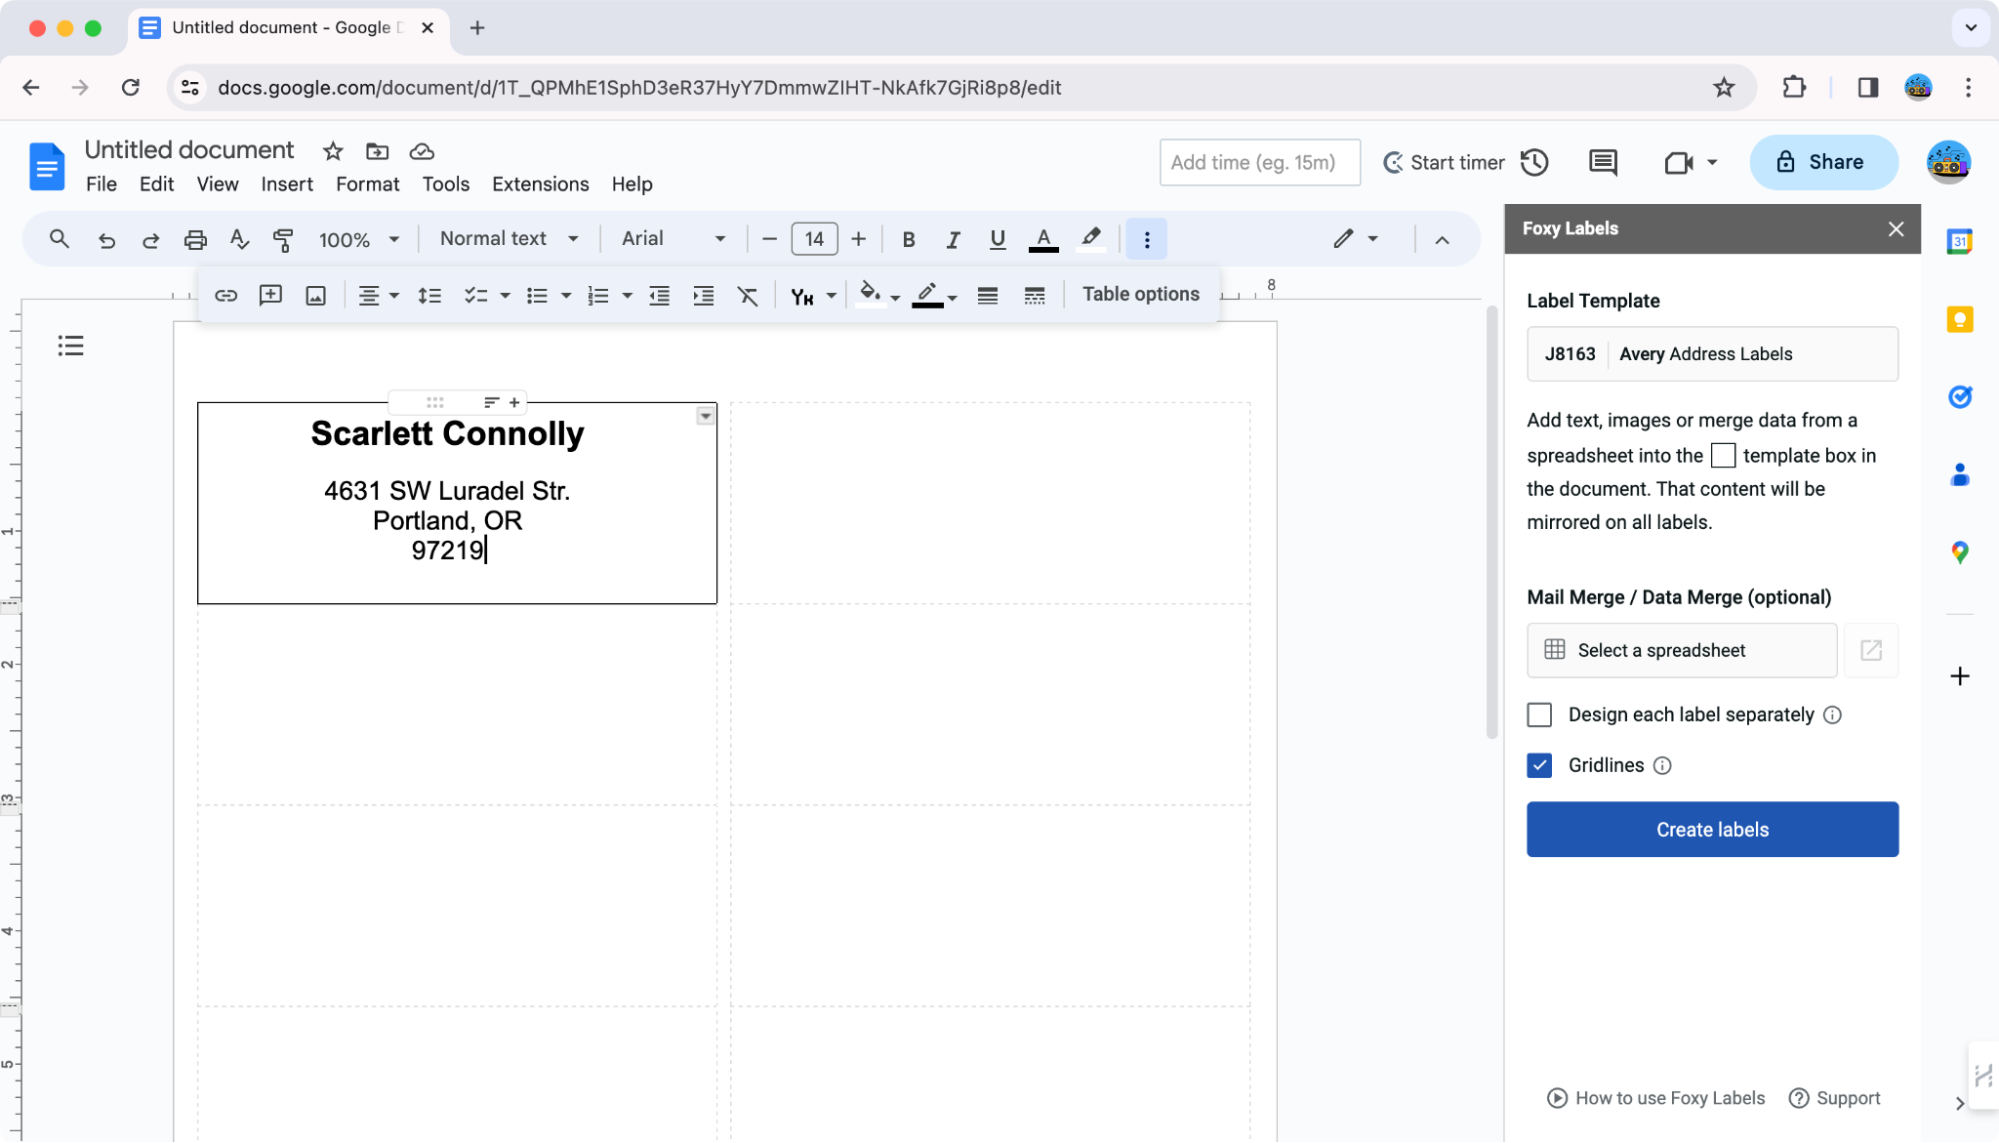
4. Design a label
In the main workspace, you'll notice that the first cell is outlined with solid frame, while the others have dashed lines. This format indicates that you should apply your label design to the first cell, and the rest will automatically be filled with the same elements. Let's dive into how this works.
If you want to create an address label, start by entering the essential postal details. These include the name of the sender (which could be an individual, a company, or any legal entity) and the full address: house number, street, city, state, and zip code. For international shipments, don't forget to include the country.
You can style the label using the standard text editing tools available in Google Docs. Remember, readability is key. Ensure that the font size is convenient and the colors are contrasting enough to be easily read. While text alignment isn't crucial, in our example, we'll center-align the entire text for a neat appearance.
Take care to avoid using overly large fonts, as this can inadvertently lead to an increase in the cell height, a change that might not be immediately noticeable to you. However, this subtle adjustment can cause misalignment issues when it comes to printing your document.
NOTE: It's important to remember that our example represents one of the simplest design approaches. However, Foxy Labels doesn't restrict your creative flair. You're free to explore beyond minimalist trends and bring your unique design ideas to life. This could include incorporating an exclusive image to add a personal touch to your labels, showcasing that your creativity is the only limit. Learn how to add images to your lables.
Also, you don't always have to input data manually. If you have a previously created mailing list, there are ways to add merge fields, integrate this data and mail merge labels. Look into how you can merge your mailing list with Avery labels in Google Sheets for a more streamlined and efficient process.
5. Create labels
Once you're happy with how the first label turned out, it's time to wrap up your project and create labels in Google Docs. Simply click "Create Labels" button, and the labelmaker will quickly get everything ready to print the document.
However, if you think your design needs a bit more tweaking, now's the time to adjust it. Otherwise, if you move forward without these changes, you'll have to begin the whole process from scratch.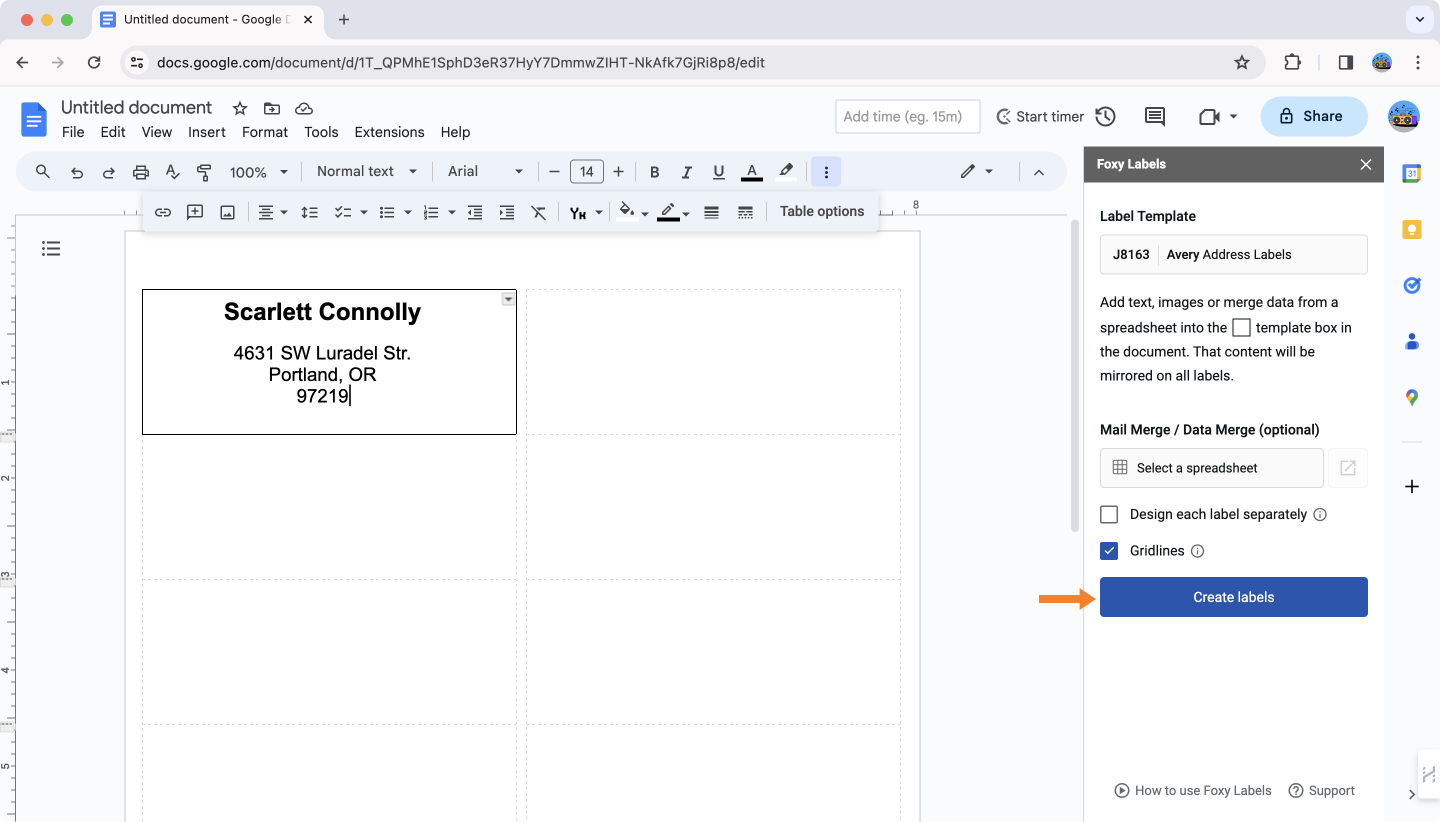
6. Review the final document
To view the final result, click the "Open" button.
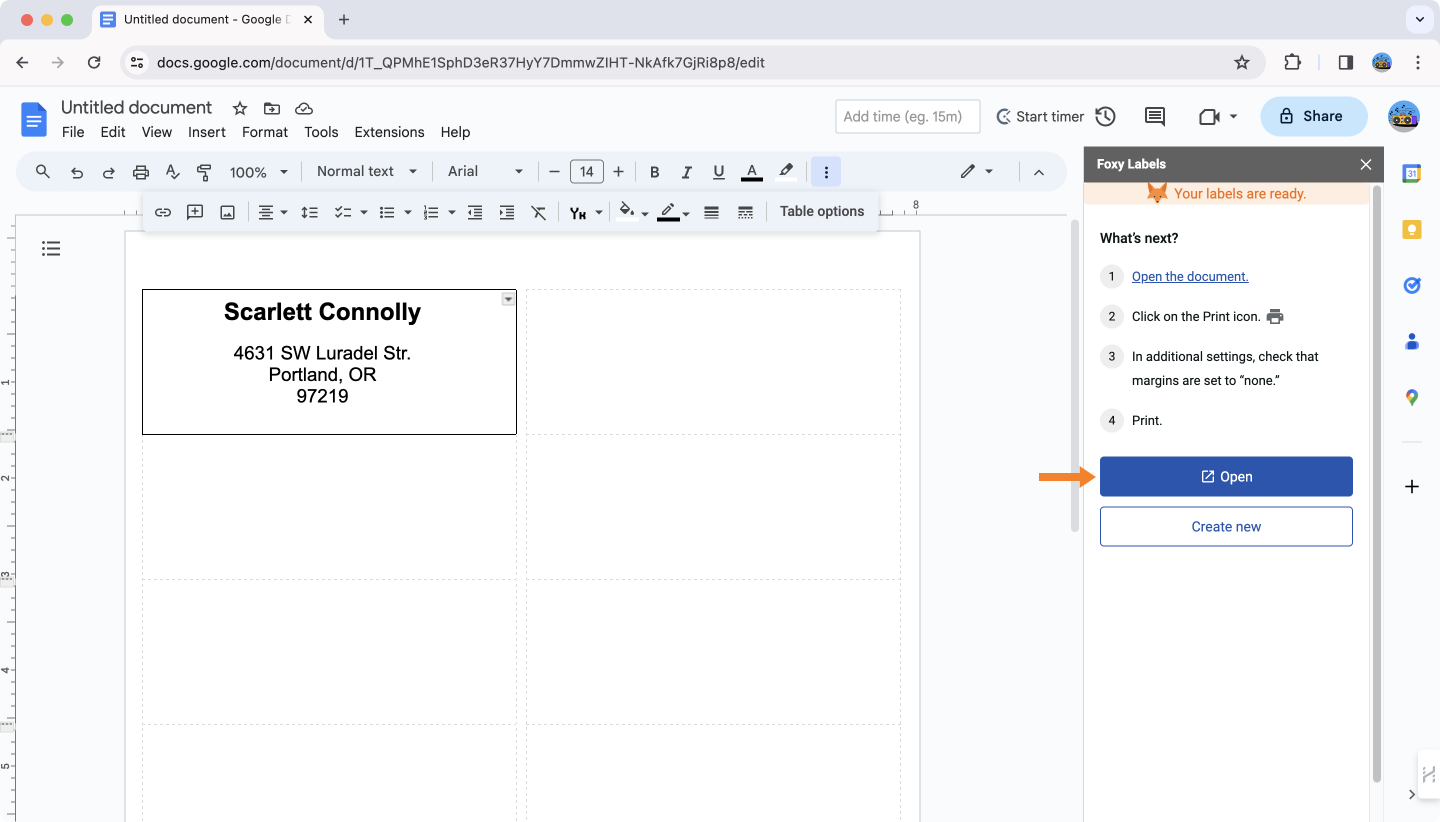
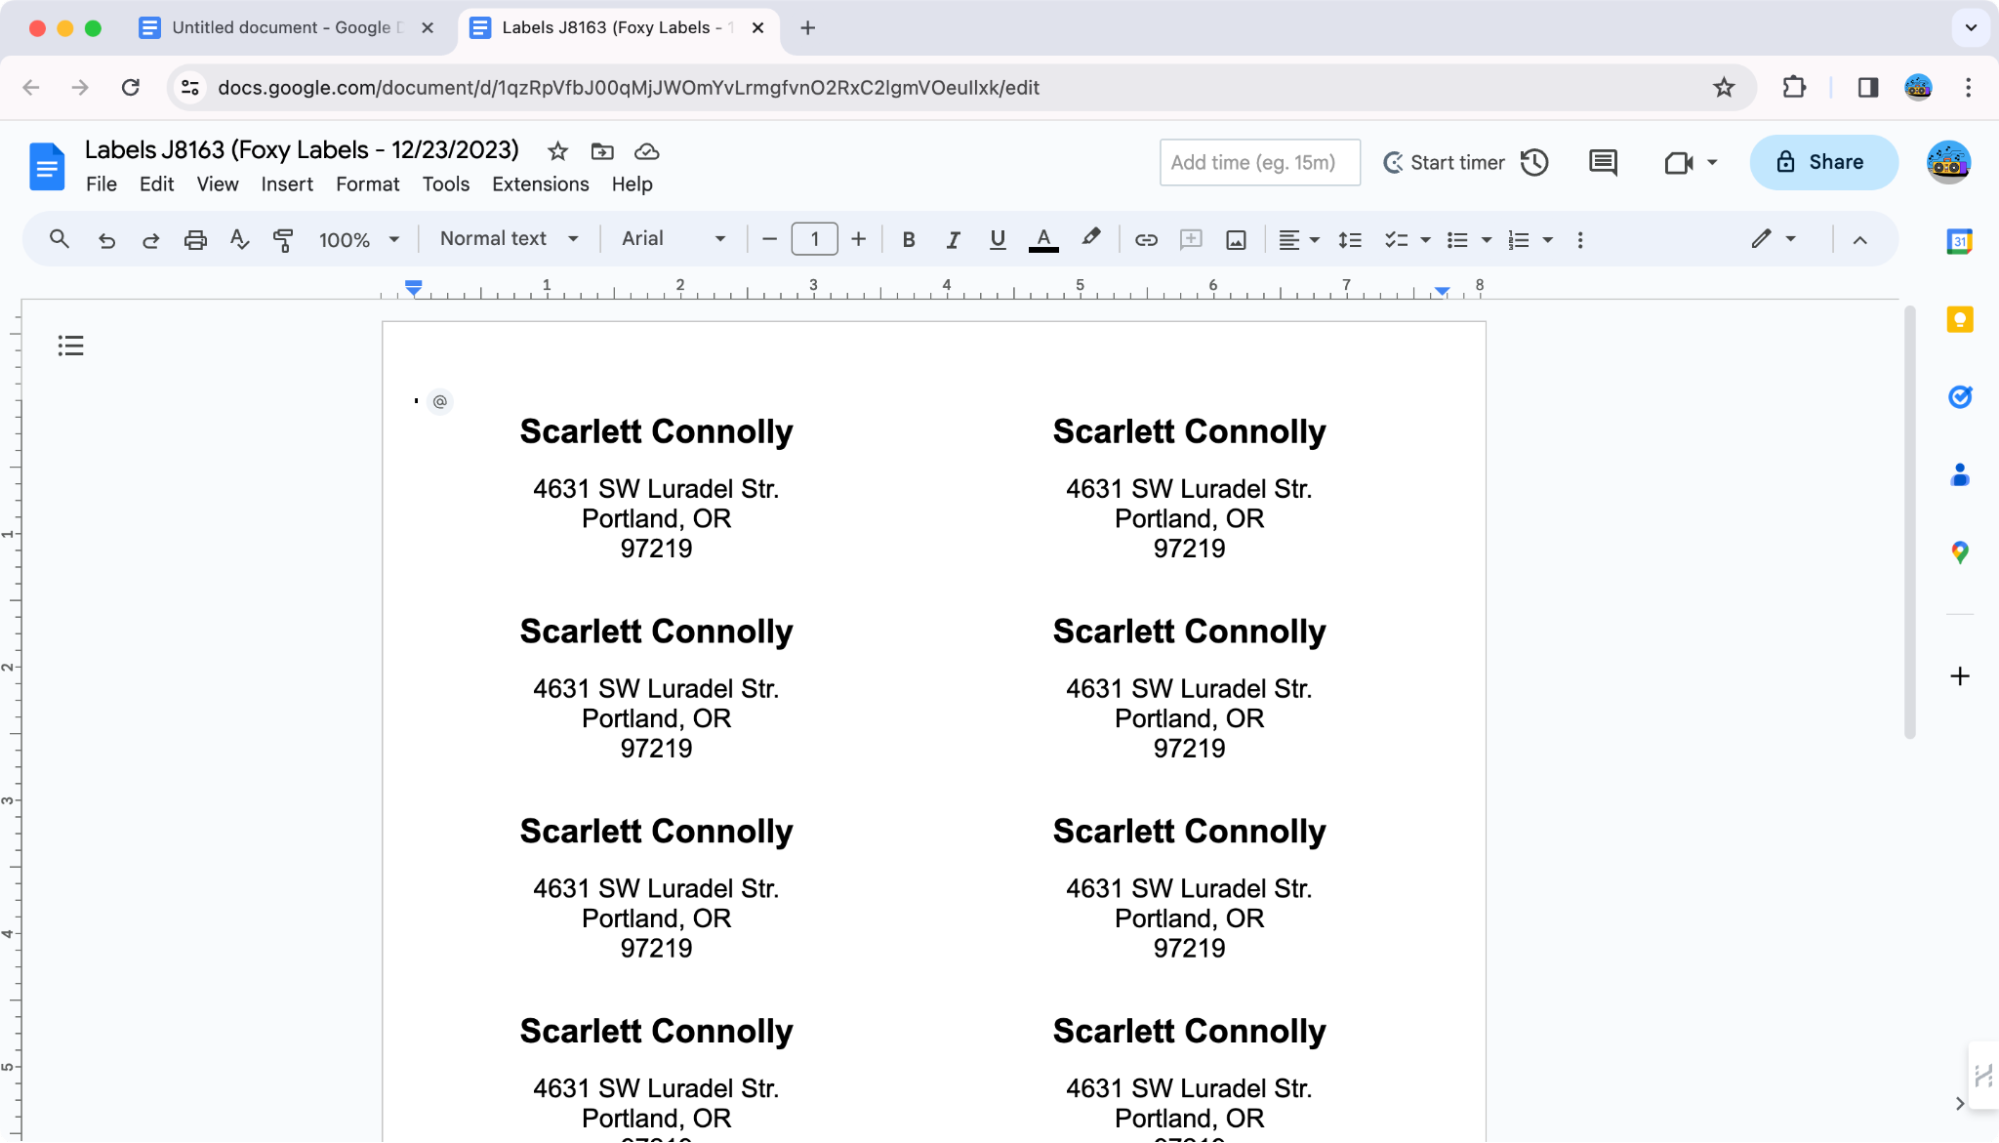
This action will launch a new tab in your browser, displaying a sheet filled with labels showcasing your personal design.
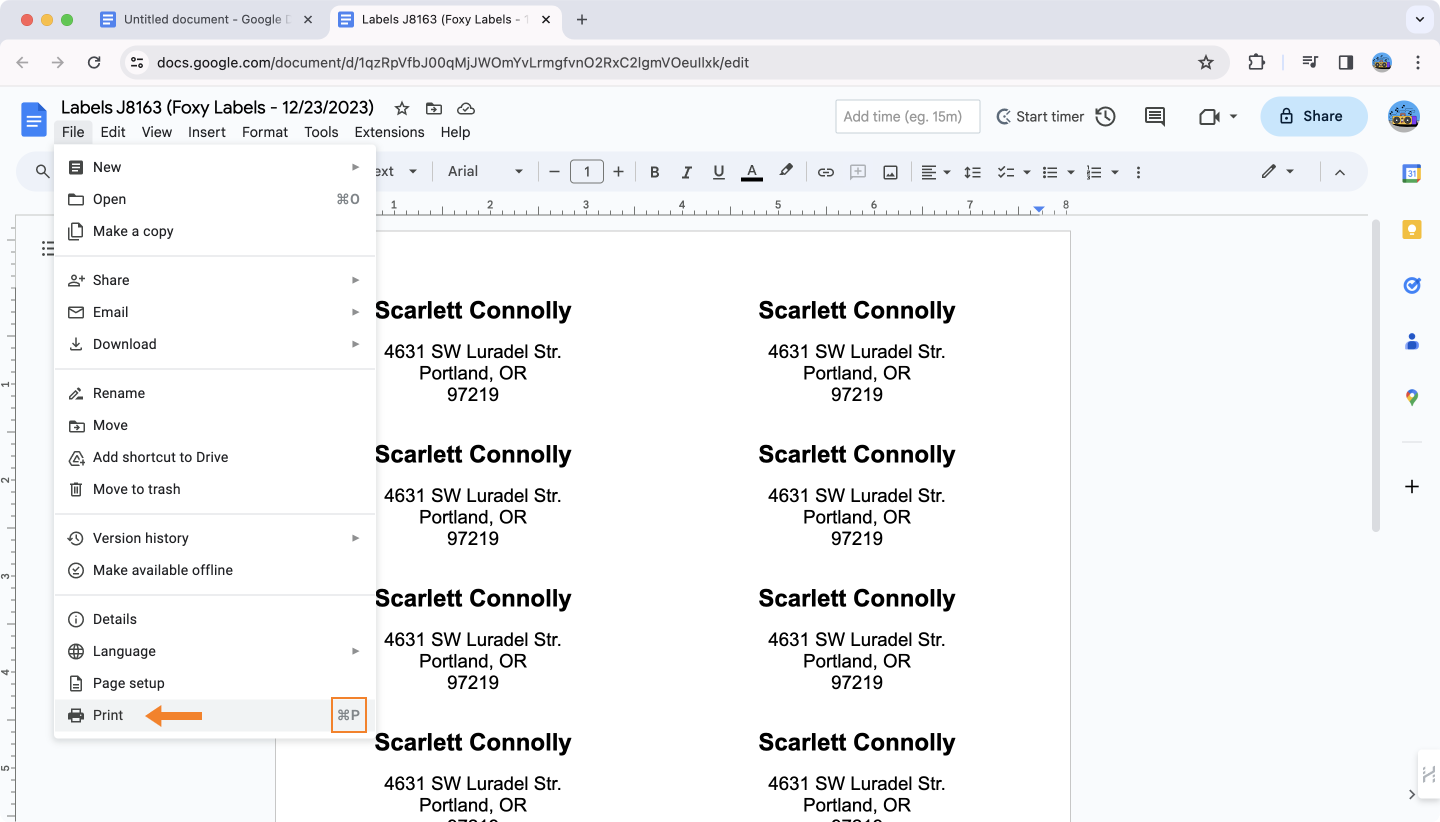
7. Print labels in Google Docs
You're all set to print a full sheet mailing labels and use right away. Whether you have a laser or inkjet printer, either will work fine. For color labels, make sure you're using a color printer. Before you print labels, double-check that your printer has enough ink and that the right quantity of label paper is loaded in the tray.
To start printing, go to File and select Print, or use the shortcut Control + P on Windows or Command + P on MacOS. Then, follow the instructions of your device's print dialogue. Make sure to set the margin to "none" and the scale to 100 in the Print settings.
If you run into any issues during printing, it's a good idea to learn how to fix misaligned label templates.
The Foxy Labels add-on for Google Workspace simplifies label creation, allowing you to create and print Avery labels in minutes. With its wide choice of label templates, including Avery, Herma, and others, you may easily bring plenty of creative ideas to life using only this powerful tool and your personal or corporate Google account.