1. Create a Google Sheets Document
To begin, go to Google Sheets and start with a new document. It will become a foundation for organizing your client information into a structured table.
Access a new document directly by visiting https://sheets.new. It will be labeled as an "Untitled spreadsheet" by the software. Feel free to rename it anytime during your work, as it is important for maintaining an organized file system. You'll find the document's title in the upper-left corner, just above the toolbar.
To change the title, simply click on the current placeholder. This action will automatically select the default title for you. Enter your desired name, for example, “New mailing list” for the document, and confirm the change by pressing "Enter" or by clicking outside the title area on the screen.

2. Organizing Your Mailing List
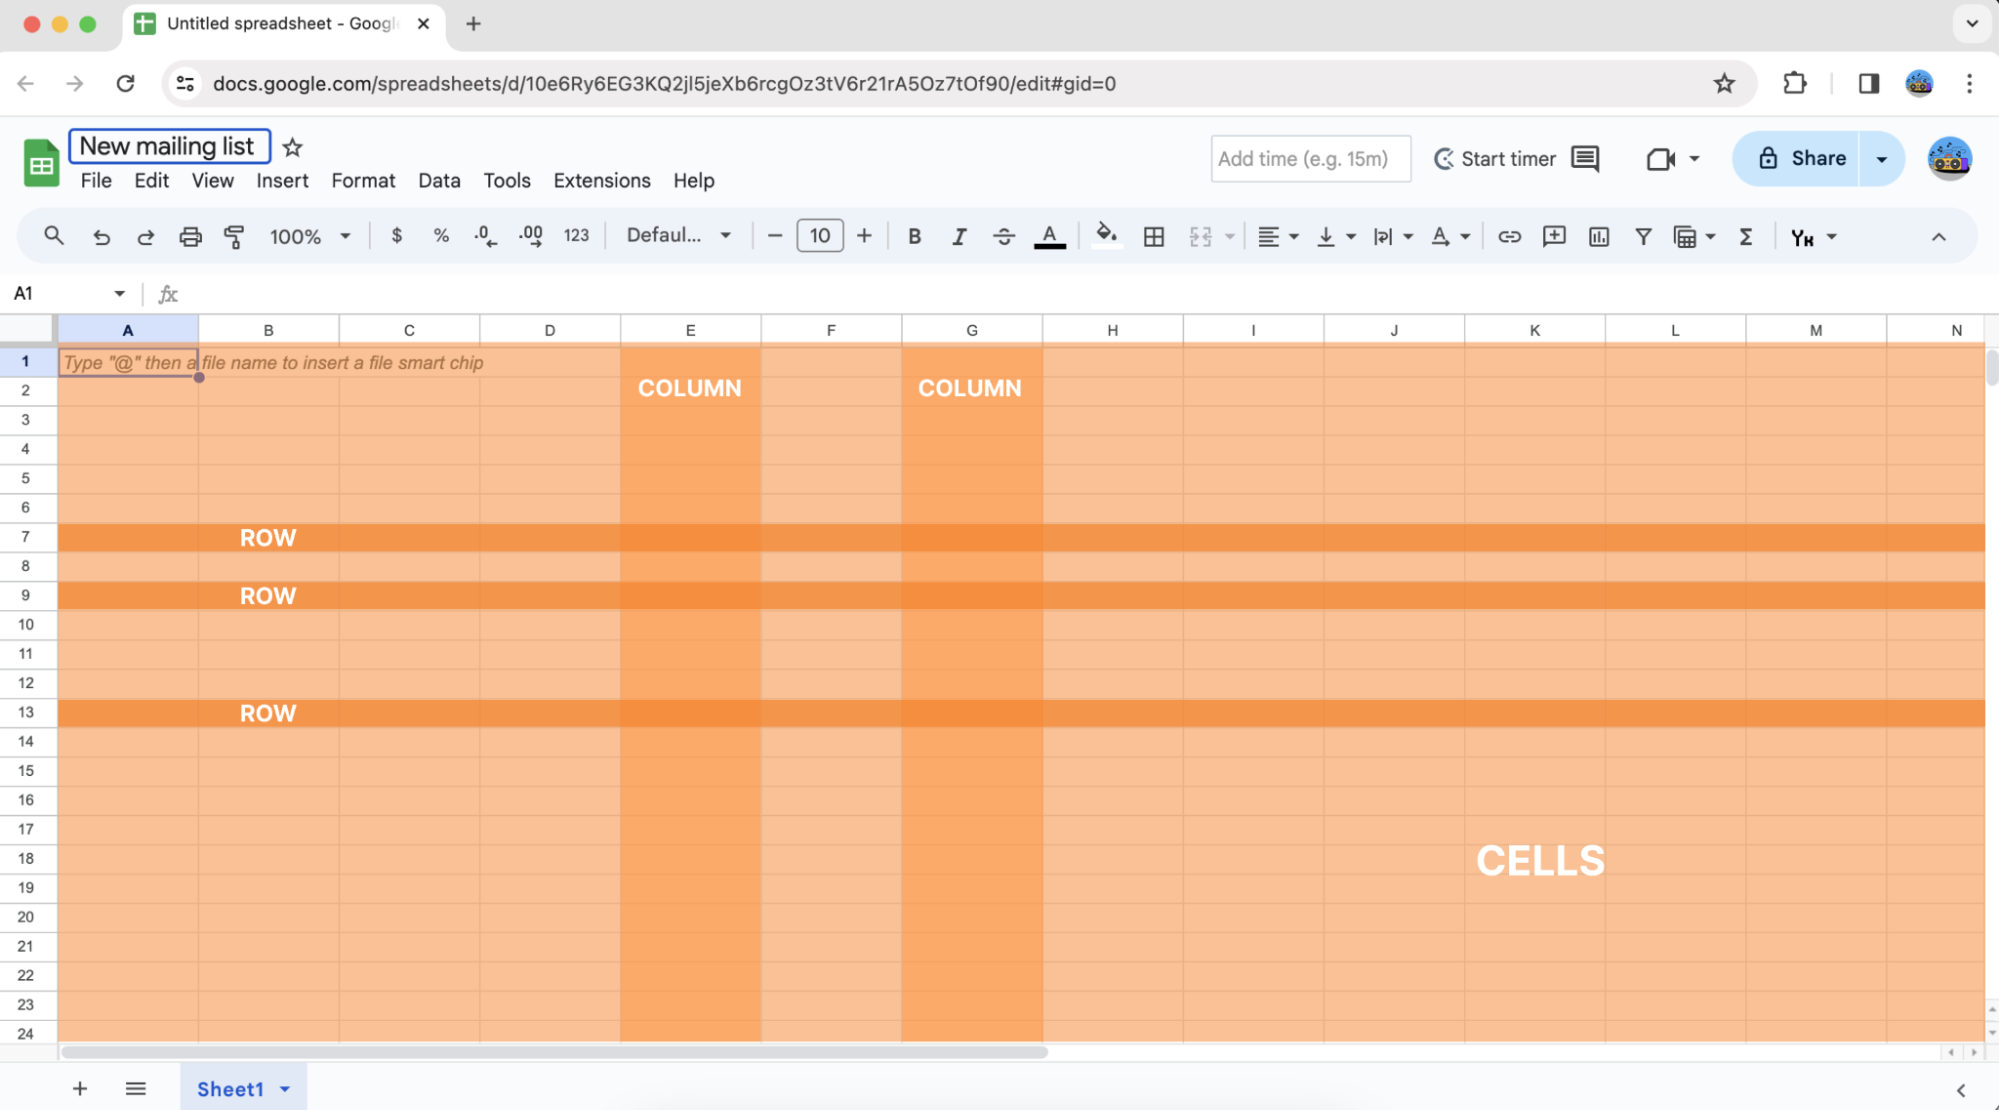
Let's understand the basic structure of a spreadsheet. A spreadsheet consists of multiple cells arranged into rows and columns.
In the context of a mailing list, we consider each row to represent an individual contact, while each column corresponds to a specific type of information about that contact. Commonly, a mailing list will feature columns for the first name and last name, mailing address, city, state, and zip code. It is not uncommon to also include another column with email addresses. The total number of rows will vary based on the number of contacts you intend to include.
It's important to note that your future mailing list is fully adaptable. Depending on your needs, you can expand it by adding extra columns or rows. Similarly, if necessary, you can reduce the list size by removing certain entries. This flexibility ensures that your mailing list can evolve alongside your requirements.
3. Adding Contact Information to Your Email List
After setting the structure of your document, the next step involves filling each cell with the relevant contact information. Remember, your spreadsheet has been organized into six distinct columns to capture a comprehensive range of data about each contact.
To improve the readability and organization of your list, consider applying some formatting to distinguish the column headers from the rest of the table's data. In this guide, we'll bold the font and center-align the titles of each column for a clearer visual hierarchy.
To do this, select the first row, which contains your column names, and use the toolbar to apply bold formatting and center alignment.
Once your headers are distinctly formatted, proceed to input the contact information beneath the appropriate column titles.
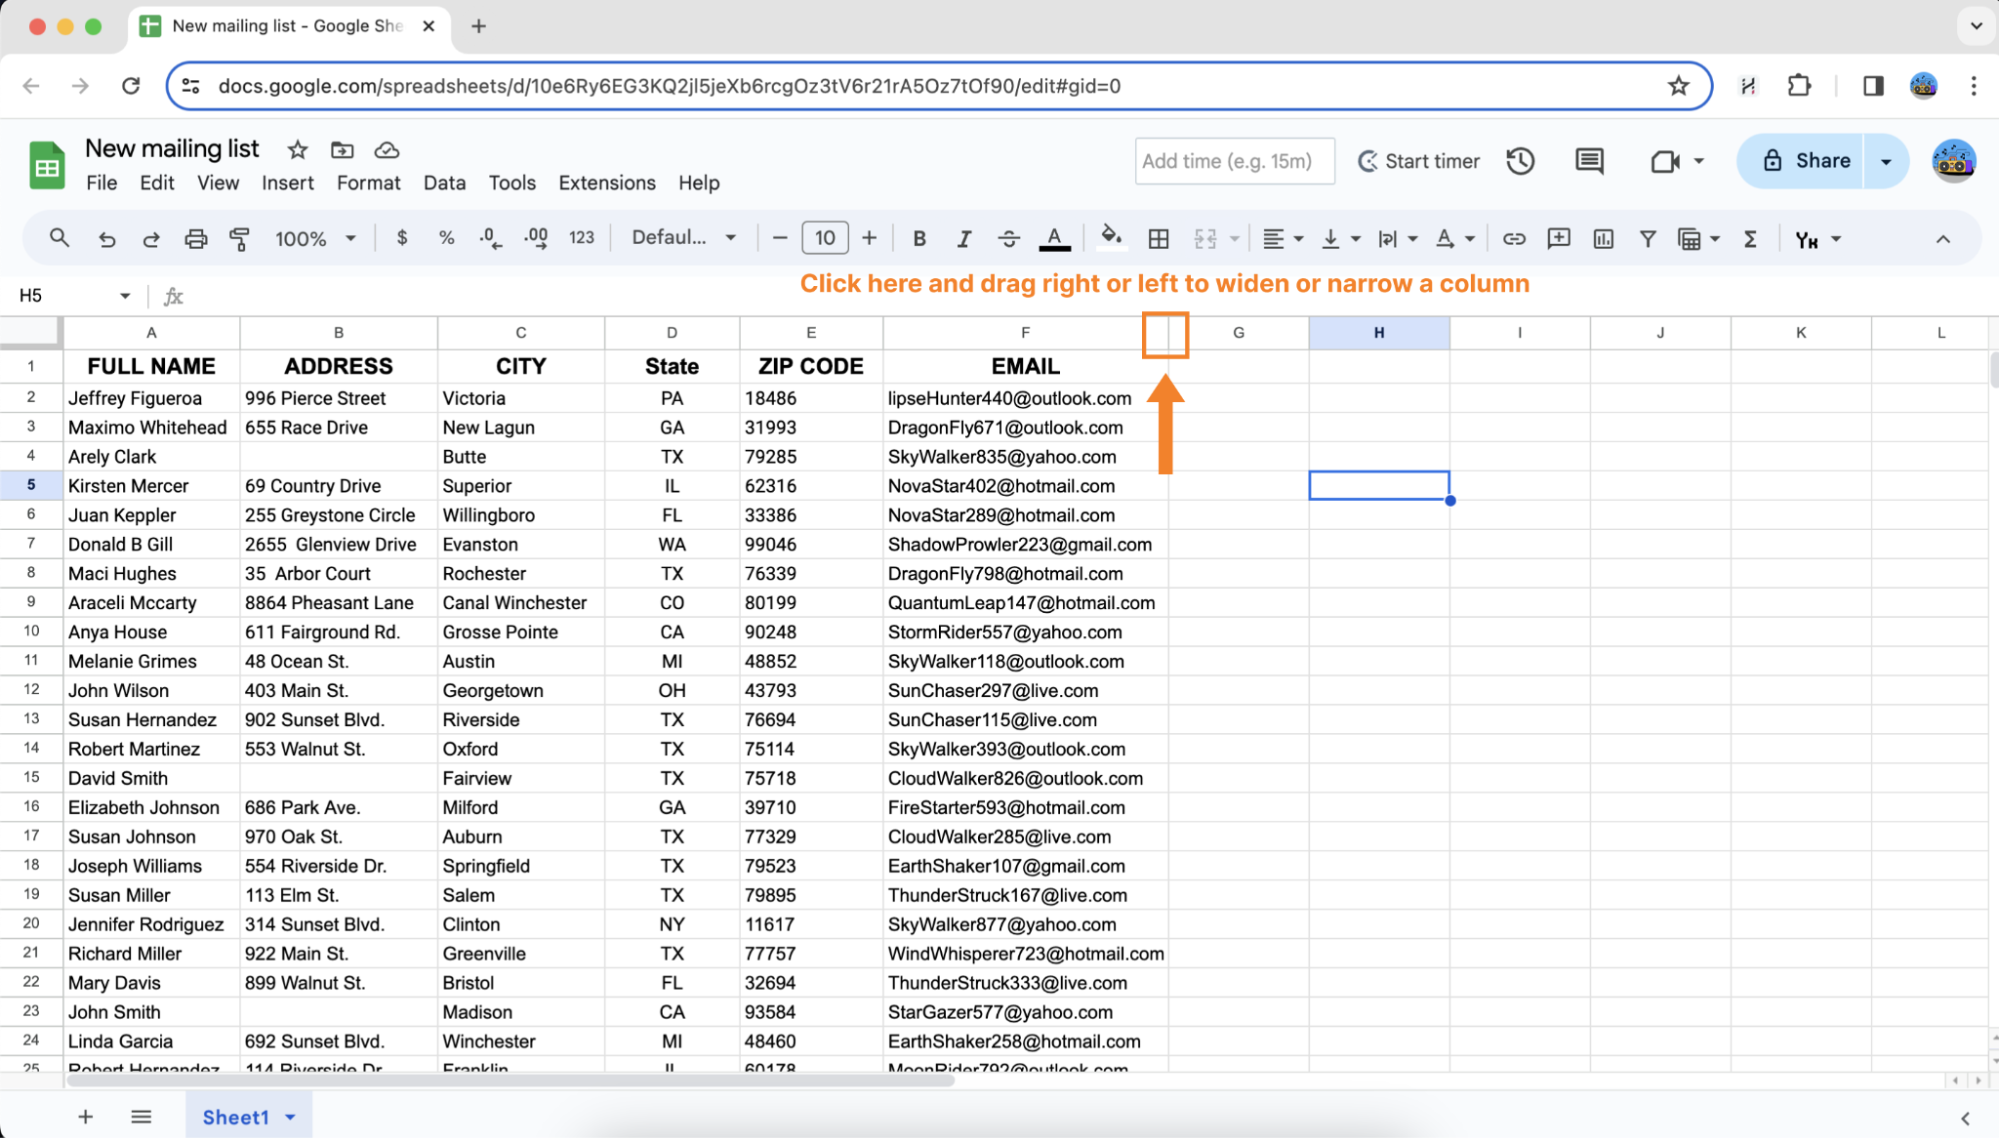
It is not unusual for the content of a cell to surpass its preset dimensions. To compensate this, resize the cells as needed by clicking and dragging the cell boundaries until all text fits comfortably within. This change guarantees that each piece of information is clearly accessible and properly organized inside your list.
NOTE: The information provided in the table is fictional and intended for demonstration purposes only. Any resemblance to actual individuals or geographic names is purely coincidental.
4. Applying filters
When working with spreadsheets for mail merge purposes, users typically manage extensive information regarding recipients, providers, or customer databases. Not all of this information is always required for merging. Using filters can significantly speed up and streamline mail merges. By applying filters, you can ensure that only relevant data appears on the screen. Therefore, only this visible information is included in the printout. It means that the data from the filtered rows or columns will not display on the printed page, essentially removing unneeded details. This strategy improves the process and increases the efficiency of mail merging by focusing on the most necessary data.
Let's look into filtering using a few examples.
Hiding blank cells
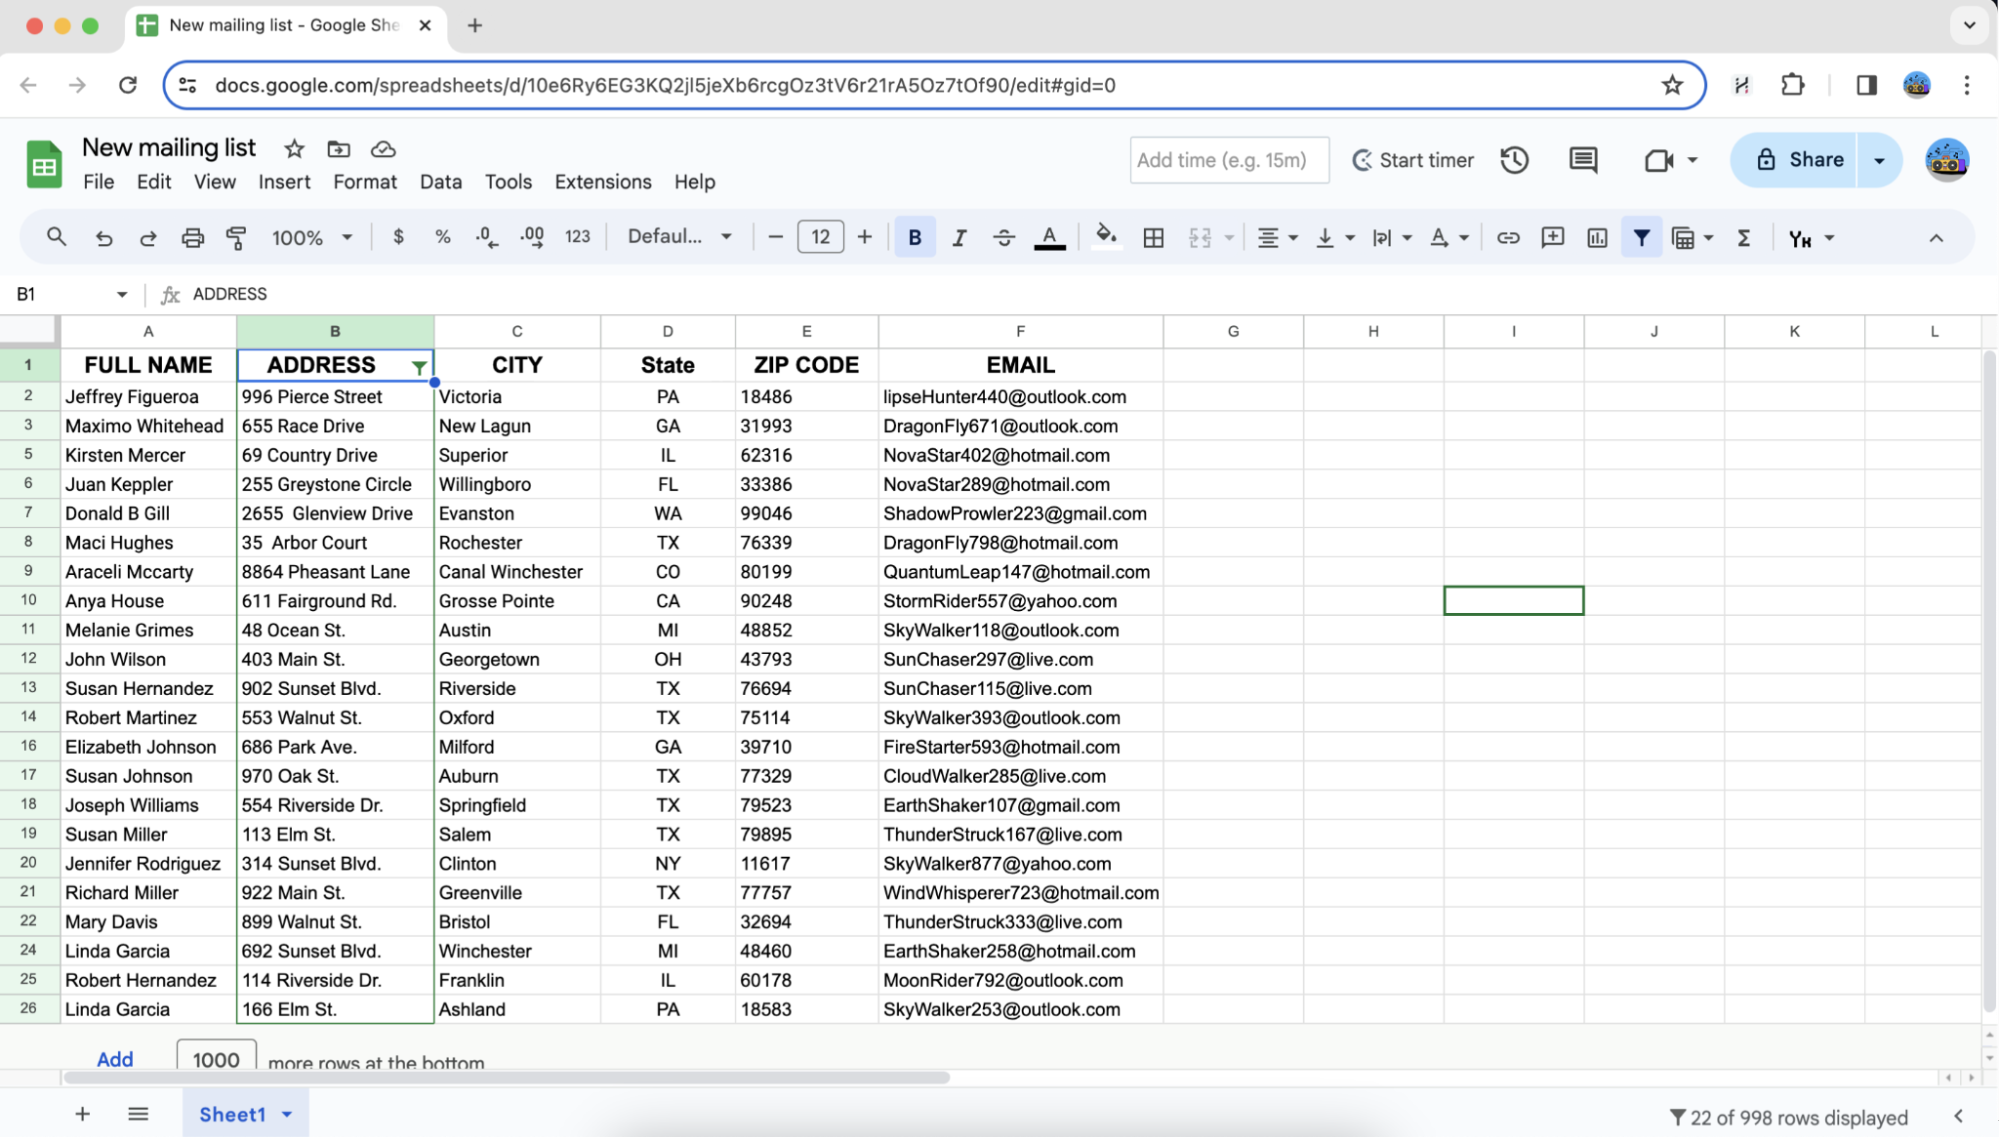
If you have missing data and want to hide empty cells, the procedure is simple. Begin by locating the column that contains the empty cell(s). As you see, in our case the empty cell is in rows 4, 15, and 23 of column B.
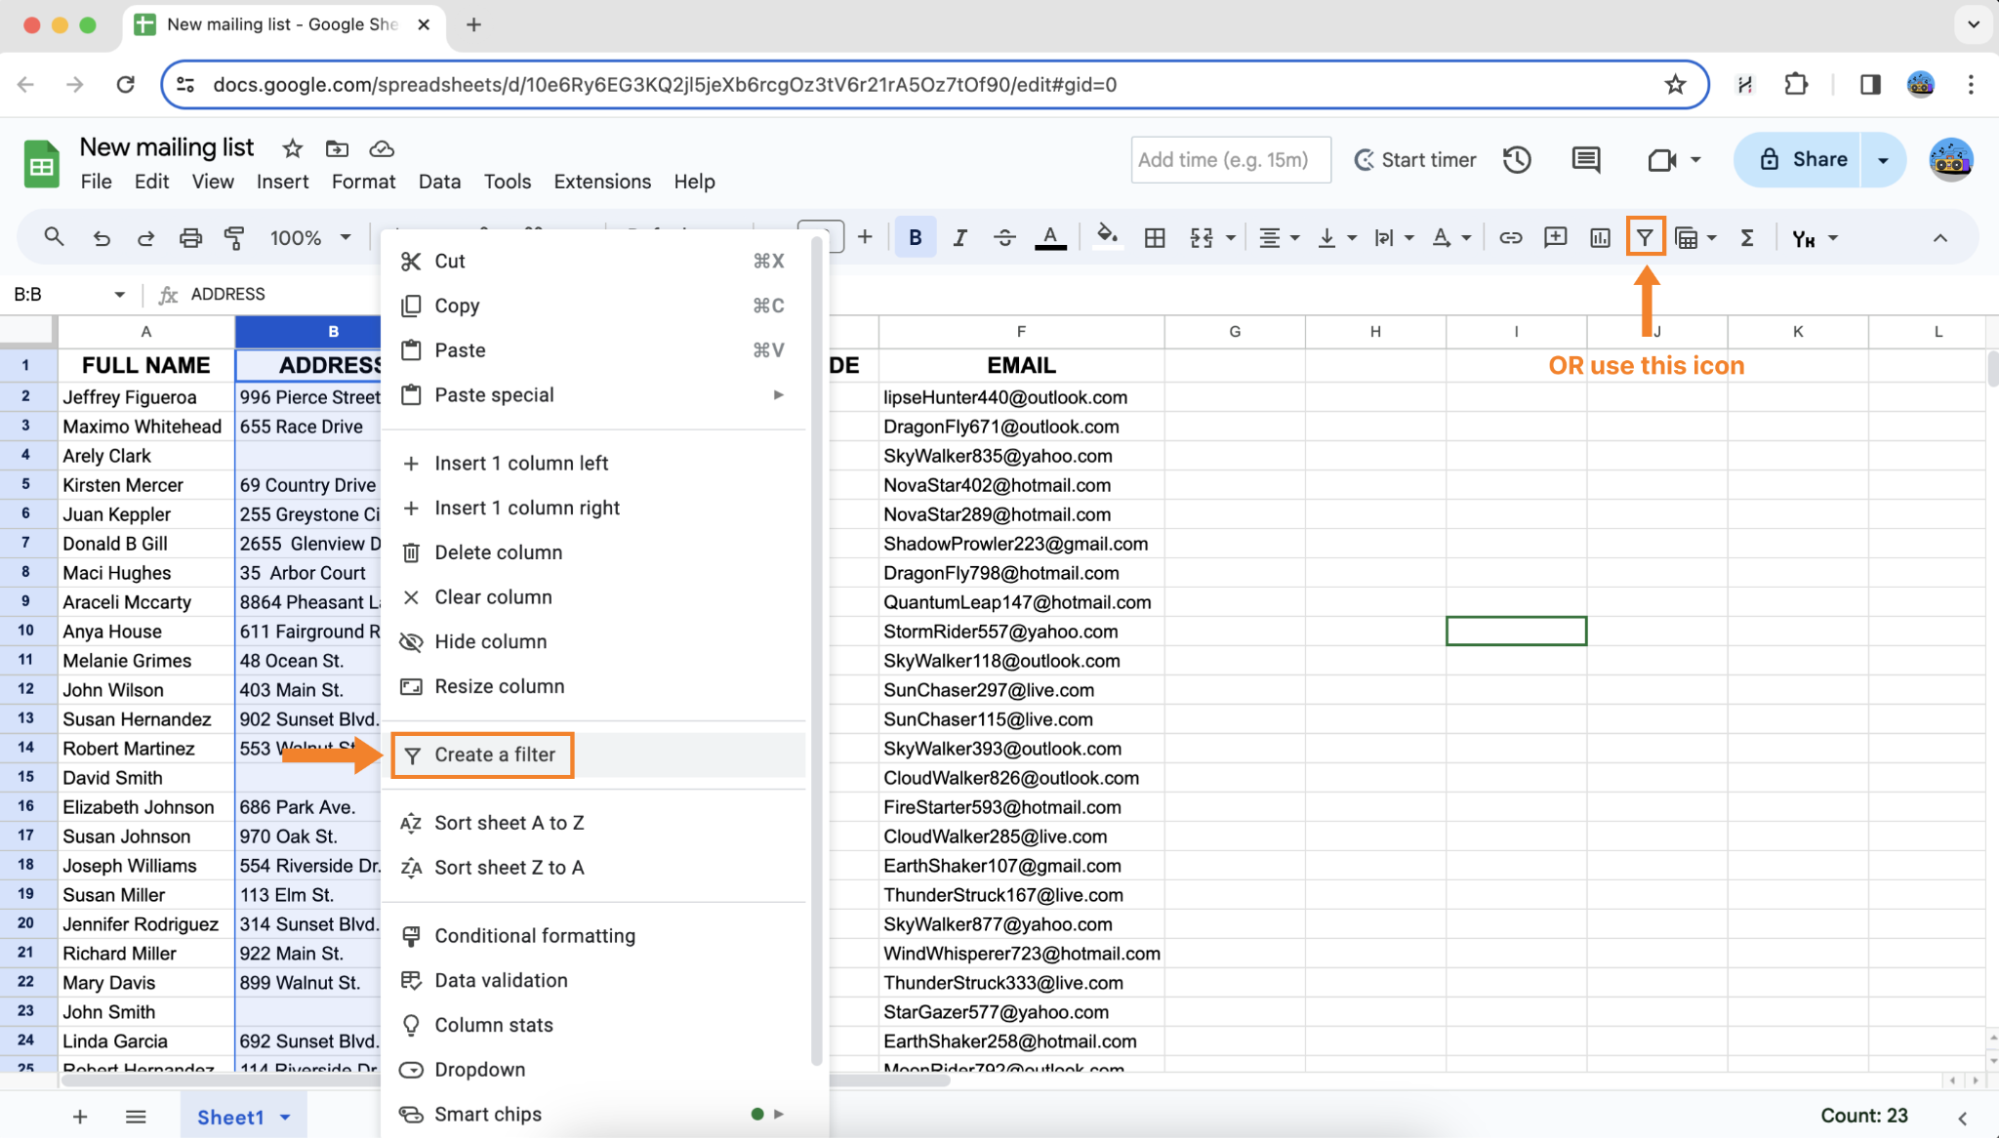
To select this specific column, simply click the left mouse button on the column's alphabetical label, which in this case is 'B'.
You can also highlight the entire table and apply filters to each column. To do this in one step, just click on the blank rectangular above row 1.
Once the column is highlighted, right-click on it to access the context menu. Within this menu, look for the "Create filter" option and select it.
As an alternative way to achieve the same result, click on the filter icon located in the top horizontal menu of your document. This method offers a quick and intuitive way to apply filters without navigating through the context menu.
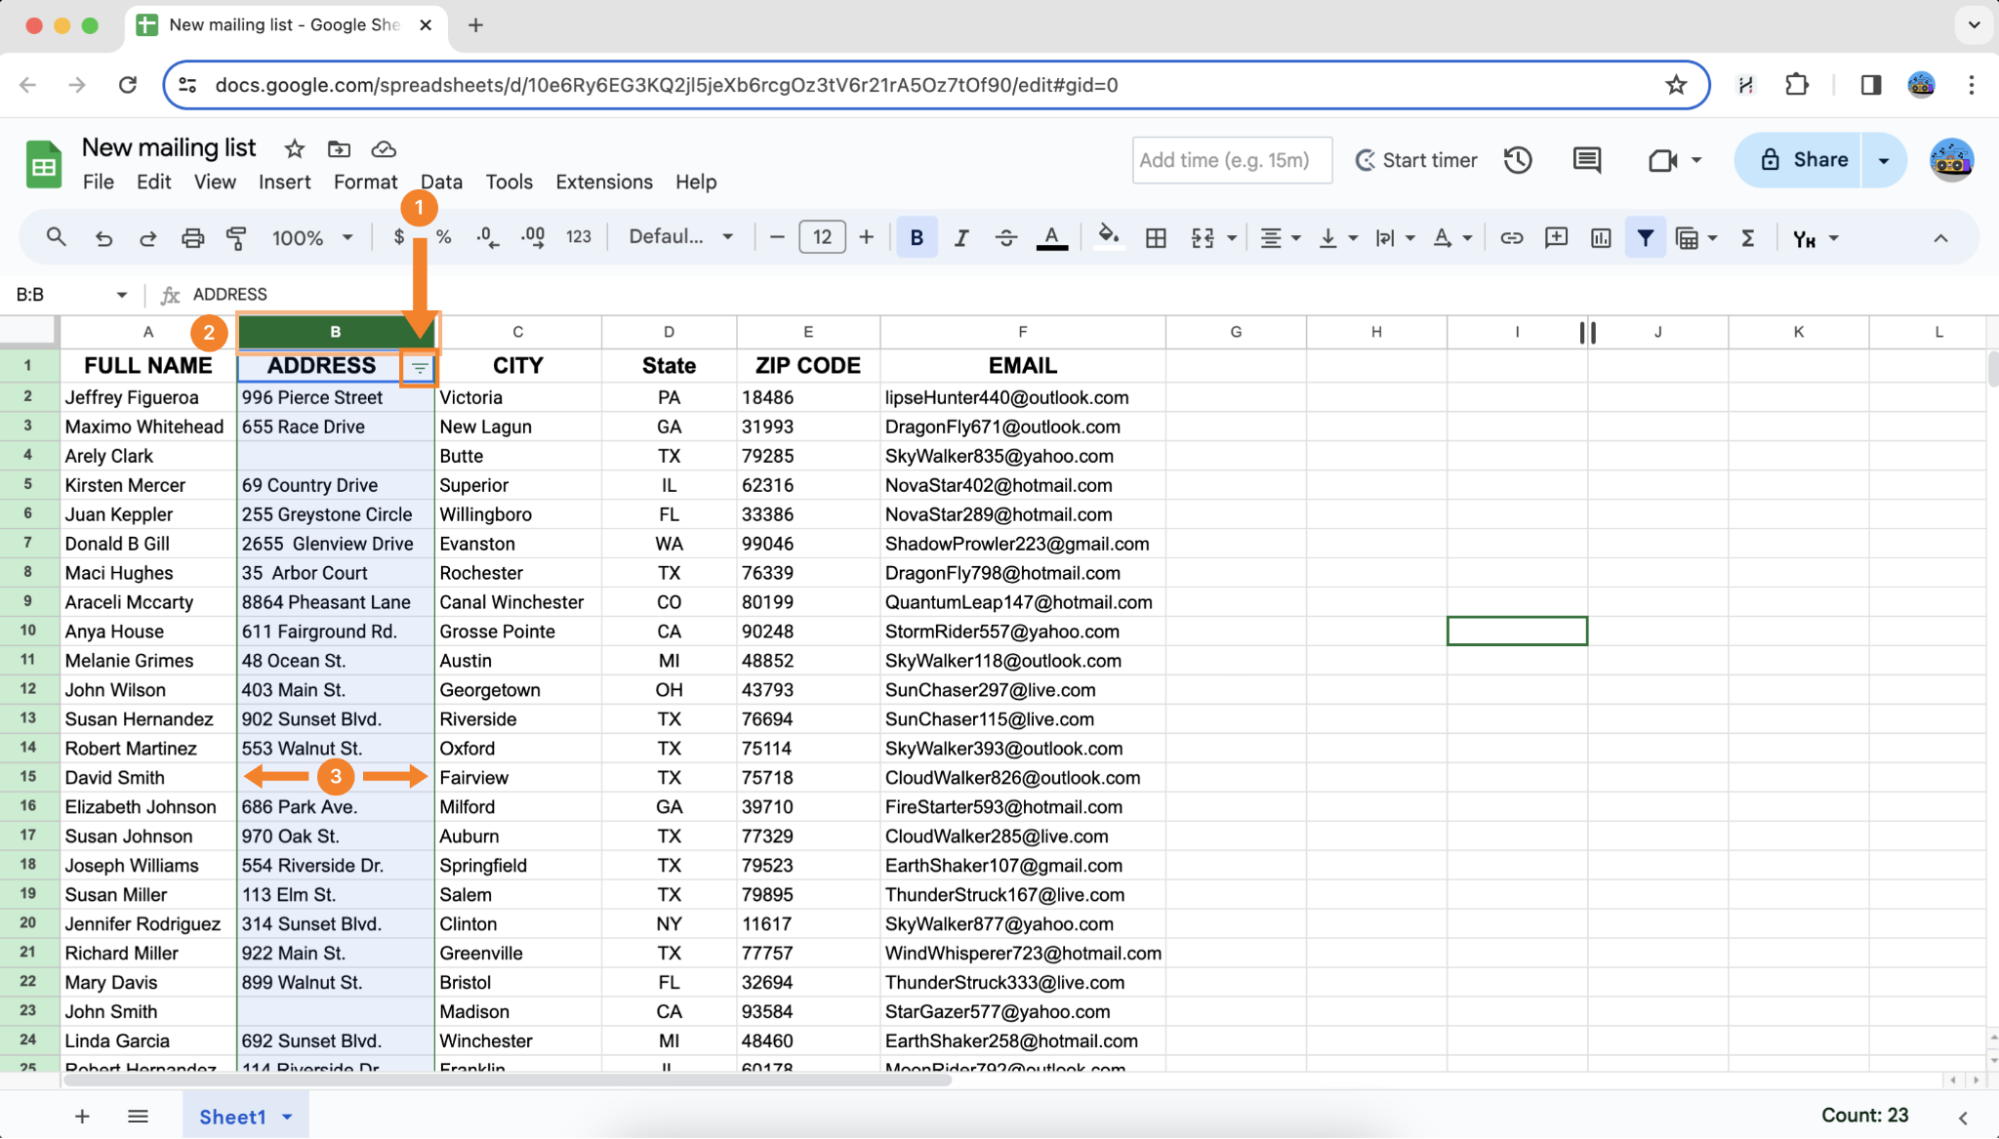
You can confirm that a filter has been successfully applied to a column by noticing a small green indicator in the right corner of the column header cell (1). Additionally, the application of a filter is signaled by the column's alphabetical name being highlighted also in the green color (2), along with its borders (3), offering a clear visual confirmation of the filter's presence.
To remove any receivers with missing information from your document, use the filter function in the column containing the empty fields:
- Сlick on the filter icon (represented by a funnel) in the header of the appropriate column, in our example column “B” (1).
- In the filter menu that displays, you'll see an option labeled "(Blank)." Deselect it (2) to remove any empty fields from your filtered view.
- To complete your choices and apply the filter, simply click "OK" (3).
This operation will conceal rows with empty cells in the chosen column, allowing you to concentrate and print only the completed records. As you see, the updated table doesn’t contain any blank cells.
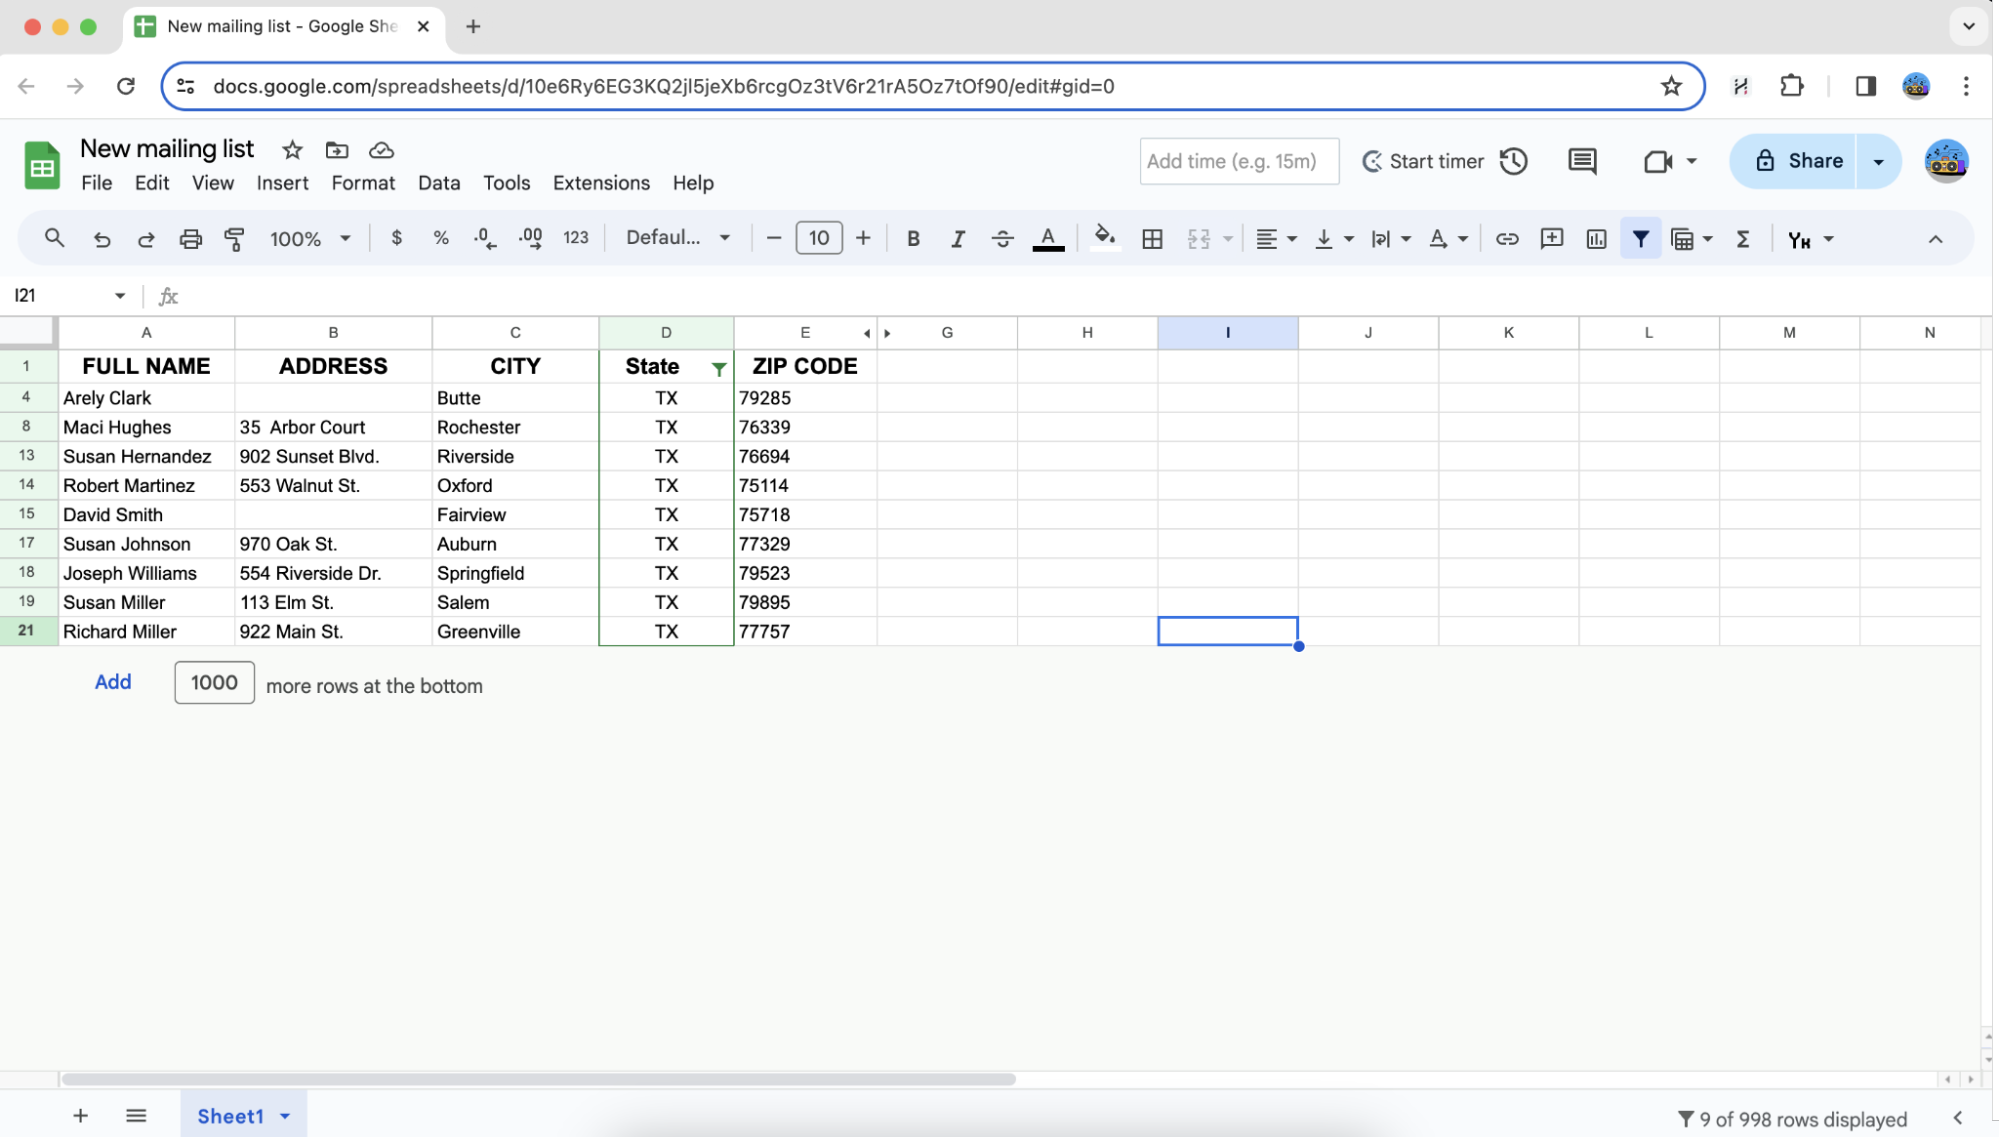
Filtering information by value
Sometimes you may need to quickly browse or print certain information from your address book. For example, suppose you want to view, edit, or print your contacts for a single state - Texas.
To complete this, add a filter to the corresponding column. In our case, the "State" column has an alphabetical index of 'D'. Follow the steps to create such filter:
- Select a column, and click "Create filter" (1)
- Locate the "Filter by values" menu (2)
- Click "Clear" (3).
- In the text input field, type the acronym for the state for which you wish to show information, which is TX. Place a checkmark next to the abbreviation.
- Click OK.

You may now only view receivers from Texas, as your selected filter hides folks from other states. Isn’t this convenient?

Hiding an entire column
Imagine you need to merge your contact list with Foxy Labels to print address labels onto envelopes. Which of your table's columns is unnecessary for this? Right. Email! Google Spreadsheets effectively solves this particular issue:
- Choose a column that is not needed for printing. The E-mail column is listed under the alphabetical index 'F'.
- Left-click once with your mouse and select "Hide column."
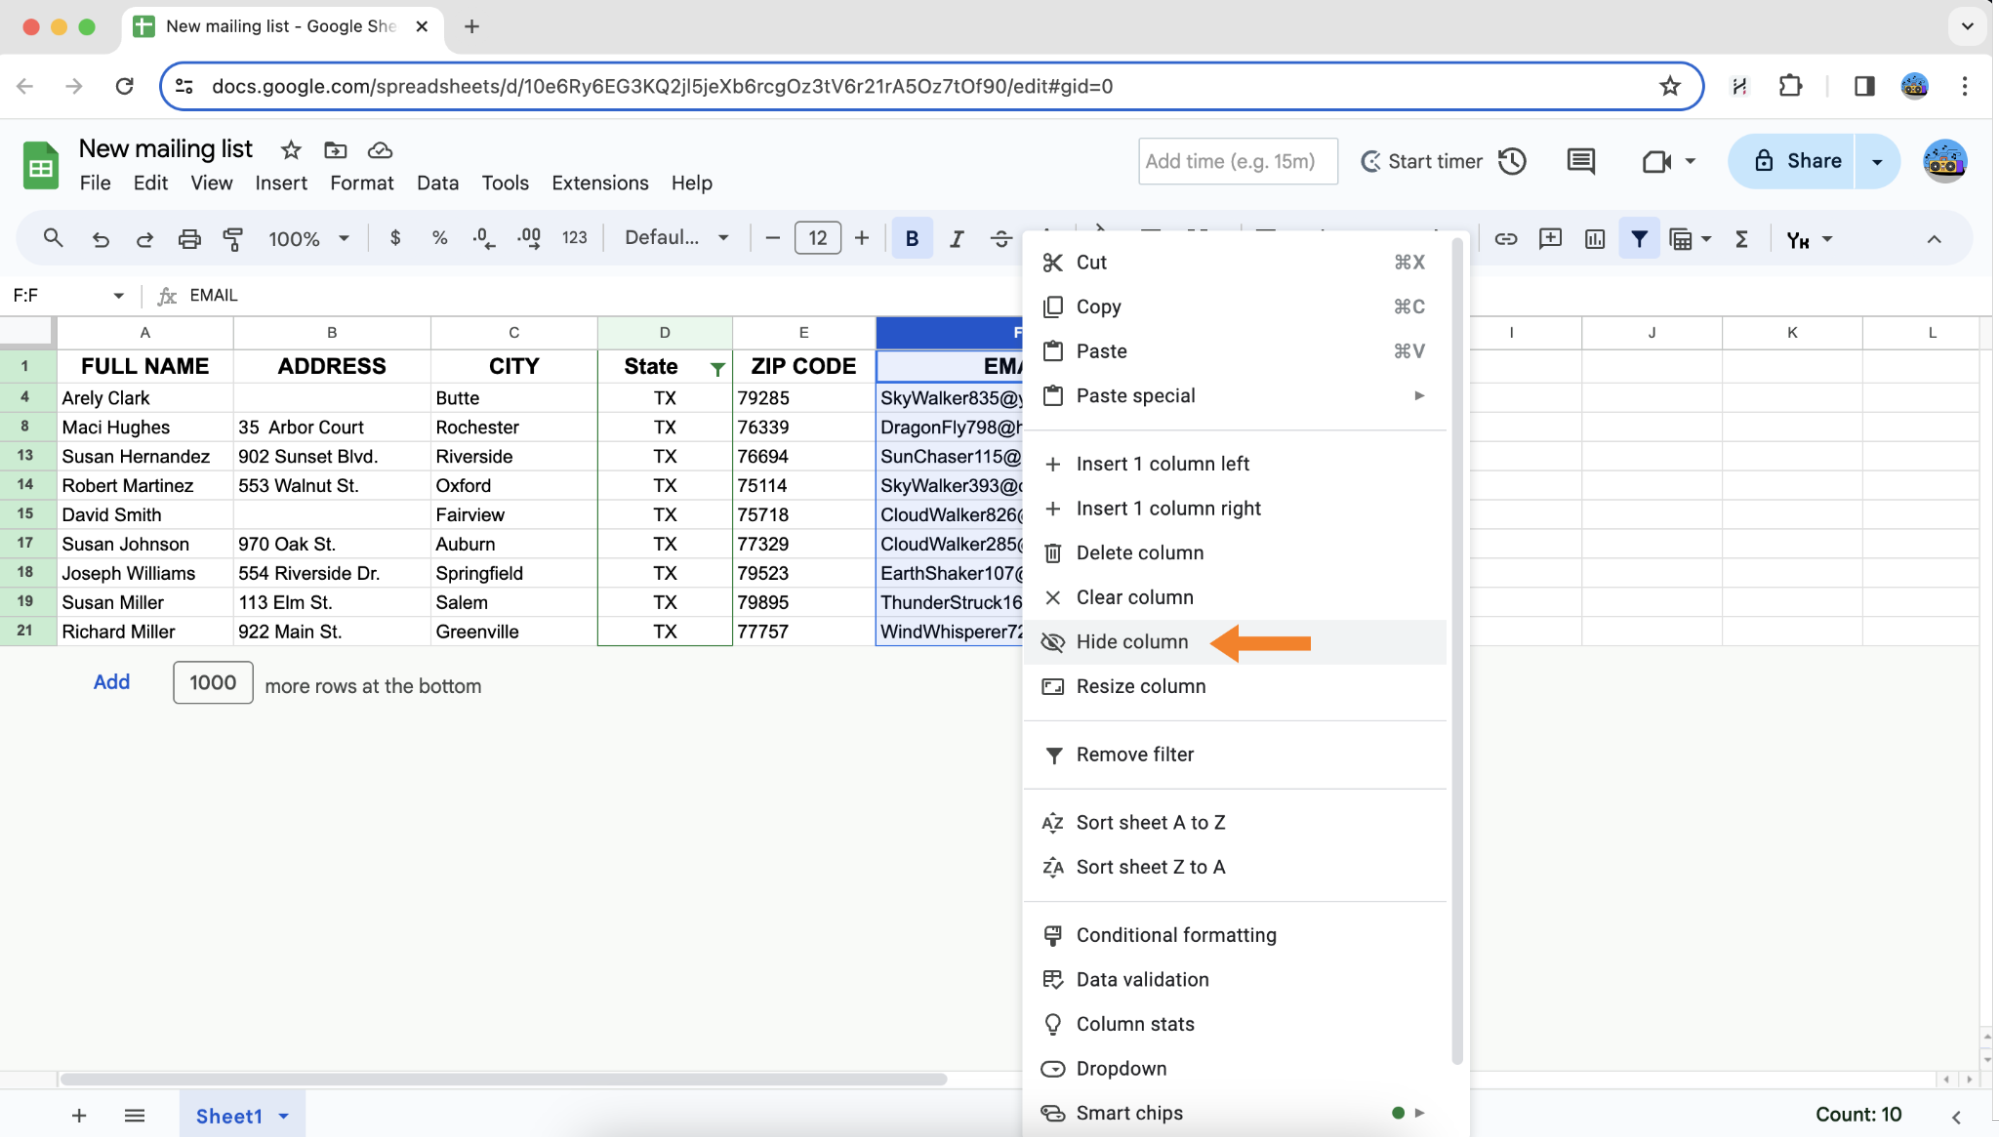
That's all there is to do. The table is now easier to read and print because it no longer includes irrelevant data.
5. Import a .csv-file (optional)
Google Sheets allows you to import a.csv file containing all of your contact information. This tool avoids the need for manual data entry by allowing you to import a.csv file right into Google Sheets. You may then either improve your existing email list or start generating a new one using the imported data.
To import your .csv file into Google Sheets, go to File > Import, and then upload your file.6. Design and Print Labels
As you've finished creating your mailing list, you may go on to the printing process. With your list complete, you can easily merge it with one of Foxy Labels' templates. This step considerably accelerates the process of generating address labels, mailing tags, or envelopes, saving you a considerable amount of precious time.